The UNIX Filesystem Commands
By Flavio Copes
Learn the core UNIX filesystem commands, from mkdir, cd, ls, and cp to setting permissions with chmod and chown, so you can manage files from the terminal.
I wrote this manual with the goal of making it easy to learn, remember and reference the main UNIX filesystem utilities. macOS and GNU/Linux are both UNIX systems, in practical terms. macOS is a certified UNIX, based on BSD UNIX, while GNU/Linux is UNIX-like, or a UNIX derivative.
After an introduction to the filesystem and how it works, I will cover the details of the following commands:
Working with folders and files
mkdircdpwdrmdirlstouchmvcpln
Permissions
chmodchownchgrp
Files content
catlessfindcpioddwc
How the Filesystem works
Every modern computer system relies on a filesystem to store and retrieve programs. Not everything can be kept in memory, which is a precious and limited resource, and we need a safe place where to store data when the computer restarts or is shut off. Memory is completely wiped off any time the computer restarts, while the disk structure is persistent.
In this guide I examine in particular the UNIX filesystem, which can be found on macOS and GNU/Linux machines. The Windows filesystem is different, although Windows 10 with the Windows Subsystem for Linux installed allows you to use the same utilities that I describe here.
A filesystem starts from /. This is the root node which hosts the first level directories.
Usual directories that you will find in a UNIX system are
/bincontains the main system commands/etccontains the system configuration/devcontains the system devices/usrcontains the user files/tmpcontains the temporary files
…there are more, but you get the idea.
How many depends on the type of system used. Linux has standardised the folders using its Linux Standard Base effort, and you usually have:
/binthe main system commands/bootthe files used to boot the machine (not existing on macOS)/devsystem devices/etcsystem configuration files/etc/optuser programs configuration files/homethe home directories of users (/Users in macOS)/libthe system libraries (not existing on macOS)/mntmounted filesystems/optuser programs/procuser by kernel and processes (not existing on macOS)/rootthe home folder of the root user (not existing on macOS)/run(not existing on macOS)/sbinsystem binaries user for booting the system/tmptemporary files/usrholds user software, libraries and tools/usr/binuser binaries/usr/includeuser header files/usr/libuser libraries/usr/localused by user software to store installations, like Homebrew on macOS/usr/sbinsystem binaries/usr/sharecontains architecture-independent data. It can hold a lot of miscellaneous stuff including documentation and man pages/usr/srccontains the source code of installed packages (not existing in macOS)/varcontains temporary files, logs and more
macOS has various different folders, including
/Applicationsstores the users applications/Libraryholds the library (settings and resources) used globally by users of the system/Systemholds system files/privateholds system files, logs and more
Each folder contains files and directories, which in turn can contain other files and directories, and so on.
All files and folders have a name.
What makes a valid name? It can be long from 1 to 255 characters, and it must be composed from any alphanumeric character (a-z/A-Z/0-9), the underscore character (_), dot (.) and comma (,) characters.
You can also use space, although generally not recommended as space needs to be escaped with a backslash every time you must reference the file/folder.
Depending on the system, the filesystem can be case sensitive. On macOS the filesystem is not case sensitive by default, so you can’t have a file/folder named test and another called Test. They are the same thing.
I am now going to introduce the various utility commands. Those are executed in the context of a shell, like Bash, Fish or Zsh. When you start a shell, you are going to be in your home directory. In macOS, that is found in the /Users/<yourname>/ path.
The commands don’t change if you change the shell you use, because those are the basic, fundamentals commands of UNIX. You will likely use those commands for many decades unless some revolution in the computing world happens (and they happen, but those server-side things usually move slow). To give you some perspective, the mkdir command you will now see was introduced in UNIX AT&T Version 1, in the early 80s.
Working with folders and files
mkdir
You create folders using the mkdir command:
mkdir fruitsYou can create multiple folders with one command:
mkdir dogs carsYou can also create multiple nested folders by adding the -p option:
mkdir -p fruits/applesOptions in UNIX commands commonly take this form. You add them right after the command name, and they change how the command behaves. You can often combine multiple options, too.
You can find which options a command supports by typing man <commandname>. Try now with man mkdir for example (press the q key to esc the man page). Man pages are the amazing built-in help for UNIX.
cd
Once you create a folder, you can move into it using the cd command. cd means change directory. You invoke it specifying a folder to move into. You can specify a folder name, or an entire path.
Example:
mkdir fruits
cd fruits
Now you are into the fruits folder.
You can use the .. special path to indicate the parent folder:
cd .. #back to the home folderThe # character indicates the start of the comment, which lasts for the entire line after it’s found.
You can use it to form a path:
mkdir fruits
mkdir cars
cd fruits
cd ../cars
There is another special path indicator which is ., and indicates the current folder.
You can also use absolute paths, which start from the root folder /:
cd /etcpwd
Whenever you feel lost in the filesystem, call the pwd command to know where you are:
pwdIt will print the current folder path.
rmdir
Just as you can create a folder using mkdir, you can delete a folder using rmdir:
mkdir fruits
rmdir fruits
You can also delete multiple folders at once:
mkdir fruits cars
rmdir fruits cars
The folder you delete must be empty.
To delete folders with files in them, we’ll use the more generic rm command which deletes files and folders, using the -rf options:
rm -rf fruits carsBe careful as this command does not ask for confirmation and it will immediately remove anything you ask it to remove.
There is no bin when removing files from the command line, and recovering lost files can be hard.
ls
Inside a folder you can list all the files that the folder contains using the ls command:
lsIf you add a folder name or path, it will print that folder contents:
ls /bin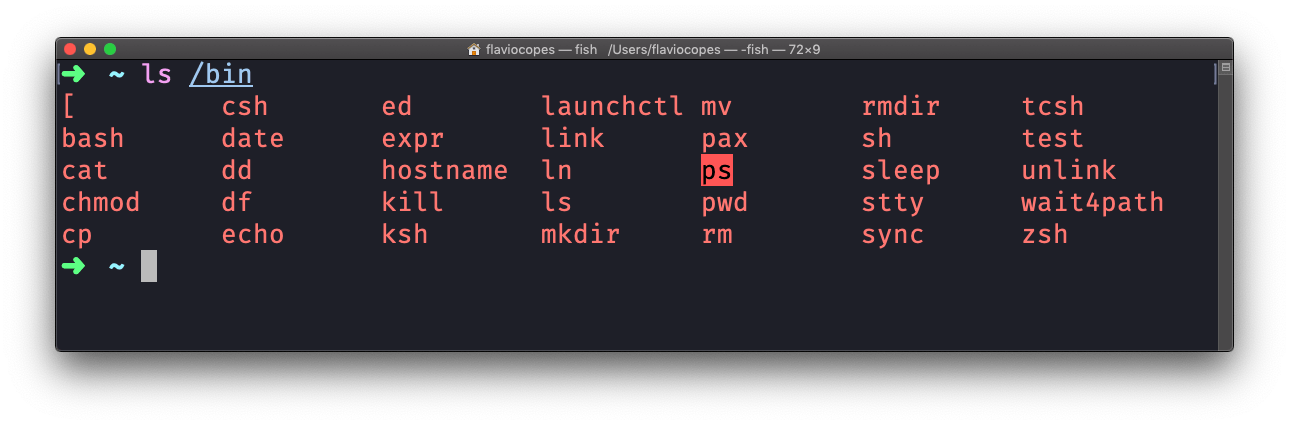
ls accepts a lot of options. One of my favorite options combinations is -al. Try it:
ls -al /bin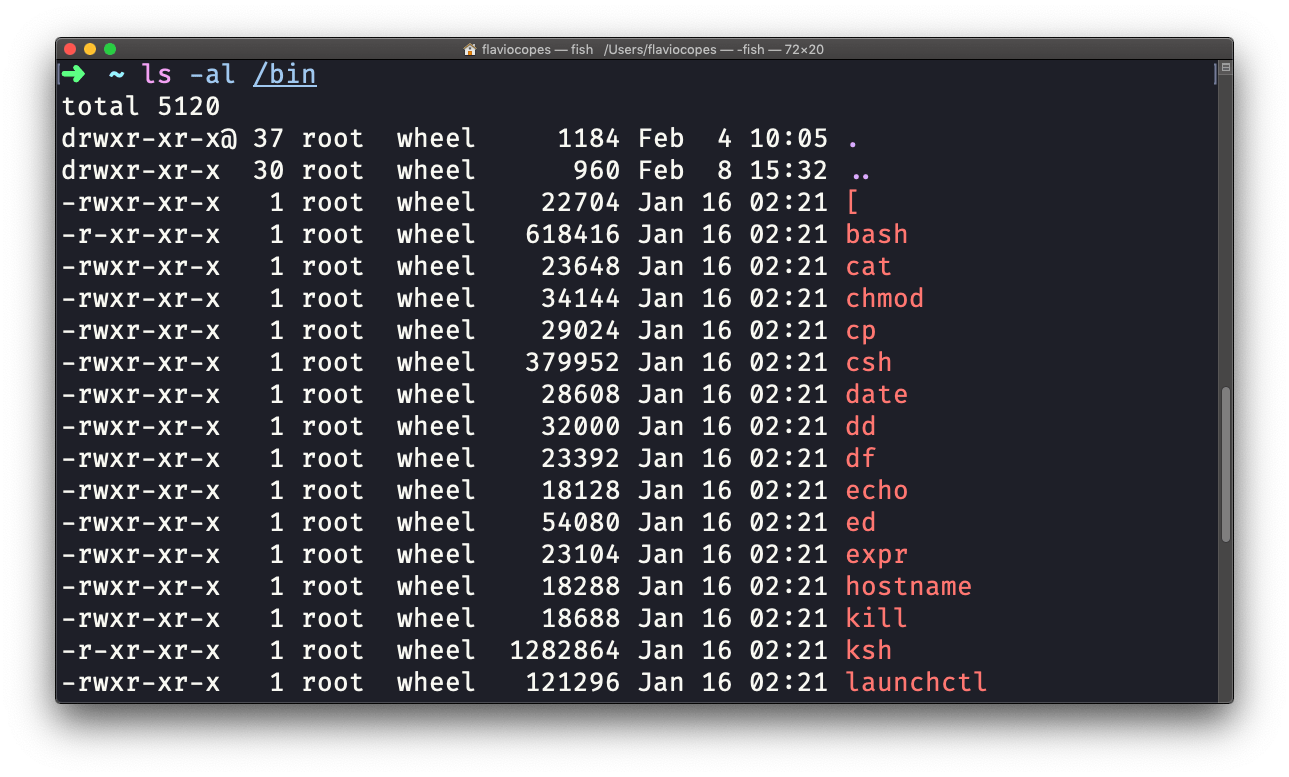
compared to the plain ls, this returns much more information.
You have, from left to right:
- the file permissions (and if your system supports ACLs, you get an ACL flag as well)
- the number of links to that file
- the owner of the file
- the group of the file
- the file size in bytes
- the file modified datetime
- the file name
This set of data is generated by the l option. The a option instead also shows the hidden files.
Hidden files are files that start with a dot (.).
touch
You can create an empty file using the touch command:
touch appleIf the file already exists, it opens the file in write mode, and the timestamp of the file is updated.
mv
Once you have a file, you can move it around using the mv command. You specify the file current path, and its new path:
touch test
mv pear new_pear
The pear file is now moved to new_pear. This is how you rename files and folders.
If the last parameter is a folder, the file located at the first parameter path is going to be moved into that folder. In this case, you can specify a list of files and they will all be moved in the folder path identified by the last parameter:
touch pear
touch apple
mkdir fruits
mv pear apple fruits #pear and apple moved to the fruits folder
cp
You can copy a file using the cp command:
touch test
cp apple another_apple
To copy folders you need to add the -r option to recursively copy the whole folder contents:
mkdir fruits
cp -r fruits cars
ln
Let’s now introduce the concept of links. A link is a file that points to another file. We have those in all the major operating systems.
We can create two types of links: hard links and symbolic (soft) links. We can’t create a hard link to a directory, but we can create a symbolic one. For this reason, symbolic links (also called symlinks) are much more common.
We create a symbolic link using this syntax: ln -s original linkname. Example:
mkdir fruits
ln -s fruits newfruits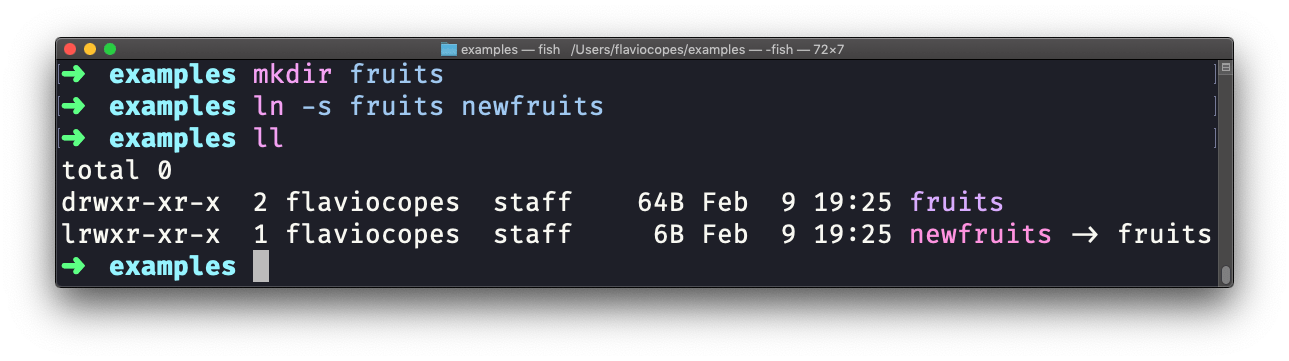
Notice how I used the
llcommand. This is not a standard command, but an alias forls -al. In a shell, you can define aliases that are shortcuts to common command and arguments combinations.
Permissions
I mentioned permissions briefly before, when introduced the ls -al command.
The weird string you see on each file line, like drwxr-xr-x, defines the permissions of the file or folder.
Let’s dissect it.
The first letter indicates the type of file:
-means it’s a normal filedmeans it’s a directorylmeans it’s a link
Then you have 3 sets of values:
- The first set represents the permissions of the owner of the file
- The second set represents the permissions of the members of the group the file is associated to
- The third set represents the permissions of the everyone else
Those sets are composed by 3 values. rwx means that specific persona has read, write and execution access. Anything that is removed is swapped with a -, which lets you form various combinations of values and relative permissions: rw-, r--, r-x, and so on.
You can change the permissions given to a file using the chmod command.
chmod can be used in 2 ways. The first is using symbolic arguments, the second is using numeric arguments. Let’s start with symbols first, which is more intuitive.
You type chmod followed by a space, and a letter:
astands for allustands for usergstands for groupostands for others
Then you type either + or - to add a permission, or to remove it. Then you enter one or more permissions symbols (r, w, x).
All followed by the file or folder name.
Here are some examples:
chmod a+r filename #everyone can now read
chmod a+rw filename #everyone can now read and write
chmod o-rwx filename #others (not the owner, not in the same group of the file) cannot read, write or execute the file
You can apply the same permissions to multiple personas by adding multiple letters before the +/-:
chmod og-r filename #other and group can't read any moreIn case you are editing a folder, you can apply the permissions to every file contained in that folder using the -r (recursive) flag.
Numeric arguments are faster but I find them hard to remember when you are not using them day to day. You use a digit that represents the permissions of the persona. This number value can be a maximum of 7, and it’s calculated in this way:
1if has execution permission2if has write permission4if has read permission
This gives us 4 combinations:
0no permissions1can execute2can write3can write, execute4can read5can read, execute6can read, write7can read, write and execute
We use them in pairs of 3, to set the permissions of all the 3 groups altogether:
chmod 777 filename
chmod 755 filename
chmod 644 filename
Owner and group
You can change the owner of a file using the chown command:
chown <username> <filename>You can change the group of a file using the chgrp command:
chgrp <group> <filename>Managing files content
less
The less command is one I use a lot. It shows you the contents stored inside a file, in a nice and interactive UI.
Usage: less <filename>.
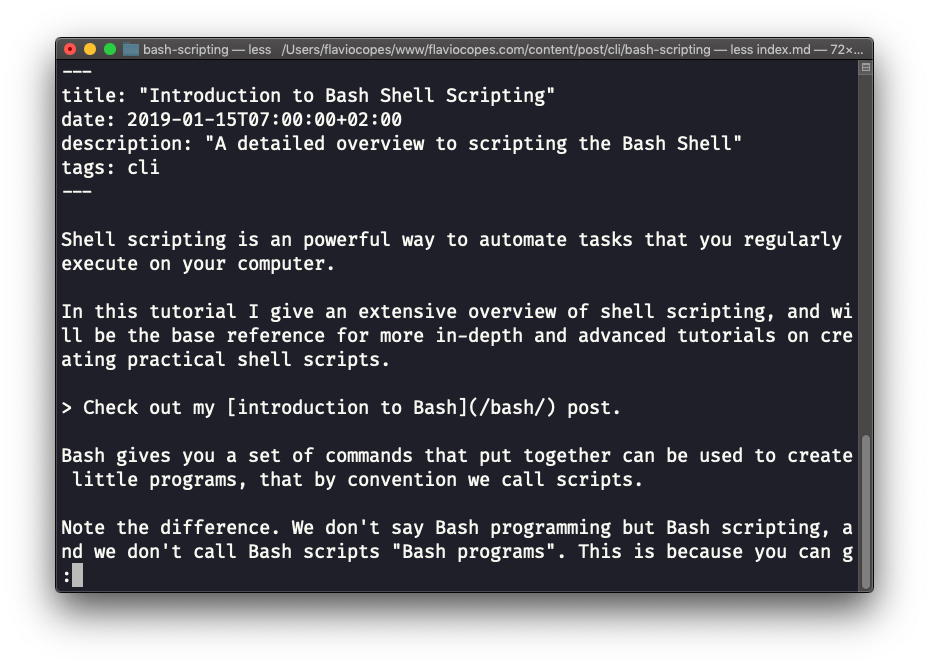
Once you are inside a less session, you can quit by pressing q.
You can navigate the file contents using the up and down keys, or using the space bar and b to navigate page by page. You can also jump to the end of the file pressing G and jump back to the start pressing g.
You can search contents inside the file by pressing / and typing a word to search. This searches forward. You can search backwards using the ? symbol and typing a word.
This command just visualises the file’s content. You can directly open an editor by pressing v. It will use the system editor, which in most cases is vim.
Pressing the F key enters follow mode, or watch mode. When the file is changed by someone else, like from another program, you get to see the changes live. By default this is not happening, and you only see the file version at the time you opened it. You need to press ctrl-C to quit this mode. In this case the behaviour is similar to running the tail -f <filename> command.
You can open multiple files, and navigate through them using :n (to go to the next file) and :p (to go to the previous).
tail
I just mentioned tail in the previous command, so let’s use this opportunity to explain what it does.
Its best use case in my opinion is when called with the -f option. It opens the file at the end, and watches for file changes. Any time there is new content in the file, it is printed in the window. This is great for watching log files, for example:
tail -f /var/log/system.logTo exit, press ctrl-C.
You can print the last 10 lines in a file:
tail -n 10 <filename>You can print the whole file content starting from a specific line using + before the line number:
tail -n +10 <filename>tail can do much more and as always my advice is to check man tail.
cat
Similar to tail in some way, we have cat. Except cat can also add content to a file, and this makes it super powerful.
In its simplest usage, cat prints a file’s content to the standard output:
cat fileYou can print the content of multiple files:
cat file1 file2and using the output redirection operator > you can concatenate the content of multiple files into a new file:
cat file1 file2 > file3Using >> you can append the content of multiple files into a new file, creating it if it does not exist:
cat file1 file2 >> file3When watching source code files it’s great to see the line numbers, and you can have cat print them using the -n option:
cat -n file1You can only add a number to non-blank lines using -b, or you can also remove all the multiple empty lines using -s.
cat is often used in combination with the pipe operator | to feed a file content as input to another command: cat file1 | anothercommand.
wc
wc means word count. Here is the most common usage:
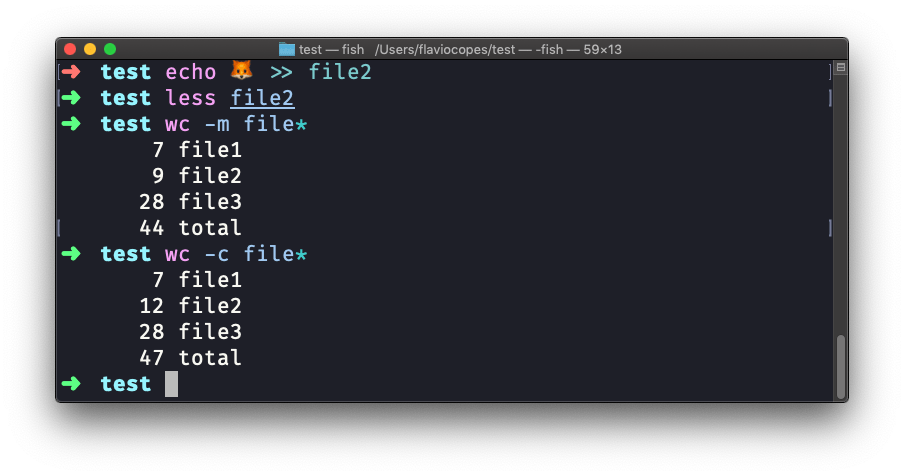
wc -l file1count lineswc -w file1count wordswc -c file1count characterswc -m file1count characters with multibyte support (i.e. emojis count as 1, not as multiple characters)
You can run wc providing multiple files, in which case it will do the calculations on each file separately, and then print a summary:
find
The find command can be used to find files or folders matching a particular search pattern. It searches recursively.
Let’s learn it by example.
Find all the files under the current tree that have the .js extension and print the relative path of each file matching:
find . -name '*.js'It’s important to use quotes around special characters like * to avoid the shell interpreting them.
Find directories under the current tree matching the name “src”:
find . -type d -name srcUse -type f to search only files, or -type l to only search symbolic links.
-name is case sensitive. use -iname to perform a case-insensitive search.
You can search under multiple root trees:
find folder1 folder2 -name filename.txtFind directories under the current tree matching the name “node_modules” or ‘public’:
find . -type d -name node_modules -or -name publicYou can also exclude a path, using -not -path:
find . -type d -name '*.md' -not -path 'node_modules/*'You can search files that have more than 100 characters (bytes) in them:
find . -type f -size +100cSearch files bigger than 100KB but smaller than 1MB:
find . -type f -size +100k -size -1MSearch files edited more than 3 days ago
find . -type f -mtime +3Search files edited in the last 24 hours
find . -type f -mtime -1You can delete all the files matching a search by adding the -delete option. This deletes all the files edited in the last 24 hours:
find . -type f -mtime -1 -deleteYou can execute a command on each result of the search. In this example we run cat to print the file content:
find . -type f -exec cat {} \;notice the terminating \;. {} is filled with the file name at execution time.
Related posts about cli: