Introduction to XState
By Flavio Copes
An overview of XState, the JavaScript library for finite state machines, covering how to install it and define a machine with the Machine factory function.
I wrote about finite state machines in the past and I mentioned XState. In this post I want to introduce this popular JavaScript library.
Finite state machines are an interesting way to tackle complex state and state changes and keep your code bugs-free as much as possible.
Just as we model a software projects using various tools to help us design it before building it, and we use mockups and UX tools to think about an UI before building it, finite state machines help us solve state transitions.
Computer programs are all about transitioning from one state to another after an input. Things can get out of control if you’re not paying close attention, and XState is a very helpful tool to help us navigate the state complexity as it grows.
You install XState using npm:
npm install xstatethen you can import it in your program using the ES Modules syntax. As a minimum you typically import the Machine and interpret functions:
import { Machine, interpret } from 'xstate'In the browser you can also import it from a CDN directly:
<script src="https://unpkg.com/xstate@4/dist/xstate.js"></script>and this will make a global XState variable on the window object.
Next you can define a finite state machine using the Machine factory function. This function accepts a configuration object, and returns a reference to the newly created state machine:
const machine = Machine({

})
In the configuration we pass an id string that identifies the state machine, the initial state string. Here is a simple traffic lights example:
const machine = Machine({
  id: 'trafficlights',
  initial: 'green'
})
We also pass a states object containing the allowed states:
const machine = Machine({
  id: 'trafficlights',
  initial: 'green',
  states: {
    green: {

    },
    yellow: {

    },
    red: {

    }
  }
})
Here I defined 3 states: green yellow and red.
To transition from one state to another we will send a message to the machine, and it will know what to do based on the configuration we set.
Here we set to switch to the yellow state when we’re in the green state and we get a TIMER event:
const machine = Machine({
  id: 'trafficlights',
  initial: 'green',
  states: {
    green: {
      on: {
        TIMER: 'yellow'
      }
    },
    yellow: {

    },
    red: {

    }
  }
})
I called it TIMER because traffic lights usually have a simple timer that changes the lights state every X seconds.
Now let’s fill the other 2 state transitions: we go from yellow to red, and from red to green:
const machine = Machine({
  id: 'trafficlights',
  initial: 'green',
  states: {
    green: {
      on: {
        TIMER: 'yellow'
      }
    },
    yellow: {
      on: {
        TIMER: 'red'
      }
    },
    red: {
      on: {
        TIMER: 'green'
      }
    }
  }
})
How do we trigger a transition?
You can get the initial state string representation of the machine using:
machine.initialState.value //'green' in our caseand we can switch to a new state using the transition() method of machine (the state machine instance returned by Machine()):
const currentState = machine.initialState.value
const newState = machine.transition(currentState, 'TIMER')
You can store the new state object into a variable, and you can get its string representation accessing the value property:
const currentState = machine.initialState.value
const newState = machine.transition(currentState, 'TIMER')
console.log(newState.value)
Using the transition() method you always have to keep track of the current state, which in my mind causes a bit of pain. It’d be great if we could ask the machine for its current state.
This is done by creating a statechart, which in XState is called service. We do so calling the interpret() method we imported from xstate passing it the state machine object, and then calling start() to start the service:
const toggleService = interpret(machine).start()Now we can use this service send() method to retrieve the new state, without having to pass the current state like we have to do with machine.transition():
const toggleService = interpret(machine).start()
toggleService.send('TOGGLE')
We can store the return value, that will hold the new state:
const newState = toggleService.send('TOGGLE')
console.log(newState.value)
This is just scratching the surface of XState.
Given a state, you can know what will trigger a state change using its nextEvents property, that will return an array.
Yes, because from a state you can go to multiple states depending on the trigger you get.
In the case of traffic lights, this is not something that will happen, but let’s model the house lights example we had in the finite state machines post:
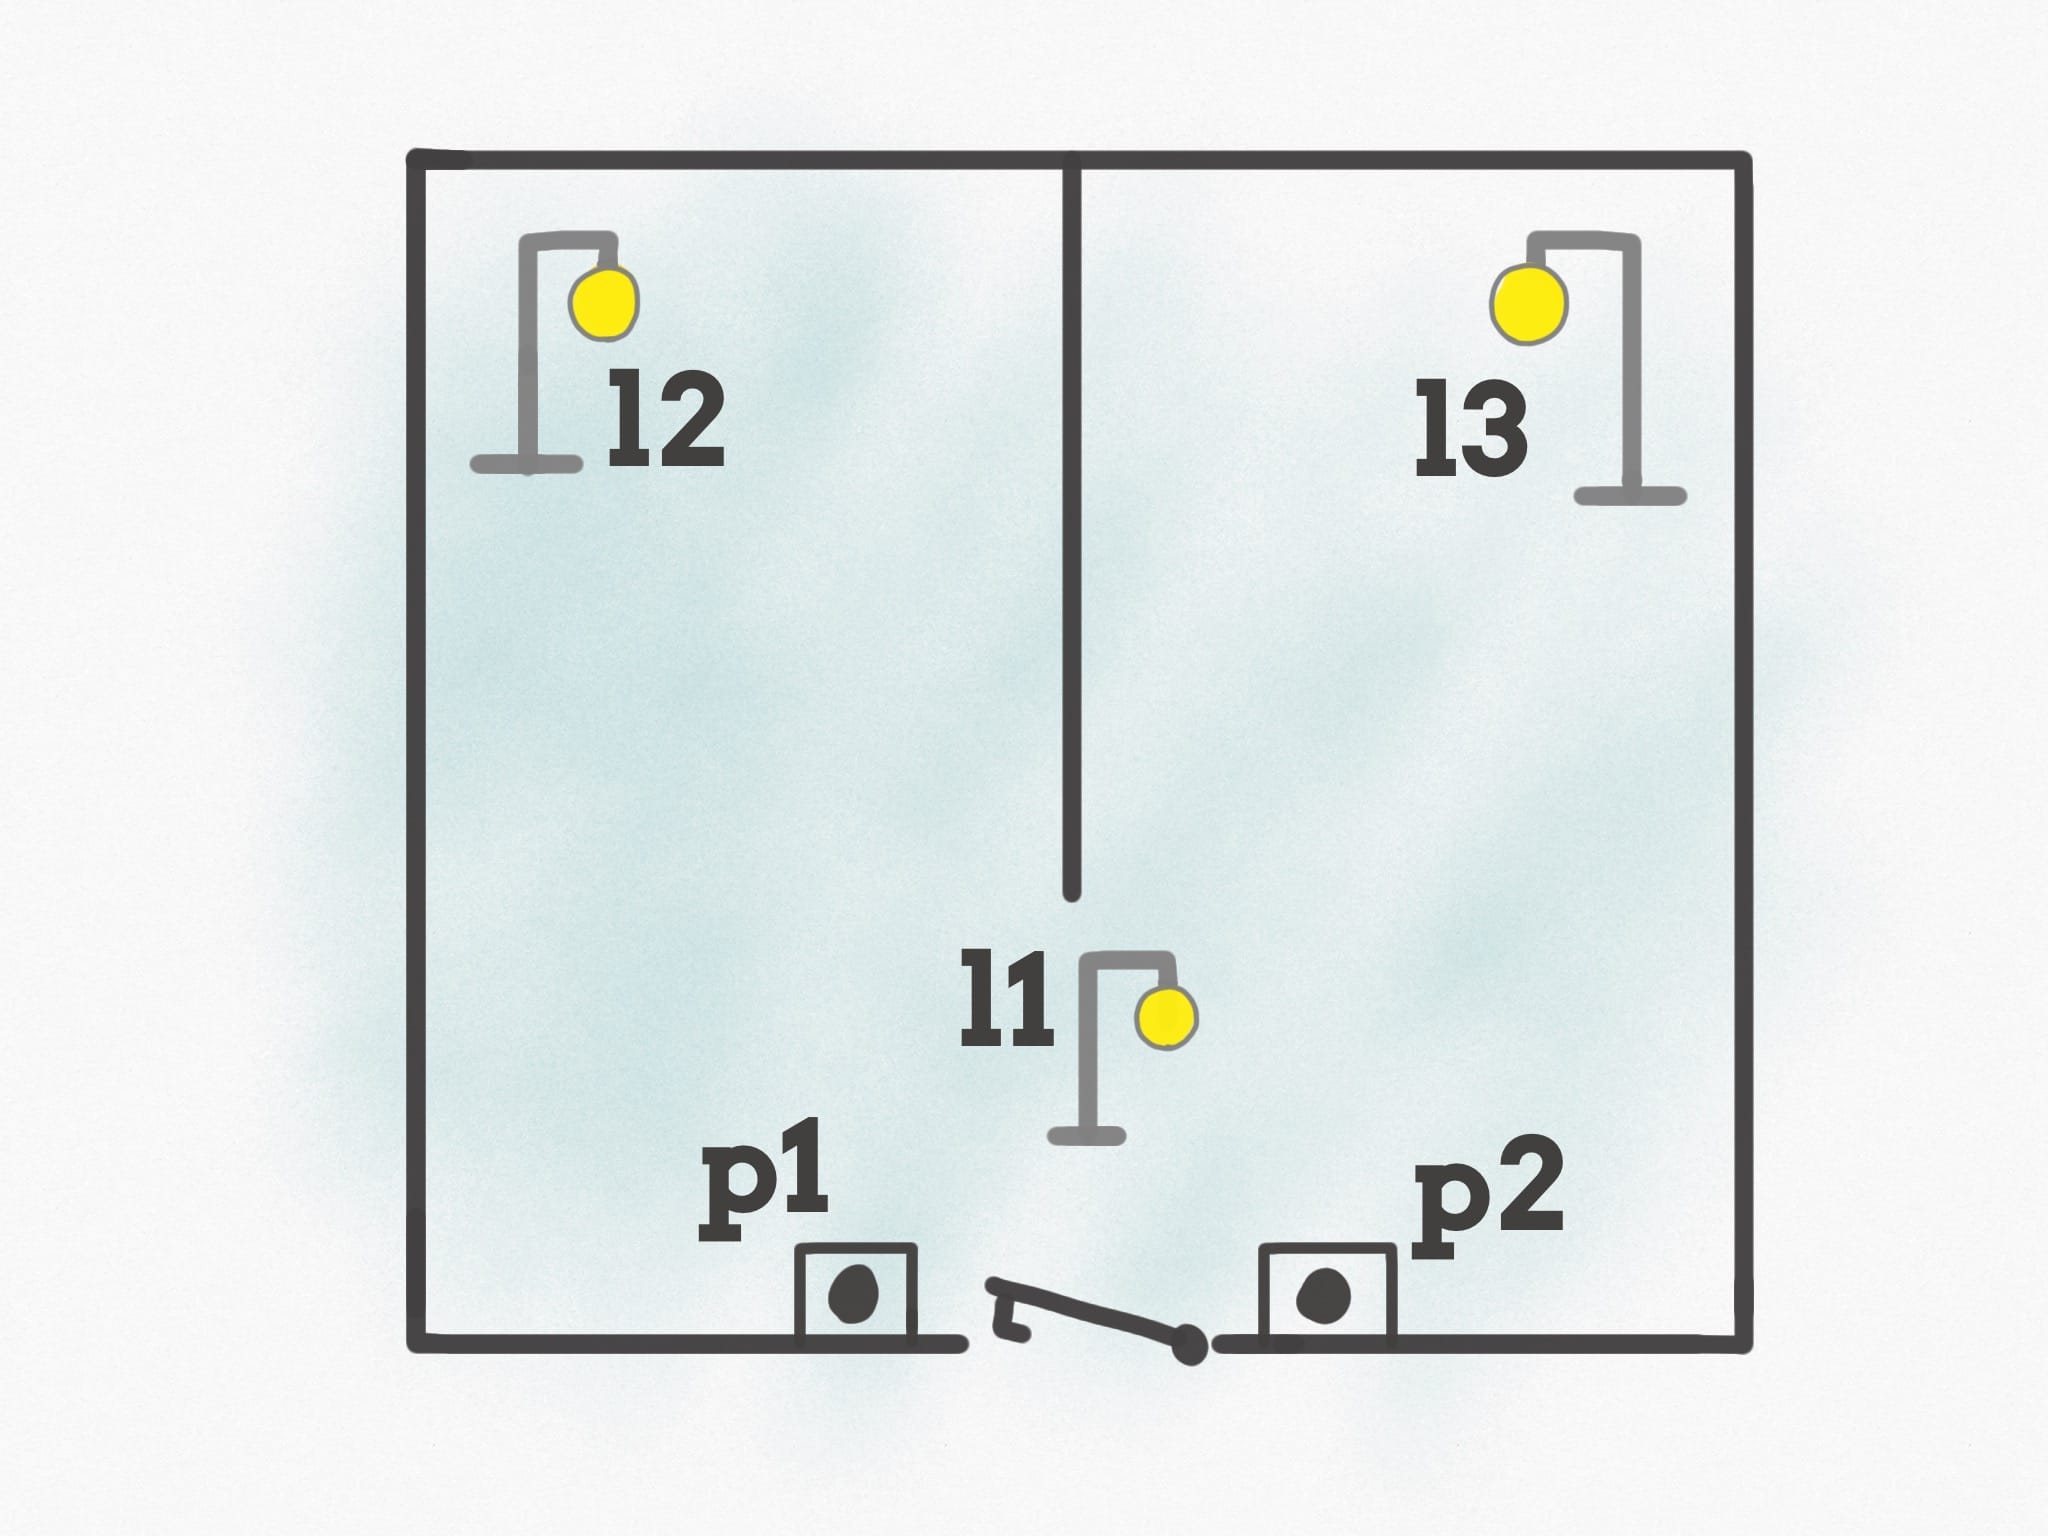
When you enter the house, you can press one of the 2 push buttons you have, p1 or p2. When you press any of those buttons, the l1 light turns on.
Imagine this is the entrance light, and you can take your jacket off. Once you are done, you decide which room you want to go into (kitchen or bedroom, for example).
If you press the button p1, l1 turns off and l2 turns on. Instead if you press the button p2, l1 turns off and l3 turns on.
Pressing another time any of the 2 buttons, p1 or p2, the light that is currently on will turn off, and we’ll get back at the initial state of the system.
Here is our XState machine object:
const machine = Machine({
  id: 'roomlights',
  initial: 'nolights',
  states: {
    nolights: {
      on: {
        p1: 'l1',
        p2: 'l1'
      }
    },
    l1: {
      on: {
        p1: 'l2',
        p2: 'l3'
      }
    },
    l2: {
      on: {
        p1: 'nolights',
        p2: 'nolights'
      }
    },
    l3: {
      on: {
        p1: 'nolights',
        p2: 'nolights'
      }
    },
  }
})
Now we can create a service and send it messages:
const toggleService = interpret(machine).start();
toggleService.send('p1').value //'l1'
toggleService.send('p1').value //'l2'
toggleService.send('p1').value //'nolights'
One thing we miss here is how do we do something when we switch to a new state. That is done through actions, which we define in a second object parameter we pass to the Machine() factory function:
const machine = Machine({
  id: 'roomlights',
  initial: 'nolights',
  states: {
    nolights: {
      on: {
        p1: {
          target: 'l1',
          actions: 'turnOnL1'
        },
        p2: {
          target: 'l1',
          actions: 'turnOnL1'
        }
      }
    },
    l1: {
      on: {
        p1: {
          target: 'l2',
          actions: 'turnOnL2'
        },
        p2: {
          target: 'l3',
          actions: 'turnOnL3'
        }
      }
    },
    l2: {
      on: {
        p1: {
          target: 'nolights',
          actions: ['turnOffAll']
        },
        p2: {
          target: 'nolights',
          actions: ['turnOffAll']
        }
      }
    },
    l3: {
      on: {
        p1: {
          target: 'nolights',
          actions: 'turnOffAll'
        },
        p2: {
          target: 'nolights',
          actions: 'turnOffAll'
        }
      }
    },
  }
}, {
  actions: {
    turnOnL1: (context, event) => {
      console.log('turnOnL1')
    },
    turnOnL2: (context, event) => {
      console.log('turnOnL2')
    },
    turnOnL3: (context, event) => {
      console.log('turnOnL3')
    },
    turnOffAll: (context, event) => {
      console.log('turnOffAll')
    }
  }
})
See how now each state transition defined in the object passed to on instead of being just a string it’s an object with the target property (where we pass the string we used before) and we also have an actions property where we can set the action to run.
We can run multiple actions by passing an array of strings instead of a string.
And you can also define the action(s) directy on the actions property instead of “centralizing” them into a separate object:
const machine = Machine({
  id: 'roomlights',
  initial: 'nolights',
  states: {
    nolights: {
      on: {
        p1: {
          target: 'l1',
          actions: (context, event) => {
            console.log('turnOnL1')
          },
          ...
But in this case it’s handy to put them all together because similar actions are fired by different state transitions.
That’s it for this tutorial. I recommend you to check out the XState Docs for more advanced usage of XState, but it’s a start.
Related posts about js: