
How to use Flashcard PDF Printer
Flashcard PDF Printer
Make a set of flashcards from a list or a ready-made set, choose the sheet, print on both sides or fold and glue, and line up the backs with the test sheet.
Free to read. You can explore the guide before buying the app.
On this page
Install Flashcard PDF Printer
Flashcard PDF Printer runs on macOS 14 Sonoma or later, on Apple silicon and Intel Macs. After buying, you land on a page with a Download button and your license key. The receipt email from Creem has both too. Unzip the app and drag Flashcard PDF Printer to your Applications folder.
The app is signed and notarized by Apple. Confirm Open at the normal first-launch prompt. It never asks macOS for a permission: it only reads the pictures you drop on it or choose, and keeps your sets in its own folder.
The app works without a license key. The key in your receipt turns on automatic updates: enter it in Flashcard PDF Printer → License…. Once a day, the app checks for a new version, shows what’s new, and installs it with Install and Relaunch. Flashcard PDF Printer → Check for Updates… checks right away. A key works on 3 Macs. To move it to another Mac, choose License… → Deactivate This Mac first. Your receipt always has the latest version, too.
Make a set
The first time you open the app it offers three ways to start.
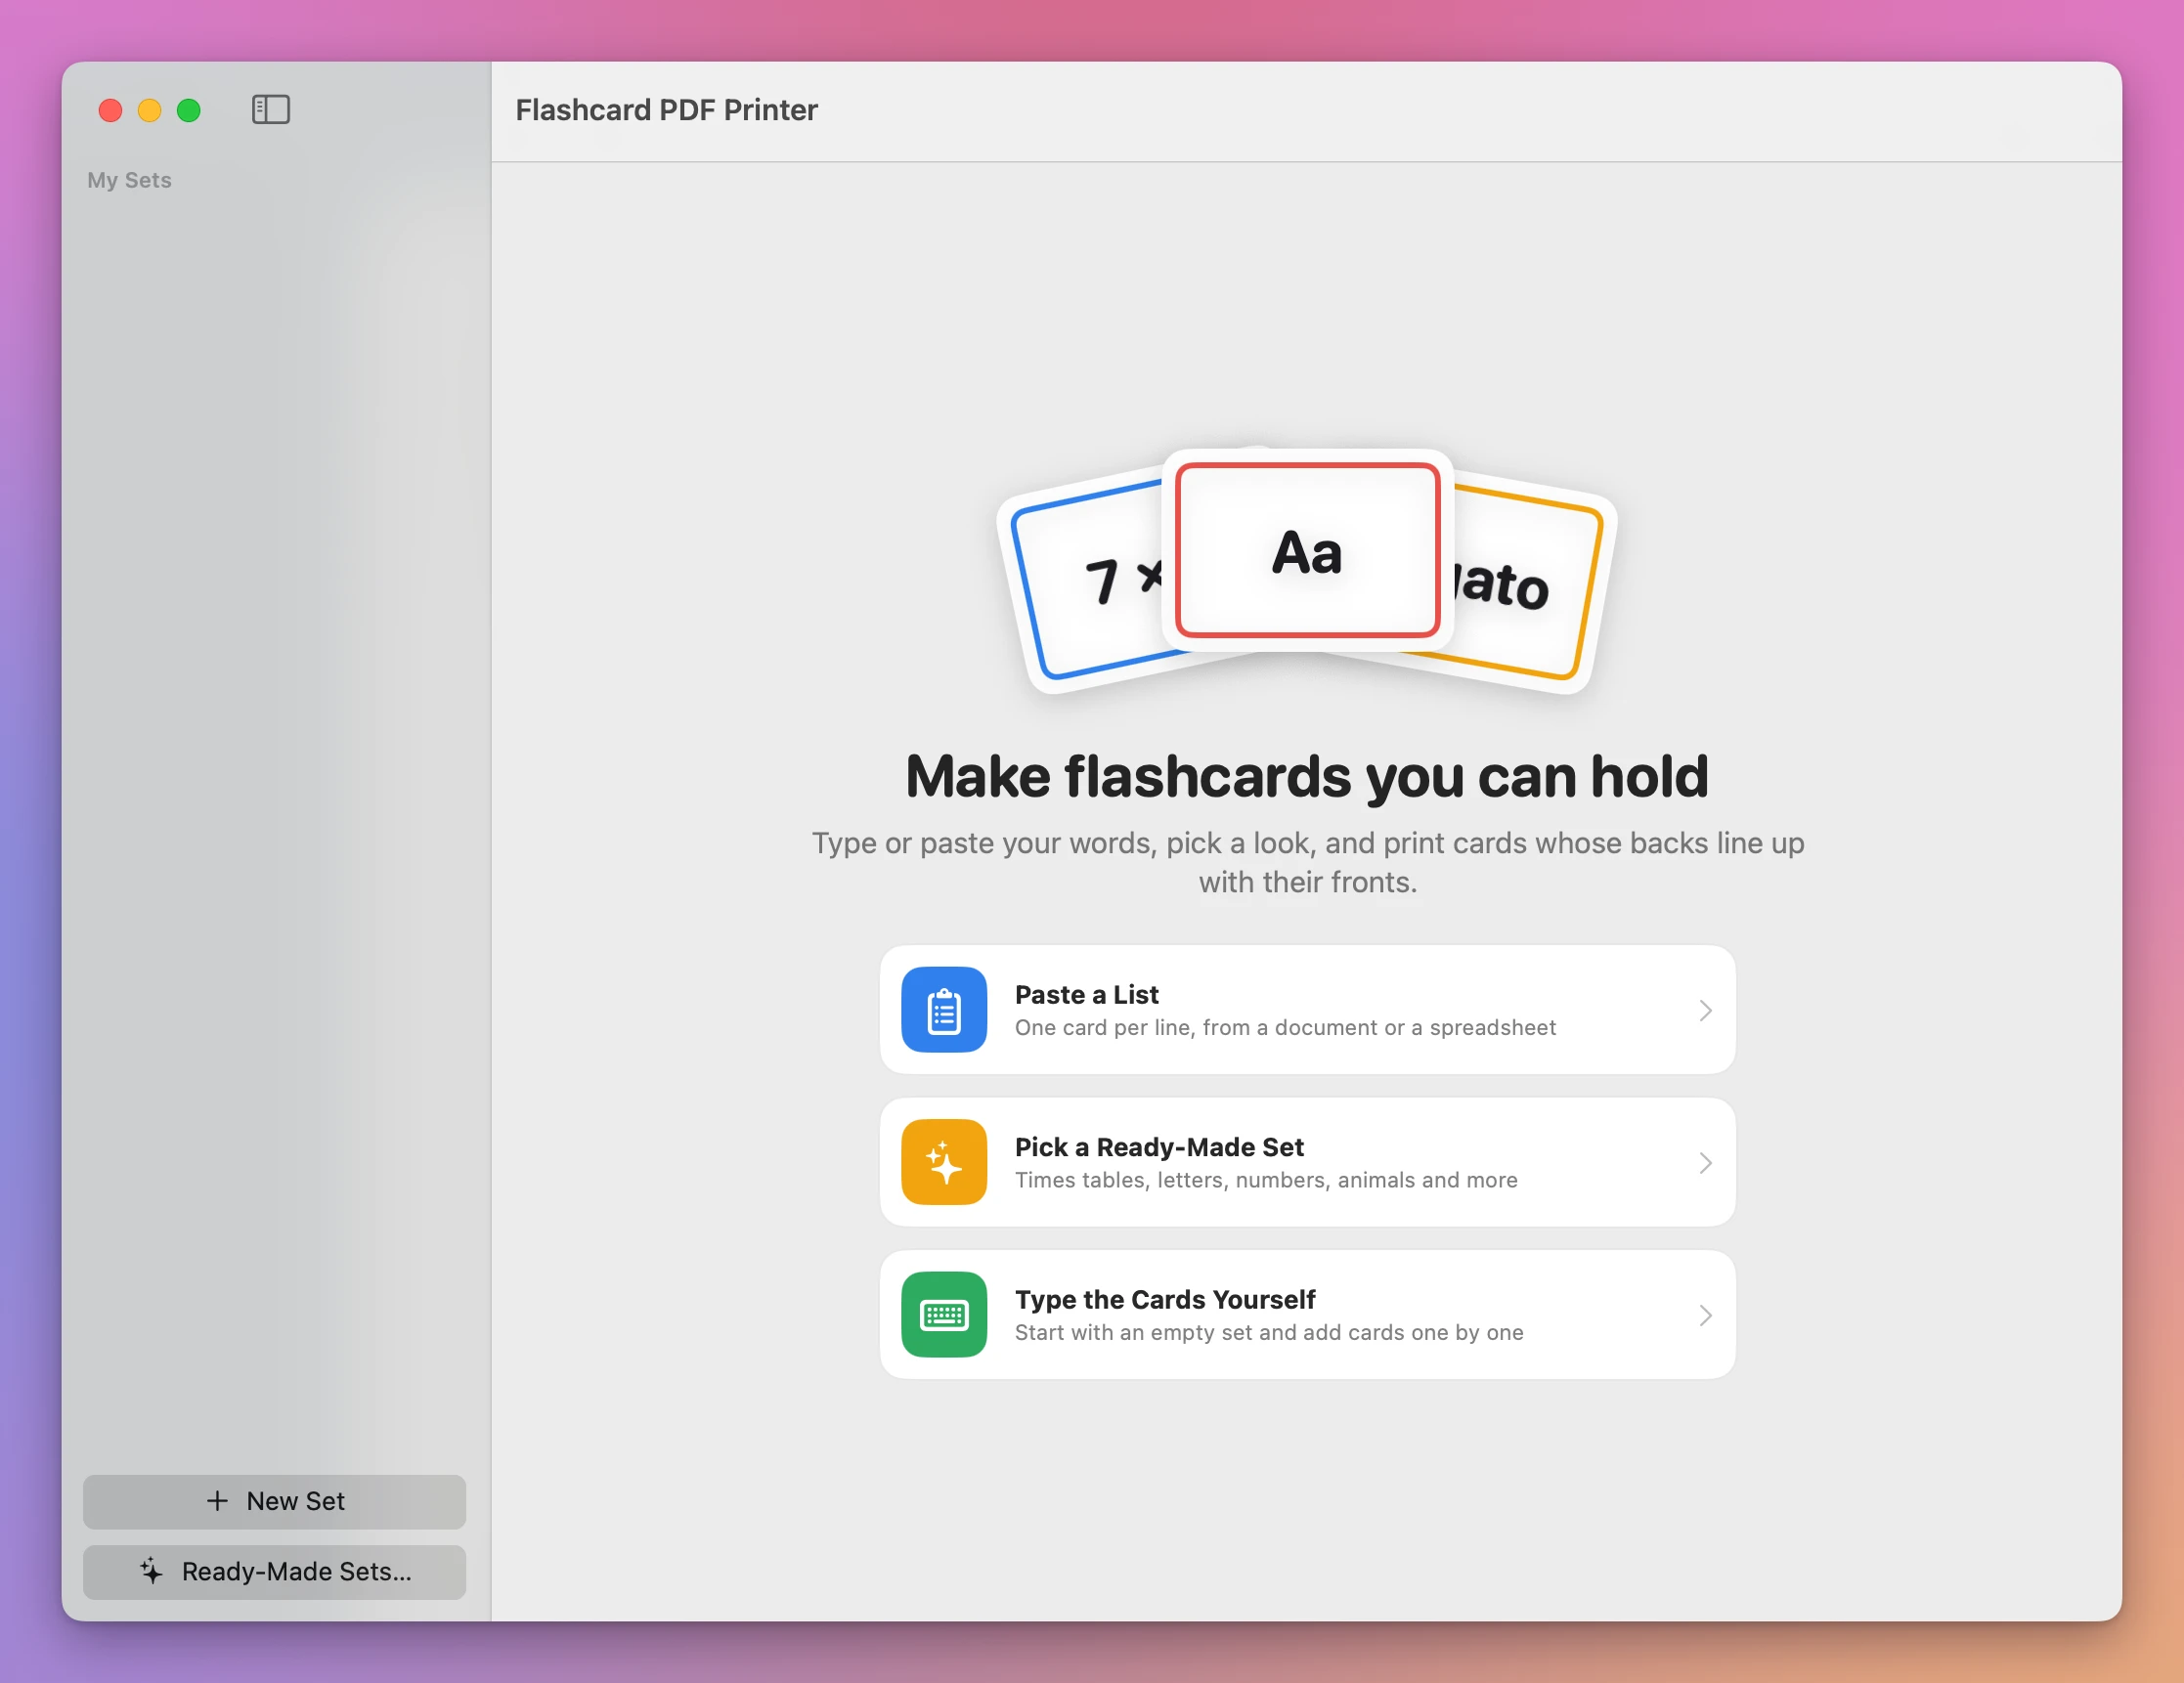
Paste a list
Click Paste a List and paste or type one card per line. Put one of these between the front and the back:
| Separator | Example |
|---|---|
| A tab | what a copy from Numbers, Excel or Google Sheets has |
| A comma | cat, el gato |
| A semicolon | cat; el gato |
| A bar | cat | el gato |
| A dash with a space on each side | cat - el gato |
| An equals sign | 3 + 4 = 7 |
| A colon | France: Paris |
The app works out which one your list uses. A line with no separator is a card with a front and no back. Bullets and numbering copied from a document are removed. A list of subtractions like 7 - 2 stays a list of fronts.
Under the box you see how many cards the list makes and the first three. Then click Add 6 Cards, or Replace the Cards in This Set to swap the set’s cards for the list’s.
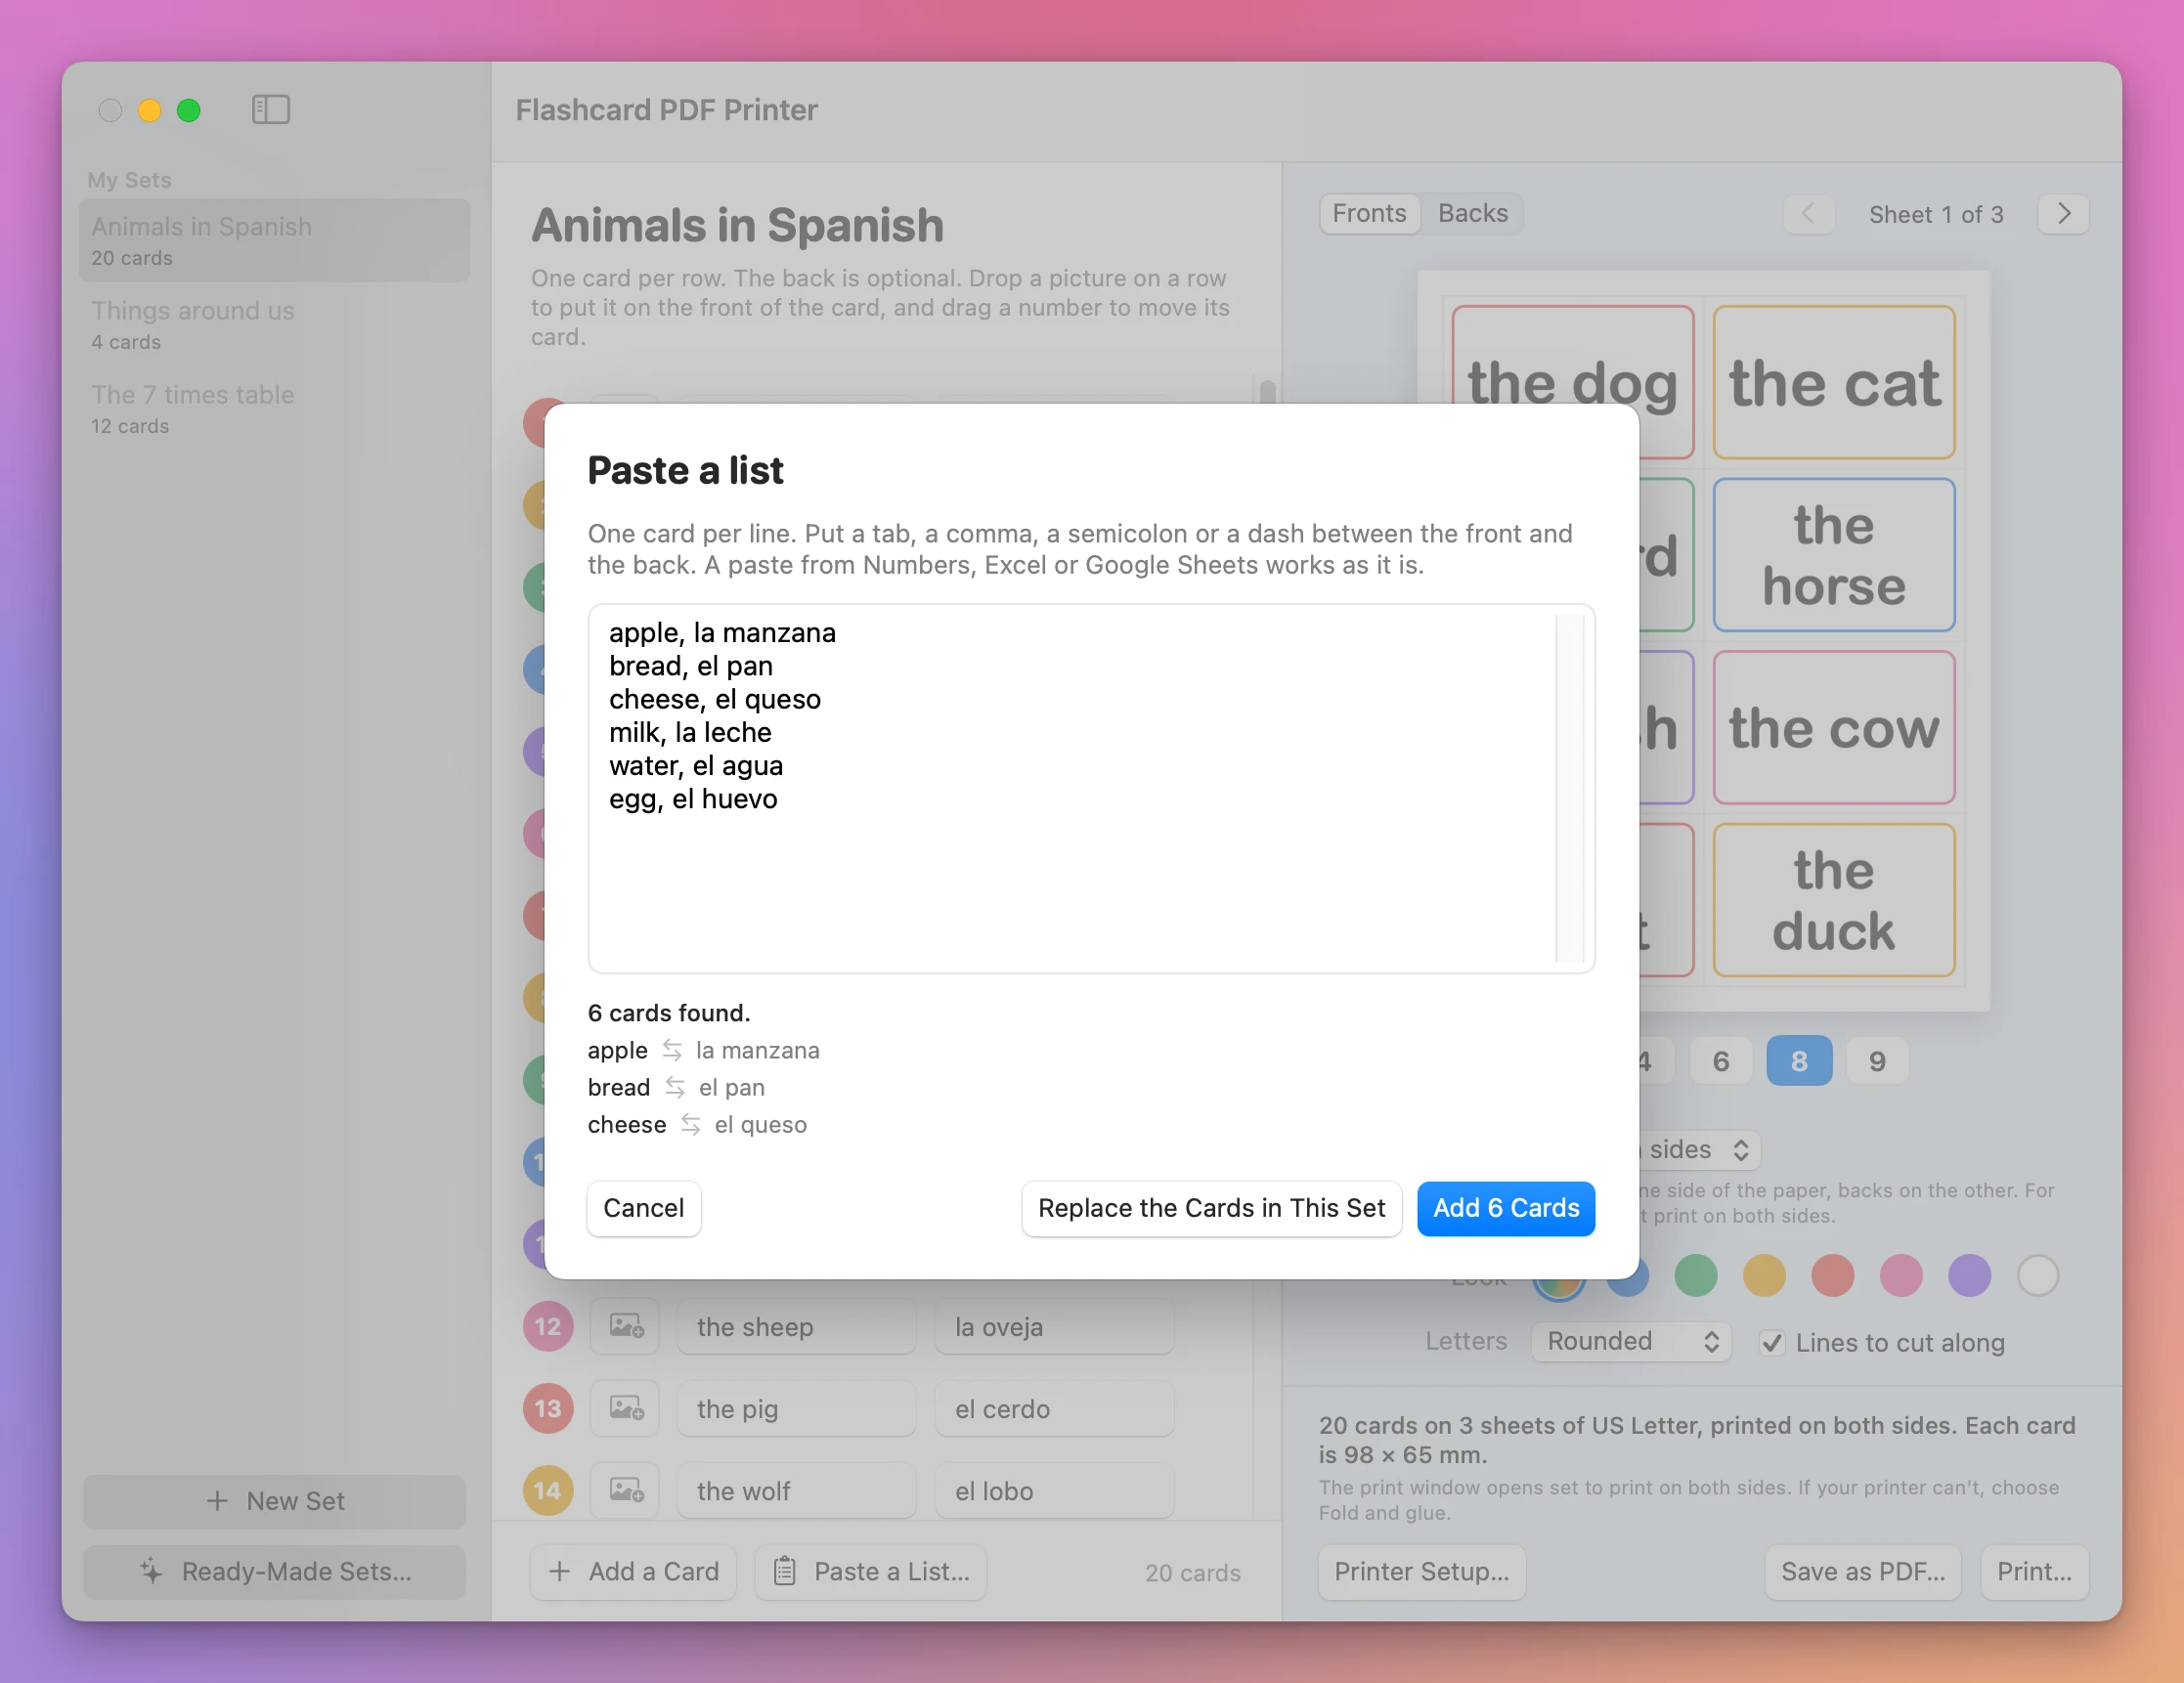
A set holds up to 2,000 cards.
Pick a ready-made set
Click Pick a Ready-Made Set, or Ready-Made Sets… under the list of sets. Pick one, choose which version in the menu under the grid when there’s more than one, and click Use This Set. It becomes a set of your own, and you can change every card.
| Set | What’s on the cards |
|---|---|
| Times tables | One table from 2 to 12: 7 × 8 on the front, 56 on the back |
| Adding | Sums up to 10, doubles, or make 10 |
| Taking away | Within 10 |
| The alphabet | Capital on the front and small on the back, both together, or small letters only |
| Numbers | 1 to 10 or 1 to 20: 7 on the front, seven on the back |
| First words | 40 short words, fronts only |
| Animals | 30 animals: a picture on the front, the name on the back |
| Fruit and vegetables | 20, the same way |
| Colors | 9 colors |
| Telling the time | A clock on the front, o’clock or half past on the back |
| Days and months | Fronts only, to read or to put in order |
The picture sets use emoji, so they print in color.
Type the cards
Type the Cards Yourself starts an empty set with the first card ready. Type the front, press Return, type the back, press Return, and you’re on the next card. Add a Card adds one at the end.
Change the cards
Each row is one card. Click a front or a back to change it. The preview on the right follows what you type.
- Move a card: drag its number onto another row.
- Remove a card: move the pointer over its row and click the small cross at the end.
- Add a picture: drop an image on the row, or click the picture button next to the number. The picture goes on the front, above the words. Click the button again to choose another or to remove it.
Your sets are listed on the left and saved as you type. Click the name at the top to rename a set. Right-click a set in the list to Duplicate it or to Delete… it. Deleting asks first, and can’t be undone.
Choose the sheet
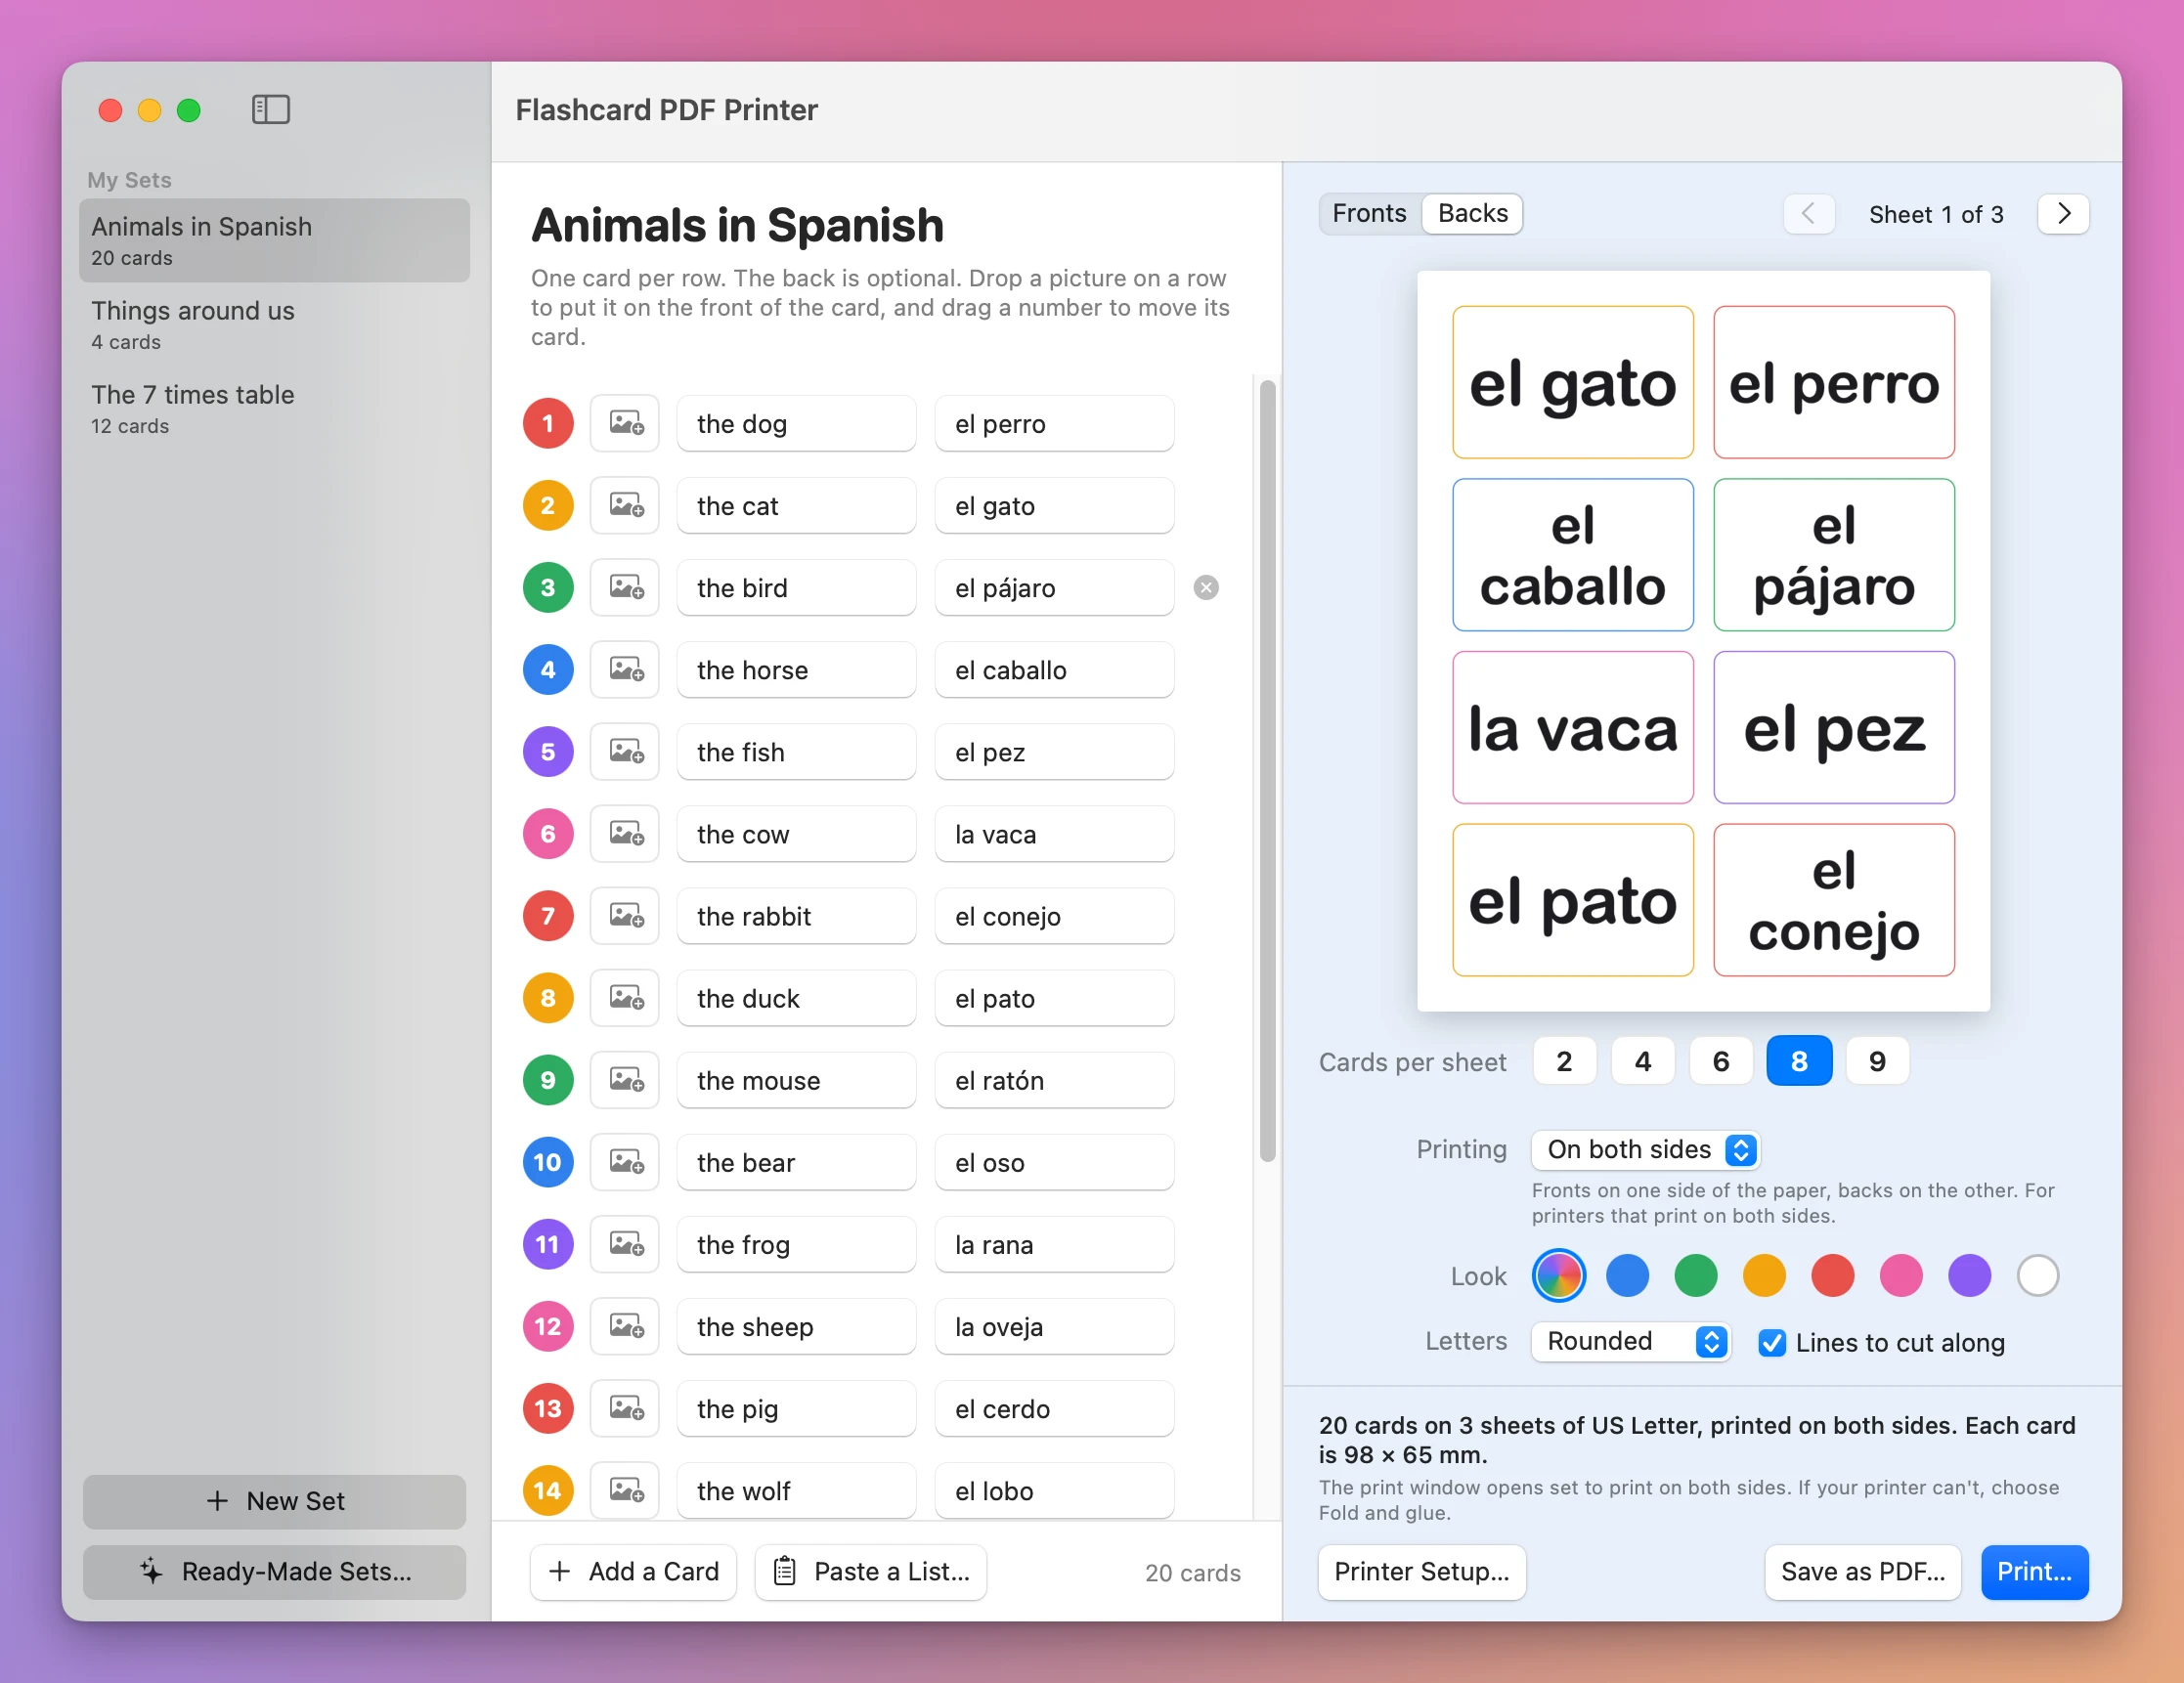
Cards per sheet is 2, 4, 6, 8 or 9. The line above the Print… button tells you the size of each card. On A4:
| Cards per sheet | Size of each card |
|---|---|
| 2 | 191 × 139 mm |
| 4 | 139 × 95 mm |
| 6 | 95 × 93 mm |
| 8 | 95 × 69 mm |
| 9 | 93 × 64 mm |
With 4 and 9 the cards lie on their side on the sheet, so every card is wider than tall. The preview turns the sheet for you.
Printing has three choices:
- On both sides: fronts on one side of the paper, backs on the other.
- Fold and glue: fronts and backs side by side on one side. Fold the sheet on the dashed line, glue it shut, then cut. It holds half as many cards per sheet, and it isn’t available with 9 cards per sheet, which has no middle to fold on.
- Fronts only. Cards with no backs are printed this way whatever you choose.
Look is the color of the frame inside each card. Rainbow changes color at every card, and the white swatch prints no frame. The front’s frame is thick and the back’s is thin, so you can tell the sides apart in a pile.
Letters is the lettering. Lines to cut along adds or removes the thin gray lines between the cards. They’re printed on the fronts only.
Click Print…. The print window opens already set to print on both sides. Print at 100%, without “scale to fit”.
Save as PDF… saves the same sheets as a file. For printing on both sides, the PDF has a page of fronts and then a page of backs for each sheet.
Line up the backs
Printers turn the paper over in one of two ways. Click Printer Setup….
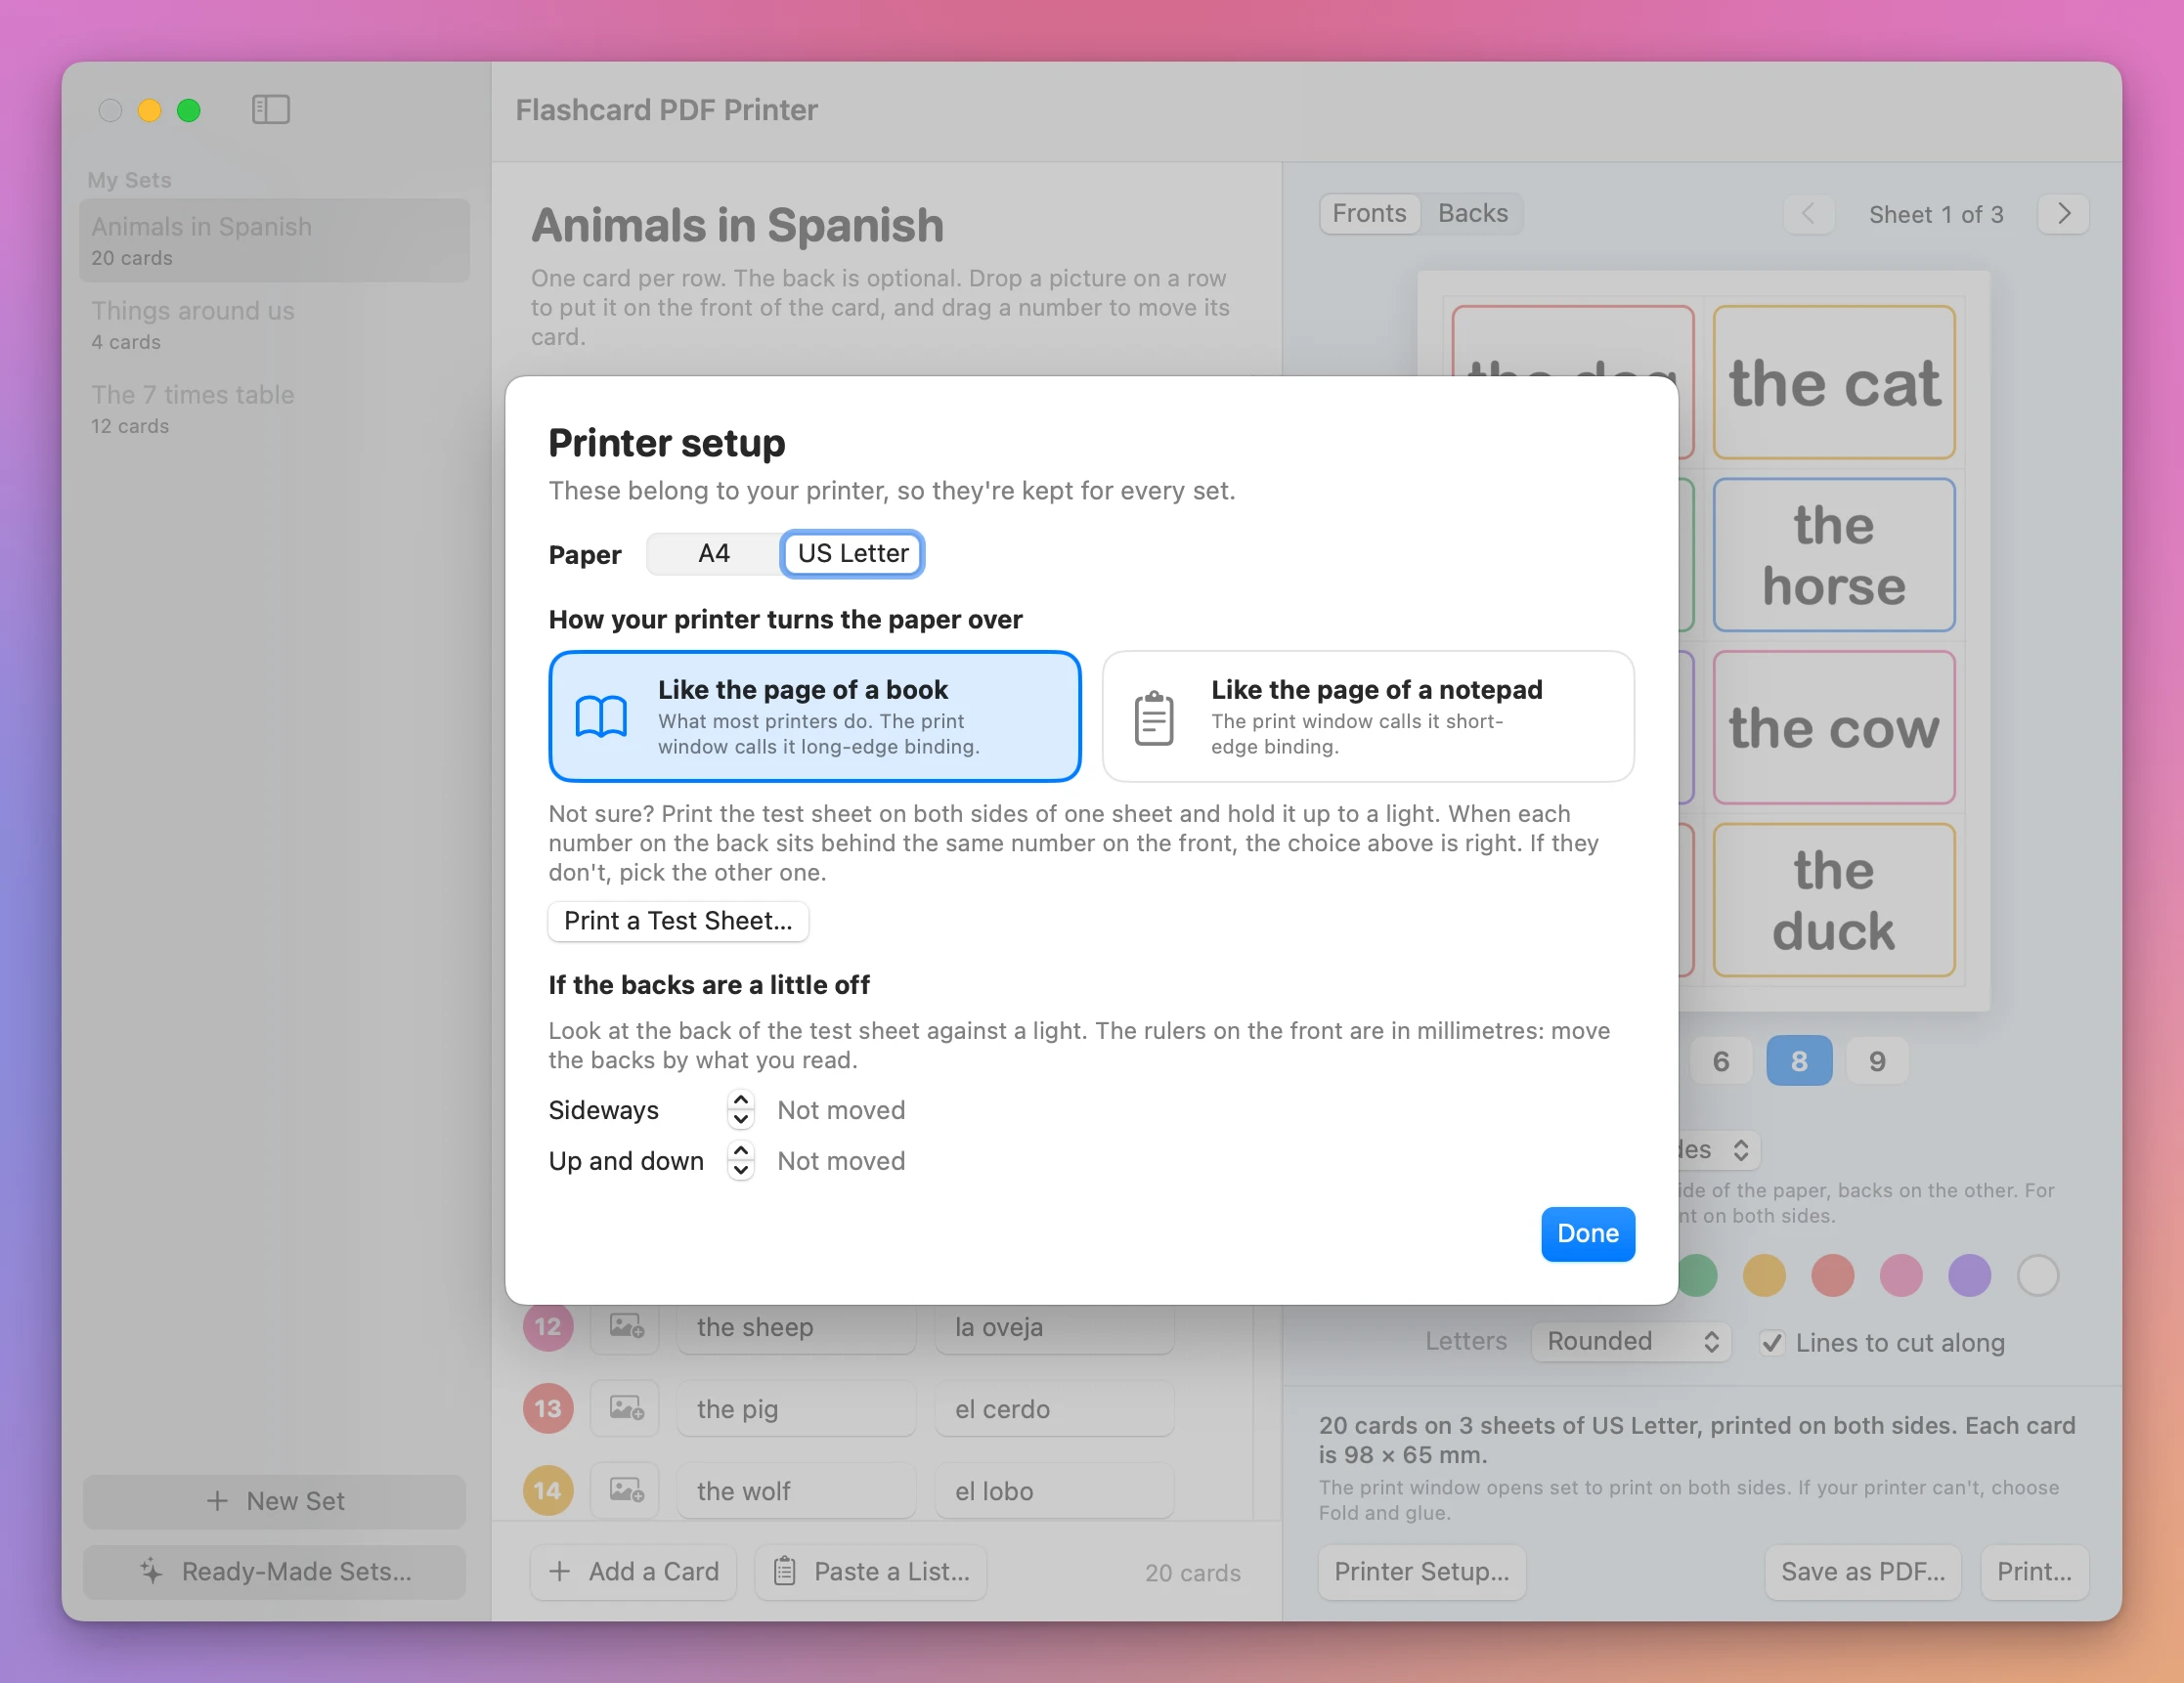
- Pick your Paper, A4 or US Letter.
- Click Print a Test Sheet… and print both pages on one sheet.
- Hold the sheet up to a light. Each number on the back should sit behind the same number on the front.
- If they don’t, pick the other choice under How your printer turns the paper over. Like the page of a book is what most printers do, and what the print window calls long-edge binding. Like the page of a notepad is short-edge binding.
If the numbers match but the backs are a little off, look at the back of the test sheet against the light. The targets on the front have rulers in millimetres. Read how far the back’s small cross is from the middle, and move the backs by that much with Sideways and Up and down. They move in steps of half a millimetre, up to 10.
The paper, the way of turning it and these two numbers are kept for every set.
Share a set
- File → Export Set… saves the open set as one
.flashcardsfile, pictures included. - File → Import Set… opens one. It’s added to your sets.
- File → Copy the Cards as a List puts the cards on the clipboard, one per line with a tab between front and back, ready to paste into a spreadsheet.
Sounds
The app makes a few quiet sounds when you add or remove cards and when it prints or saves. Flashcard PDF Printer → Sound Effects turns them off.
Where your sets are
In ~/Library/Application Support/Flashcard PDF Printer/Sets, one file per set. Nothing is sent anywhere. The only time the app goes online is to check your license key and look for a new version.
More examples
See Flashcard PDF Printer → · $20 including tax.