Pick UI sounds for clicks, toggles and errors in a Mac or iOS app
By Flavio
Updated
Choose a click, toggle or error sound in Chip Pops, export the WAV, and play it from a Mac or iOS app with Swift and blips.
You can also let your coding agent add sounds to an app with blips.
A button that does something should sound like it did something. A toggle should sound different from an error. You want a short file, in the project, that Swift can play. You don’t want a pack with a license page and filenames that don’t say what the sound is.
Chip Pops is a Mac app with about 6,000 8-bit effects, made with jsfxr. The Interface group is the set for this: click, blip, pop, toggle, success, error, notification and swoosh. You listen, then drag a WAV into Xcode or export it with blips.
Add a button sound with Chip Pops and a few lines of HTML plays one file from a web button. Choose 8-bit game sound effects in Chip Pops and export them as WAV stays in the Game group. This one stays in Interface, and it ends in a Mac or iOS app. How to play a sound from the macOS command line is afplay, which is also what blips play uses, so you can hear a file before you wire it up.
What you need
Chip Pops runs on macOS 14 Sonoma or later, on Apple silicon and on Intel.
After purchasing, download the app ZIP from your Polar receipt, unzip it, and drag Chip Pops.app to Applications. The app is signed and notarized. Confirm Open at the normal first-launch prompt.
The first time you open it, click Generate the Library. Chip Pops makes the sounds on your Mac. The page says that takes less than half a minute, and the library is about 300 MB. There’s no account. The sounds are yours to use in a free or commercial project, with no credit.
Choose Chip Pops → Install Command Line Tool… when you want blips. It links the command into ~/.local/bin. Add that directory to your PATH if Terminal can’t find it. Install Agent Skill… is for an agent. You can pick the sounds yourself without it.
Xcode is only required for the last step, the app that plays the file. Audition and export work without it. The library lives in ~/Library/Application Support/Blips, including the audio and the library metadata. Library → Show Library in Finder opens that folder.
Run blips help before you trust a flag. It lists the commands for the version you installed. blips capabilities --json is the agent-readable manifest.
blips helpblips capabilities --jsonAudition the Interface sounds
A UI sound is doing a job in the interface, not scoring a game. Click, blip and pop are the small ones. Toggle is the switch. Success and error have to be distinguishable with the volume low. Notification and swoosh are the ones that travel, a banner or a sheet. If you skip the audition and export the first row, you find out in the app that the error and the success are the same gesture.
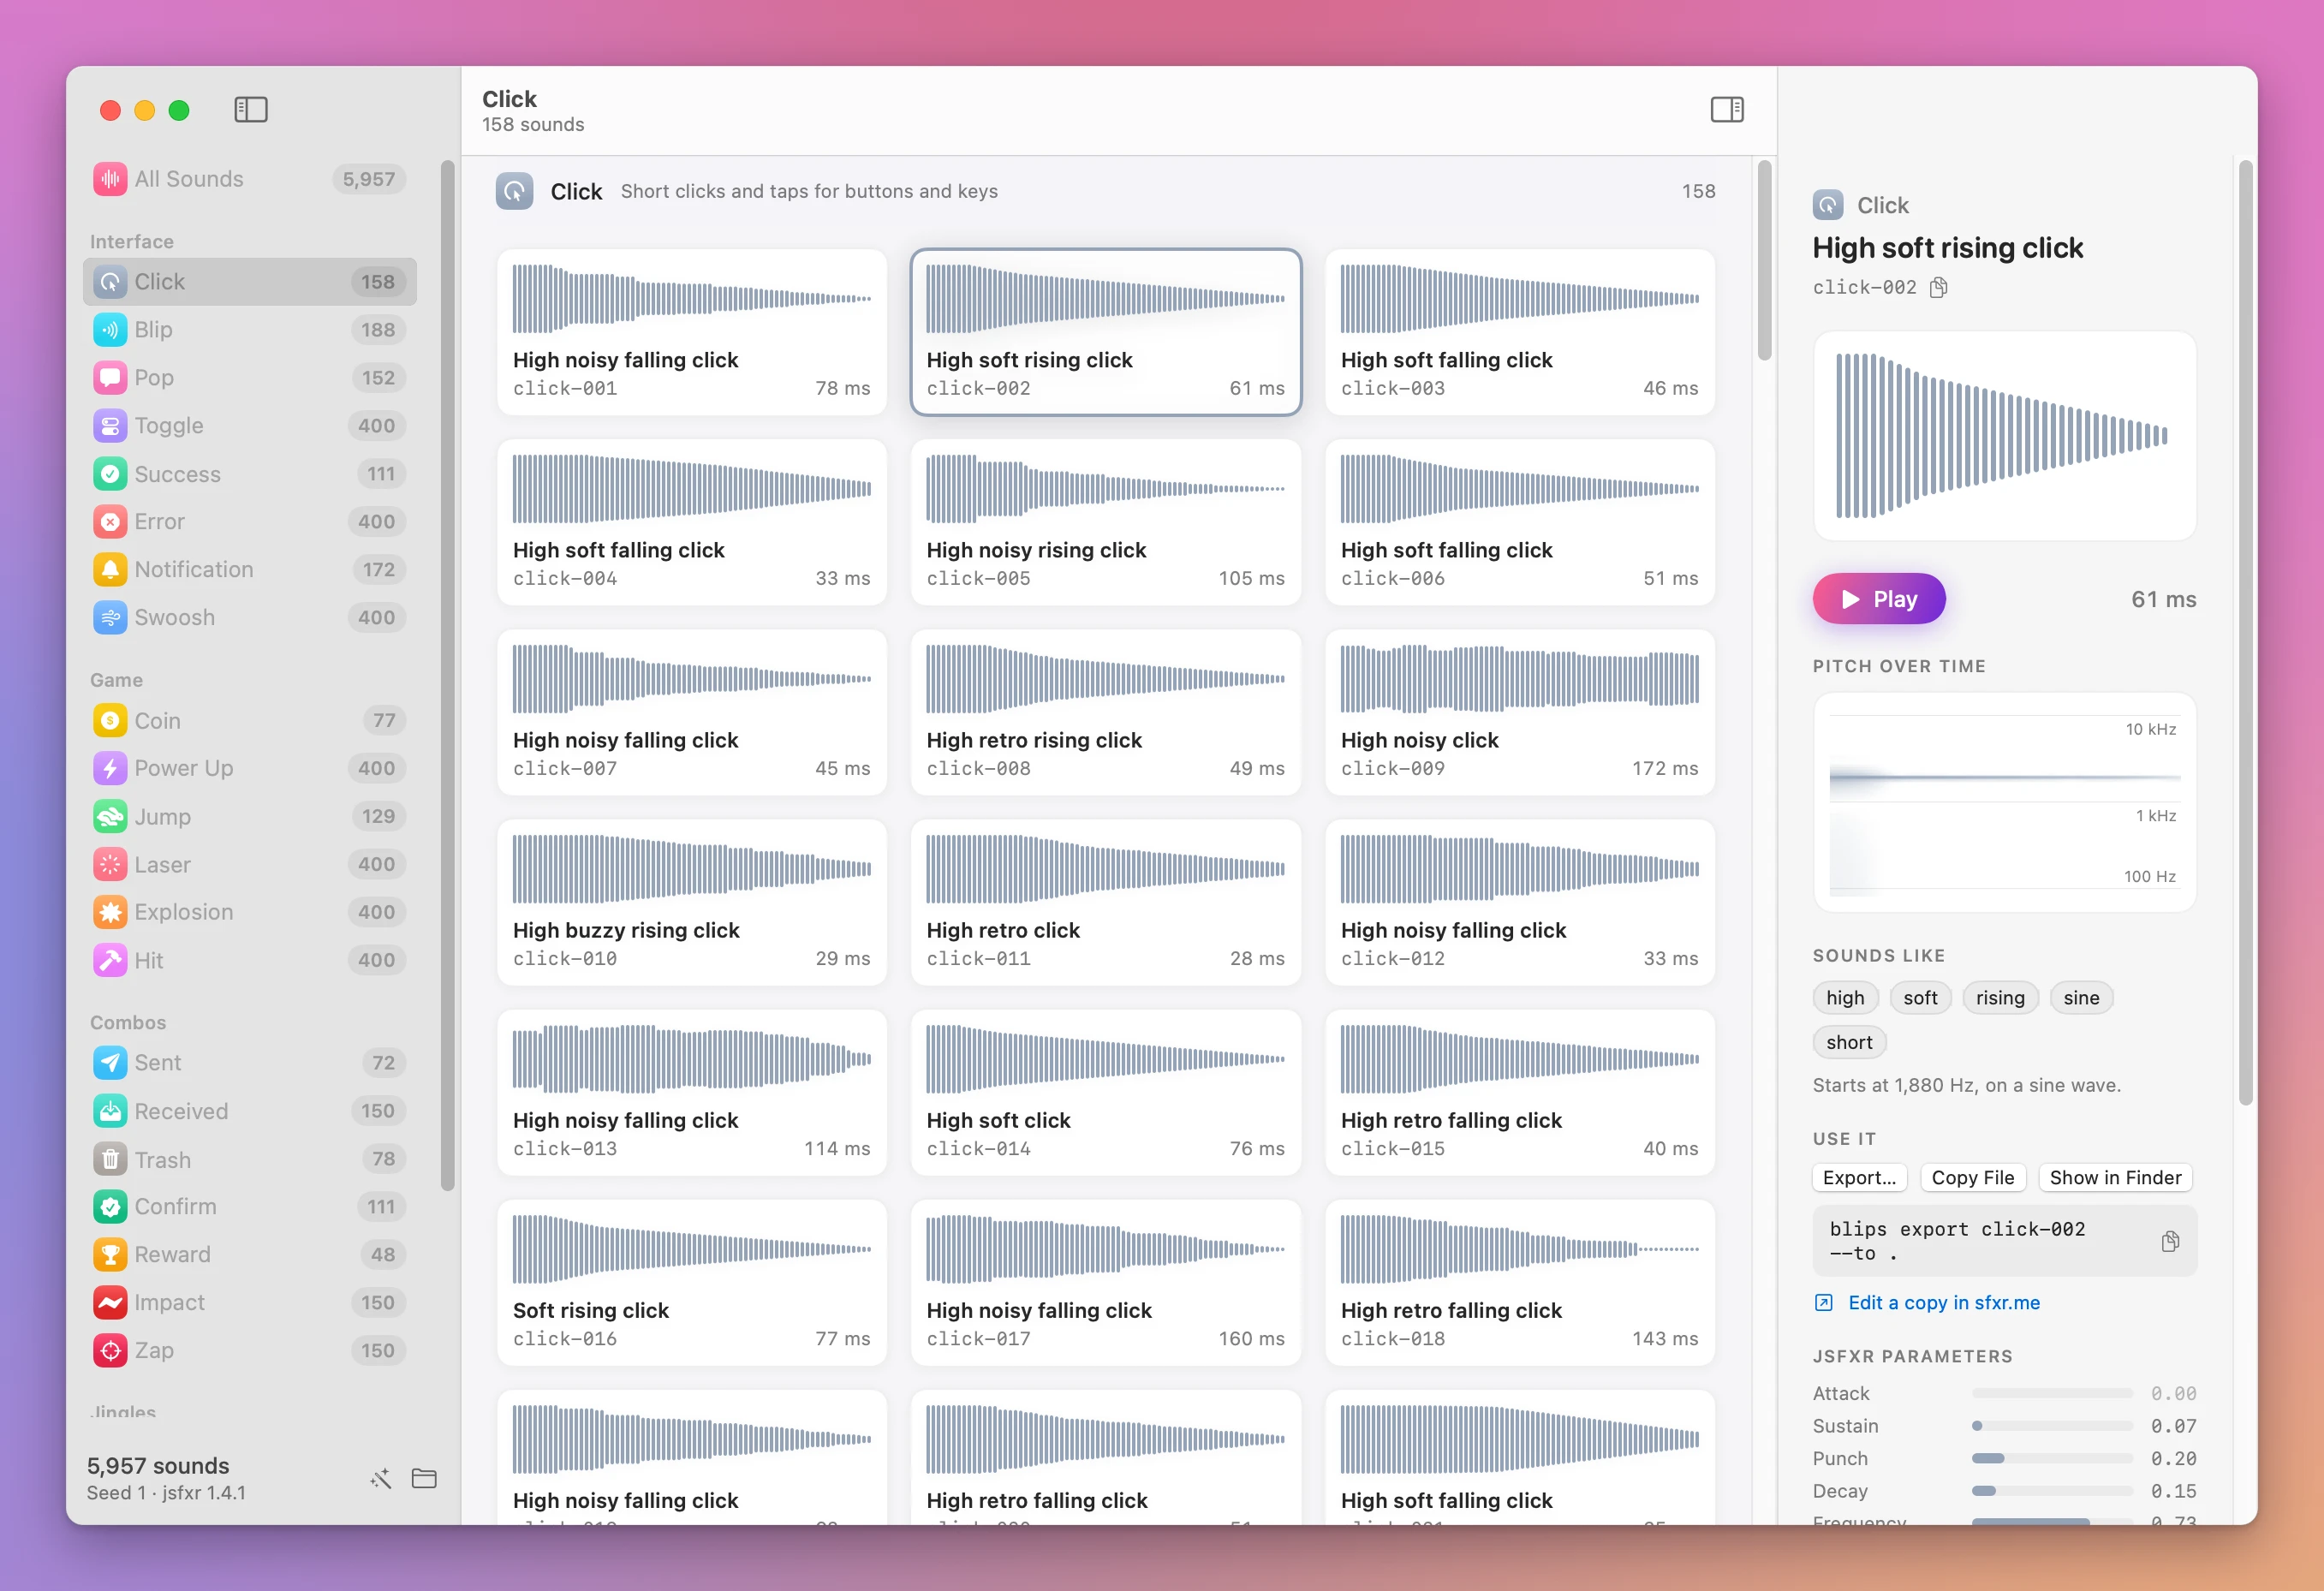
The sidebar groups sounds by purpose. Select Click, or whichever Interface category matches the control. Click a sound to hear it. The arrow keys move to the next one and play it, so you can walk a category without reaching for the mouse on every row. Space plays or stops the selection.
The inspector shows the waveform, the pitch over time, the tags and the jsfxr parameters. Pitch is what separates these sounds when the waveform looks similar. A combo would show its two parts. Interface sounds aren’t combos. Jingles show notes. You don’t need either for a click.
There is no search field in the window. You browse the sidebar and use the arrows. The terminal can still search. The changelog names blips list --search, and blips help prints that flag’s arguments. Don’t invent the rest of the line.
Example 1: a click, from the sidebar
This is the GUI path. No export yet. You’re only deciding which click is short enough to put on a button.
Sidebar: Click
Down arrow to play the next sound
Up arrow to play the previous one
Space to play or stop the selection
Here’s Click with click-002 selected, a 61 ms soft rising click. The inspector on the right has its waveform, its pitch and the tags it’s filed under:
Do the same pass on Toggle and Error before you leave the window. A control that uses one sound for every state trains people to ignore it. My advice is to keep a sound for success and for error, and to leave ordinary navigation quiet. That’s a design choice, not a setting in the app.
A second walk down Click plays the same files. The library doesn’t reshuffle while you audition. If the row you liked is gone, you’re in another category, or the library was generated again from a different seed. The seed is example 3.
Export the WAV into the project
The sound has to be a file in the app target, or Swift has nothing to load. Dragging from Chip Pops copies the WAV. Since version 1.3.1, a dragged or copied file keeps the sound’s ID as its name, like fanfare-016.wav. Before that, every file came out as “Waveform audio.wav”, and two exports were indistinguishable in Finder.
Drag the sound into the Xcode project, or into Finder if you want to hear it outside Xcode. ⌘C copies the file. Sound → Copy File is the same idea from the menu. Sound → Export…, or ⌘E, saves it under a name you type. The docs’ example name is saved.wav.
Drag into Xcode or Finder
Command-C copies the file
Sound → Export… or Command-E
The changelog’s example of that ID filename is:
fanfare-016.wavRight-click a sound for its ID or an export command. Right-click a sidebar category to export the whole category. Exporting the whole of Click is how you compare a few files in Finder. You still only ship the one you kept.
Sound → Show in Finder reveals the file Chip Pops already generated. Open in sfxr.me opens an external editor in the browser, for sounds with supported parameters. That’s the one step here that leaves the Mac. Audio stays local until you choose it.
If you drag the same sound again, the name is the ID again. Finder then has two files with the same name only if you drop them in the same folder. The docs don’t describe a special overwrite. Look at the folder before you replace a WAV the project already compiles.
Export a different sound with blips
The arrows are the way to choose. blips is the way to repeat the choice, or to let a script copy the file into Resources/Sounds. The HTML tutorial exports a soft success for a web button. Here the same commands put a WAV where an Xcode target can see it.
The docs’ list command filters by category and tag. success and soft are the values it prints. Use an ID your own list returns. An ID from someone else’s write-up can be a different sound if your library seed isn’t the default.
Example 2: a success sound, through the CLI
Example 1 never left the Click category, and it never ran blips. This one uses the documented success filter, plays two candidates, and exports one file under the name the docs use.
blips list --category success --tag soft --jsonIf you’d rather click, the Success category in the window has the same sounds. The wave is in each name, like “Soft rising success”, and the inspector lists the tags under Sounds like. Under Use it you get Export…, Copy File and Show in Finder, plus the blips export line for the selected sound, ready to copy:
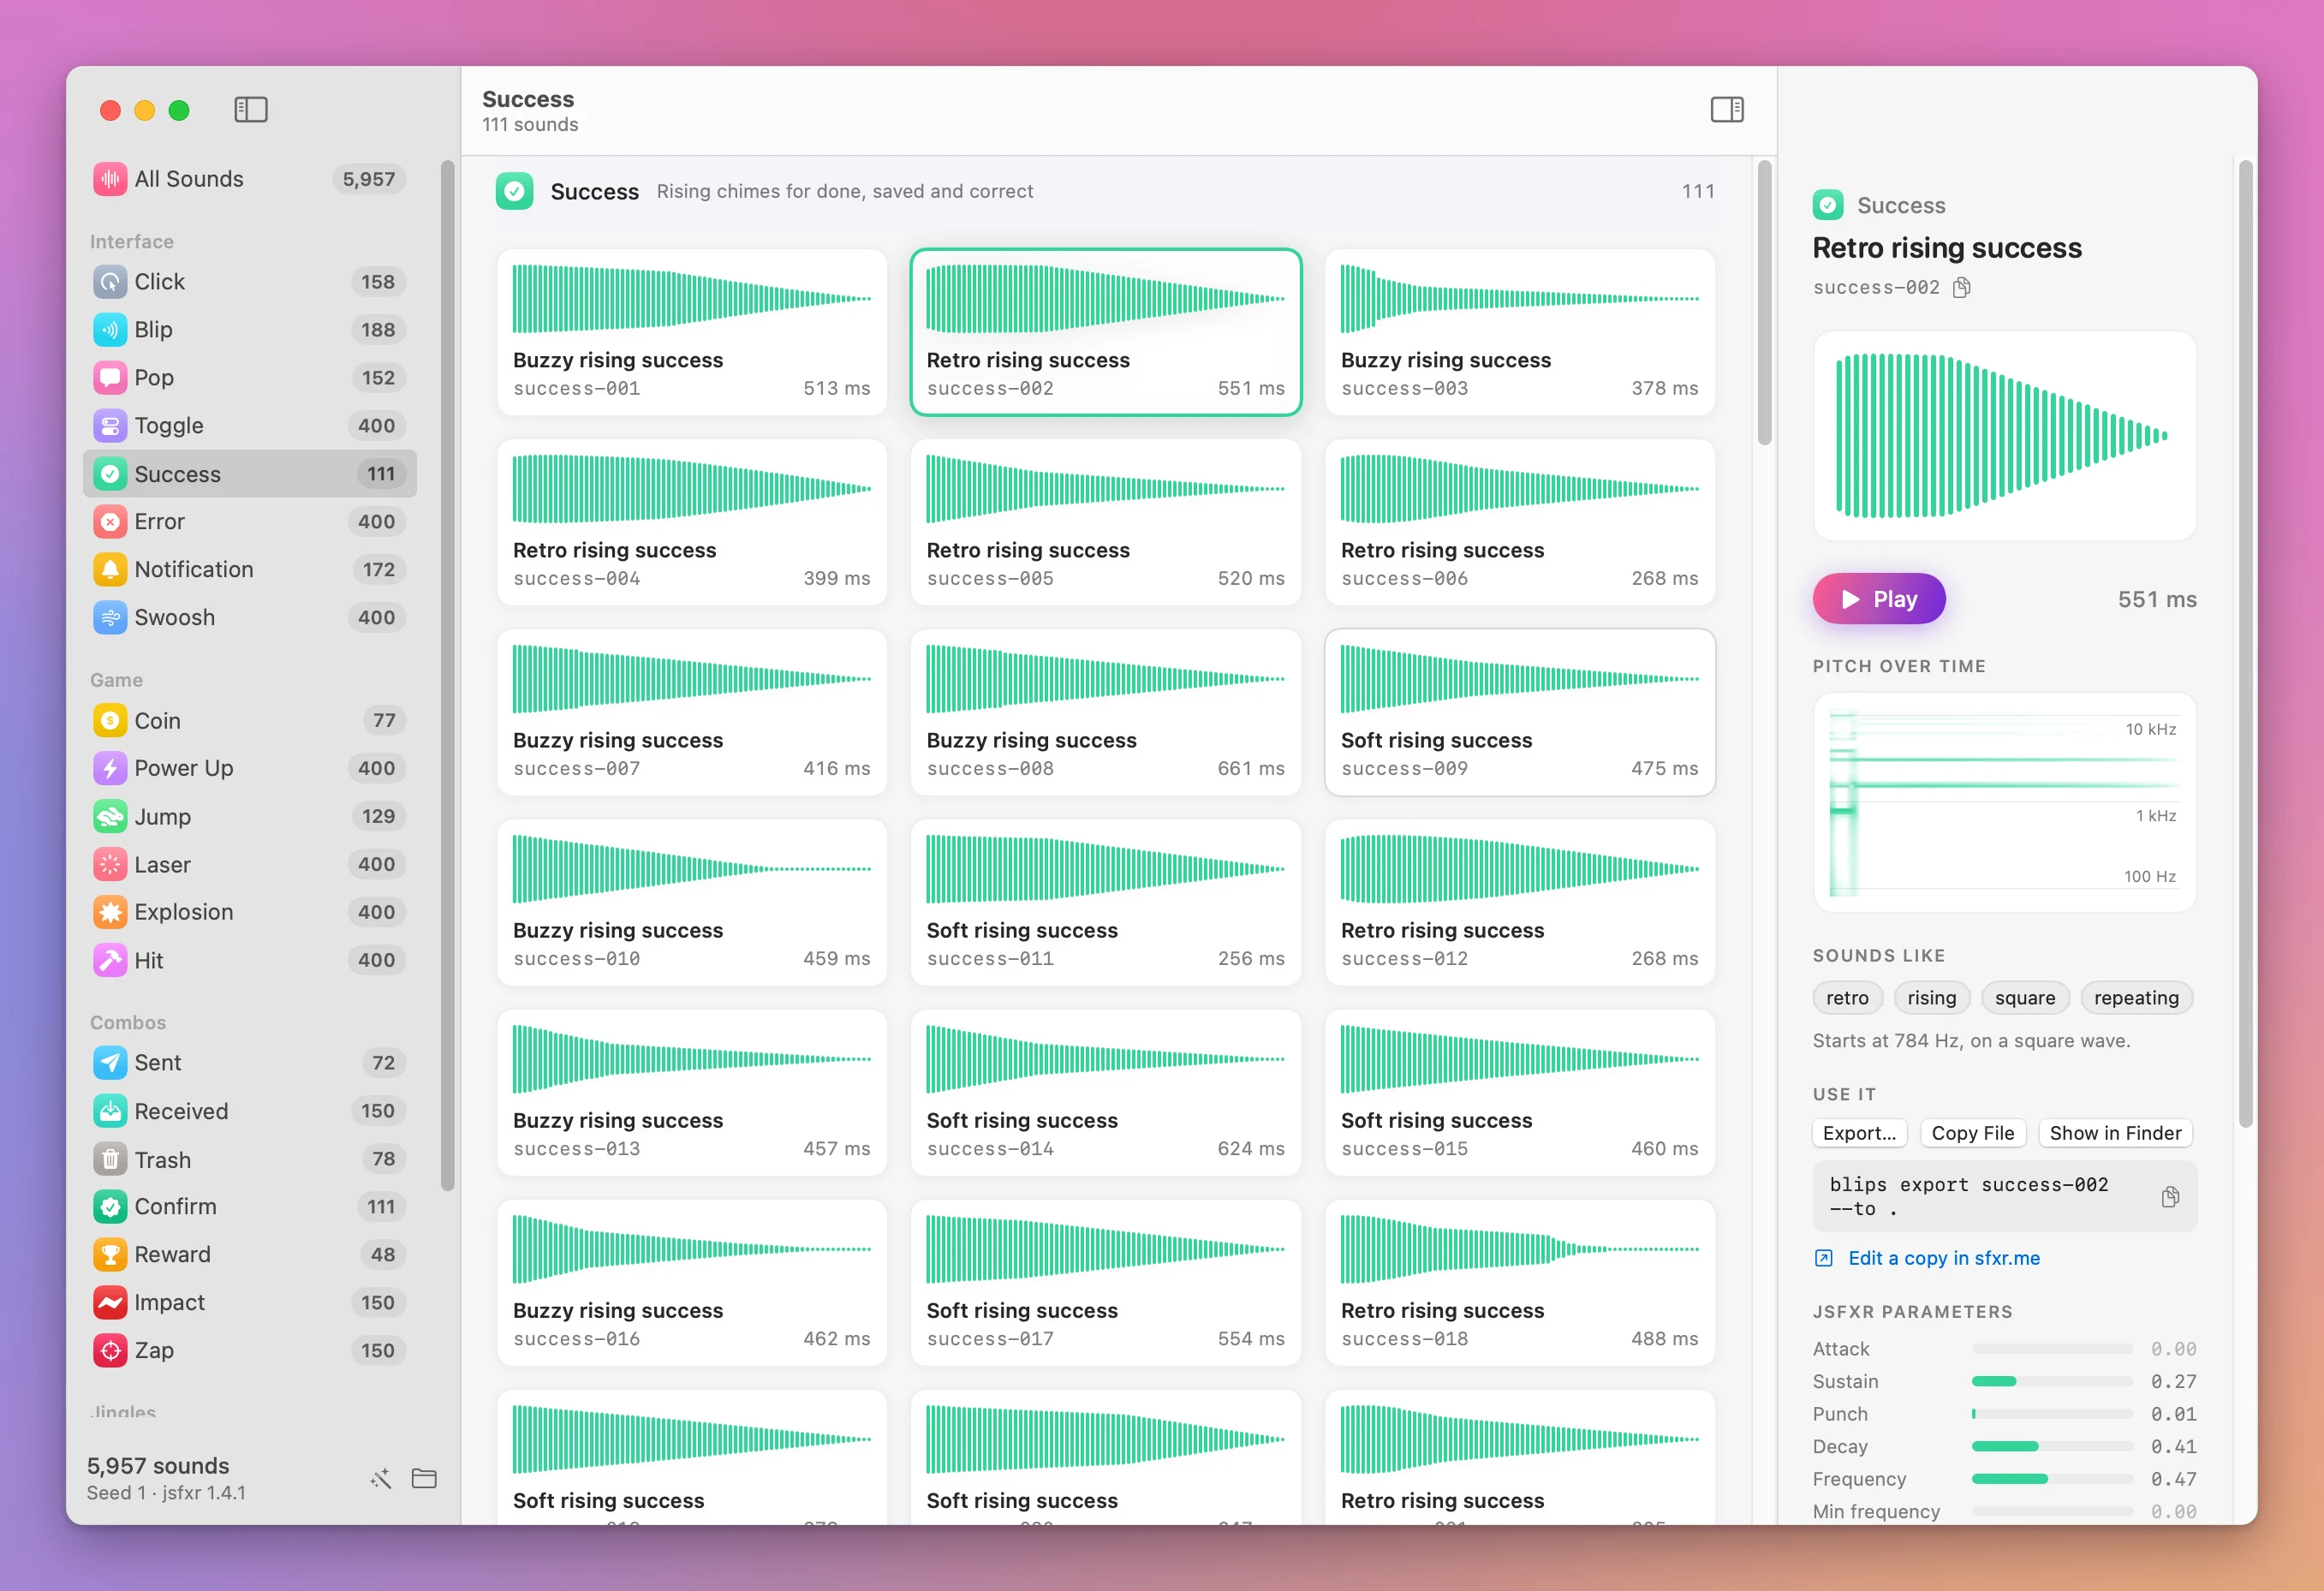
The docs don’t include a sample of that JSON. Read the IDs your command printed. The play command in the docs uses success-003 and success-005. With the default library, success-003 is the same sound on every Mac. If your list doesn’t contain those IDs, play IDs the list did return. blips play uses afplay, and it will play each file you name.
blips play success-003 success-005--name applies to one sound at a time. WAV is the default. --format m4a converts the export. Stick to WAV for AVAudioPlayer and NSSound. Both play WAV. The page says each sound is mastered to the same loudness and saved as 16-bit WAV.
blips export success-003 --to Resources/Sounds --name saved.wavblips show success-003 prints that sound’s details and parameters. Run it when you want a record of which ID became saved.wav, because the filename you chose no longer contains the ID.
blips show success-003Hear the exported file with the command the Mac already has. afplay plays it and waits until the sound finishes. The post on afplay is the place for rate and background playback. There isn’t a transcript. The sound is the output.
afplay Resources/Sounds/saved.wavA second export with the same --to and --name writes that path again. The docs don’t say whether the bytes are replaced or refused. Check the file’s modification time in Finder after the second run. --name still applies to one sound, so a second ID needs its own --name or it will target saved.wav too.
Play the file from Swift
Exporting the WAV doesn’t play it. The app has to load the file and keep the player alive until the sound finishes. A local variable that dies when the function returns stops the audio immediately. That’s the usual bug, and it looks like the file is silent.
On a Mac app, NSSound is the small option. contentsOf:byReference: loads the file at that URL. byReference: true reads from the URL instead of copying the bytes into the object. Keep the NSSound in a property. play() starts it. This is AppKit, so it’s the Mac target, not the iPhone target.
import AppKit

final class ClickPlayer {
  private var sound: NSSound?

  func playSaved() {
    let url = Bundle.main.url(forResource: "saved", withExtension: "wav")
    sound = url.flatMap { NSSound(contentsOf: $0, byReference: true) }
    sound?.play()
  }
}
Bundle.main.url returns nil when the WAV isn’t in the app target. Dragging the file into the project navigator isn’t always the same as adding it to the target. Select the file and check the target membership. A nil URL hits the flatMap and play() never runs. That’s a missing resource, not a broken WAV.
iOS doesn’t have NSSound. AVAudioPlayer does, and it also works on Mac if you’d rather have one player. Create it with the file URL, call prepareToPlay(), then play(). Store the player on the object that owns the screen. The initializer throws if the file isn’t a sound it can read.
For a click on iOS, set the audio session to ambient once, at launch. Ambient mixes with other audio and goes silent when the Ring/Silent switch is on. playback ignores that switch, which is the wrong category for a button. AVAudioSession is an iOS type. A Mac target doesn’t have it. The Mac’s output volume is the control, and NSSound follows that. The #if os(iOS) line keeps this file building on both.
import AVFoundation

final class ClickPlayer {
  private var player: AVAudioPlayer?

  func prepareSession() {
    #if os(iOS)
    let session = AVAudioSession.sharedInstance()
    try? session.setCategory(.ambient)
    try? session.setActive(true)
    #endif
  }

  func playSaved() {
    guard let url = Bundle.main.url(forResource: "saved", withExtension: "wav") else {
      return
    }
    player = try? AVAudioPlayer(contentsOf: url)
    player?.prepareToPlay()
    player?.play()
  }
}
Call playSaved() from the button, the toggle, or the error path. Don’t call it from every onAppear. A sound on every appearance is how a quiet click becomes noise. The file is already the same loudness as the rest of the library, so the way to keep it quiet is to use it rarely, not to hunt for a volume flag the export doesn’t have.
Know when the ID stops meaning the same sound
A sound ID, such as success-003, names a sound inside a generated library. The seed is what makes generation repeatable. Keep both the ID and the seed when the project has to rebuild the same click later. The seed is shown in the sidebar.
Example 3: success-003 after New Sounds
Library → Generate… offers New Sounds for a random seed, or Seed… for a specific one. A different seed changes the sounds behind the IDs. success-003 on the new library is not the file you exported last week. The Swift code will still load saved.wav from the bundle. That file doesn’t change until you export again. The surprise is the next person who exports success-003 and expects your click.
Export the sounds the project uses before you replace the library, and write down the seed. Library → Reload is the step when the window is empty after a generate, not the step that puts an old seed back.
If the app and blips disagree about which sound an ID is, they aren’t on the same library. blips help describes the seed options. Match the seed before you trust the ID in a script.
A second Generate the Library on a new seed is the destructive one. The WAV you already copied into Xcode is untouched. The IDs in Chip Pops are not. ⌘Z doesn’t restore a replaced library. The seed you wrote down, plus Seed…, is the way back, and only if you still have that seed.
If something looks wrong
If the sidebar has no sounds, the first generate didn’t finish. Click Generate the Library, then Library → Reload if the window is still empty.
If every dragged file is named “Waveform audio.wav”, the app is older than 1.3.1. Update from your Polar receipt, quit, replace Chip Pops.app, and install the command-line tool again from the menu. The library and the IDs stay. The copied filename is what changed.
If blips and the window play different audio for success-003, check the seed each one is using. blips help is the list of seed options. Export from the one that matches the file you already shipped.
If blips play is silent, the ID isn’t in this library, or afplay can’t read the file. Run blips list with the category you think you’re in, and play an ID from that output. The docs’ success-003 assumes the default seed.
If afplay Resources/Sounds/saved.wav can’t open the file, the export didn’t use that --to path, or you ran it from another directory. blips export writes where you tell it. afplay only plays the path you pass.
If the Swift button does nothing, Bundle.main.url(forResource:withExtension:) is returning nil, or the player was released. Check target membership for saved.wav. Keep the AVAudioPlayer or NSSound in a property, not a local that ends with the function.
If the iPhone plays the click while the Ring/Silent switch is on, the session category isn’t ambient. playback ignores the switch. Set ambient before you play UI sounds. A Mac won’t show this. It has no silent switch.
If Open in sfxr.me fails, that step needs the browser and a sound with supported parameters. The WAV you already exported doesn’t depend on it. Playback stays local.
Get Chip Pops
Find and export about 6,000 8-bit sound effects for apps and games. Includes a Mac app, the blips command and full MIT source code.
See Chip Pops → · Read the docs · $20. See the app page for tax details, with full source code.
Want me to talk about your product? You can sponsor this site.