How to use GitHub Copilot CLI: a complete tutorial
By Flavio
Tagged: AI
Learn GitHub Copilot CLI with a real coding task: install, sign in, control permissions, review changes, run tests, manage context, and add skills, Ponytail and MCP tools.
GitHub Copilot CLI is a coding agent you run from your terminal. It can read a project, explain its code, change files, and run commands while you supervise the work.
In this tutorial we’ll install it, give it a small change from this site’s codebase, inspect the diff, and run the tests. Then we’ll look at the features that make it useful beyond the first conversation: project instructions, permissions, sessions, skills, plugins, and MCP tools.
The hands-on example uses Copilot CLI 1.0.112 and a Copilot Free account. The screenshots show real CLI sessions. The example works in a small local folder, so you can follow it without giving an agent your whole project.
If you’re new to the terminal, my free terminal course covers commands, directories, and paths. You don’t need to master shell scripting to use Copilot.
What Copilot CLI does
You start Copilot in a project directory and describe a result. It chooses tools to gather context, proposes or makes edits, runs checks when permitted, and reads their output before continuing.
For example, you can ask it:
Explain how postSlugFromFilename works. Point to its tests.
Do not edit files.
Or give it a change:
Support .mdx filenames as well as .md. Preserve the existing
normalization behavior and add regression coverage.
The second request needs more than a reply. Copilot has to find the implementation, understand its behavior, edit it, and check the result.
The important part is the loop between those actions:
Your job is to define the outcome and decide whether the result meets it. Copilot’s tool log helps you see what happened between the request and its final answer.
This guide uses the standalone copilot executable. If an older tutorial tells you to run gh copilot suggest, its commands belong to an older GitHub CLI extension.
Install GitHub Copilot CLI
On macOS, install it with Homebrew:
brew install --cask copilot-cliWith Node.js and npm, install the official package:
npm install -g @github/copilotPick one installation method. Installing through multiple package managers makes it harder to tell which executable your shell runs.
For the npm route, GitHub requires Node.js 22 or later. The exercise below also uses a recent Node.js version to execute TypeScript tests directly. I ran it on Node.js 26.12.1.
Check the installation:
copilot --versionThe output from the tutorial session was:
GitHub Copilot CLI 1.0.112.
Run 'copilot update' to check for updates.
Windows users can follow the WinGet or npm route in GitHub’s installation instructions. Those instructions also cover the standalone installer and updates.
If copilot isn’t found after installation, open a new terminal and try again. On macOS or Linux, this command shows which executable the shell finds:
command -v copilotSign in and check your access
Start the login flow:
copilot loginFollow the browser instructions and authorize the GitHub account you want to use. You can also start copilot and run /login inside it.
On a remote machine, use the device-code flow:
copilot login --device-codeYou complete authorization in a browser while the CLI waits in the terminal.
Copilot CLI is available with all Copilot plans. If an organization supplies your access, its administrators must enable the CLI policy. A successful GitHub login and permission to use Copilot are separate checks.
For authentication problems, start with GitHub’s authentication guide. Avoid putting a token directly in a shell command where it can enter your history.
Prepare a small project to learn on
We’ll use a helper from this site’s publication code. It turns a Markdown filename into the slug used in the URL.
The original function strips .md, decomposes accented characters, and removes the remaining non-ASCII characters:
export function postSlugFromFilename(filename: string): string {
  return filename
    .replace(/\.md$/, '')
    .normalize('NFKD')
    .replace(/[^\x00-\x7F]/g, '')
}
The task is to support .mdx too, while preserving those existing rules.
Download the starting helper and its test file, and put both in a directory named copilot-cli-lab. These are the original files, before Copilot’s edit.
You can also download them from your terminal:
mkdir copilot-cli-lab
cd copilot-cli-lab
curl -fLO https://flaviocopes.com/code/copilot-cli/post-publication.ts
curl -fLO https://flaviocopes.com/code/copilot-cli/post-publication.test.ts
The helper includes publication-date functions as well. Keeping their tests lets us see whether the filename change breaks neighboring behavior.
Run the baseline:
node --test post-publication.test.tsThe baseline run passed:
ℹ tests 7
ℹ suites 0
ℹ pass 7
ℹ fail 0
If you get a TypeScript extension error, check node --version and use a current Node.js release. My Node.js course explains the runtime and its built-in tools.
Create a Git checkpoint before asking for edits:
git init
git add post-publication.ts post-publication.test.ts
git commit -m "Start with the publication helper and tests"
Git needs your name and email configured for the commit. If that part is new, the free Git course walks through setup and diffs.
Start a session and understand folder trust
From the lab directory, run:
copilotCopilot asks whether you trust the folder. Read the path before accepting. This is the directory whose files and configuration you’re bringing into the session.
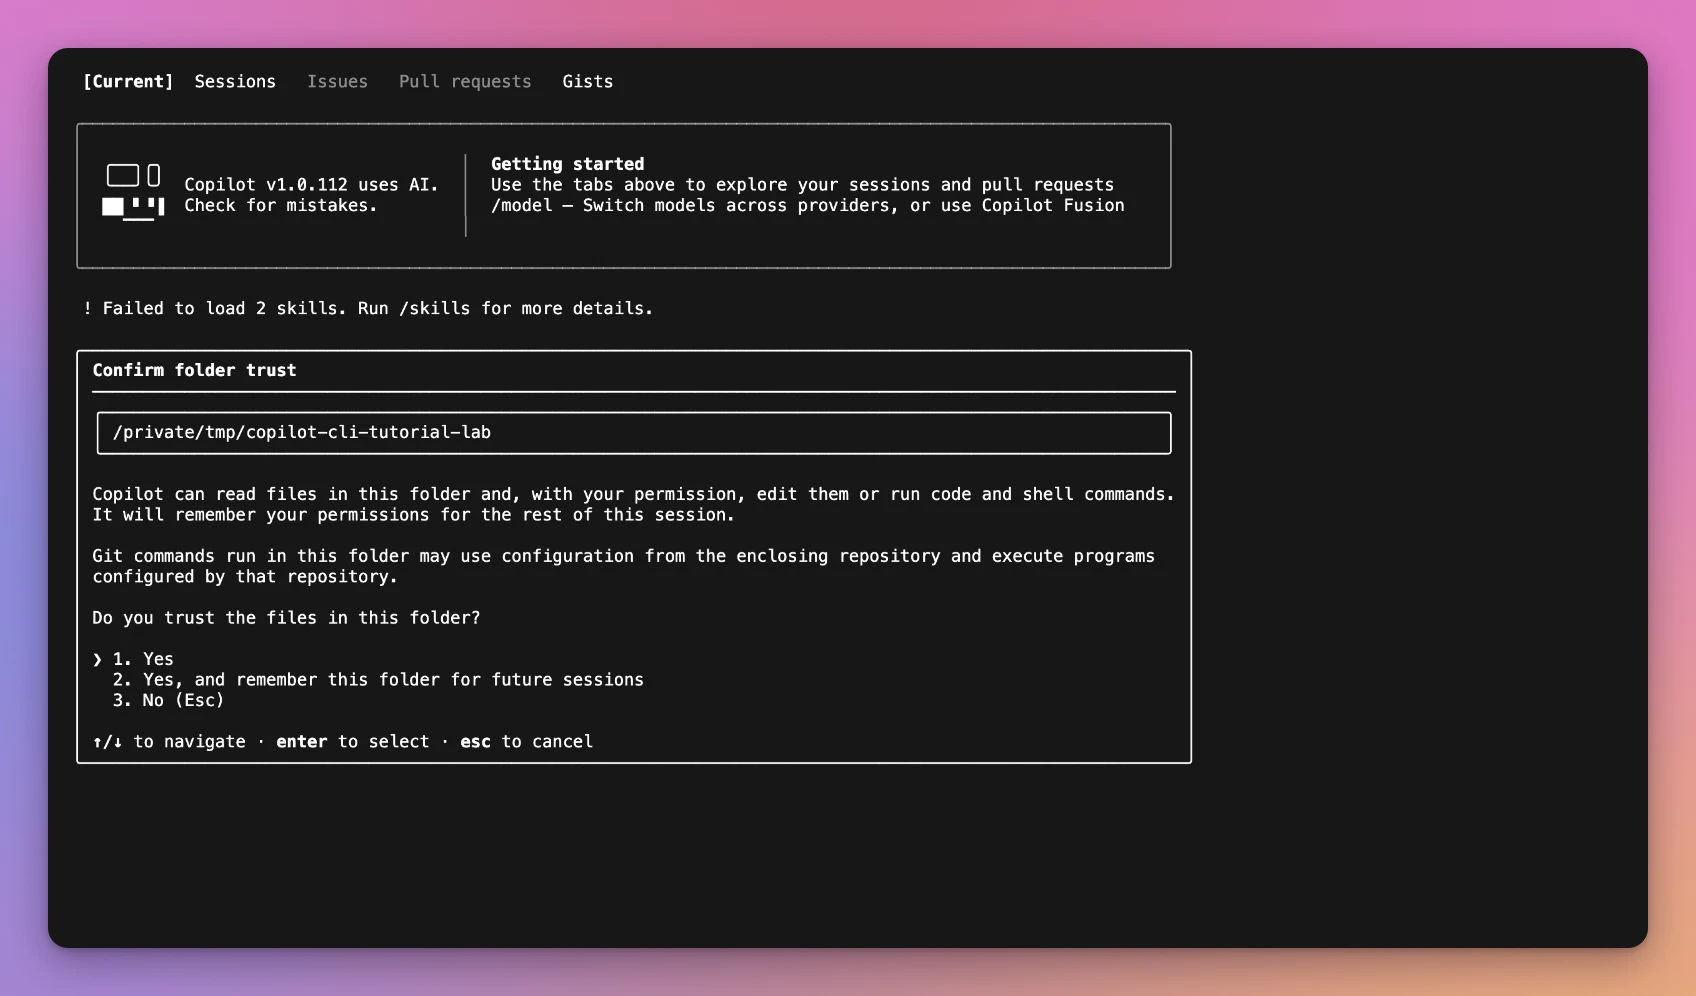
Folder trust and action permissions answer different questions. Trust lets Copilot work with the project context. Permissions govern actions such as editing a file or running a command.
Choose the one-session trust option while learning. There is also an option to remember the folder for future sessions.
Start with an inspection request:
Read post-publication.ts and post-publication.test.ts.
Explain what postSlugFromFilename does and which tests cover it.
Do not edit files or run shell commands.
Watch which files Copilot reads. If it starts exploring unrelated directories, stop it and narrow the request.
You can mention a file with @ in the composer. Type @, choose the file, and include the question beside it. This helps when several files have similar names.
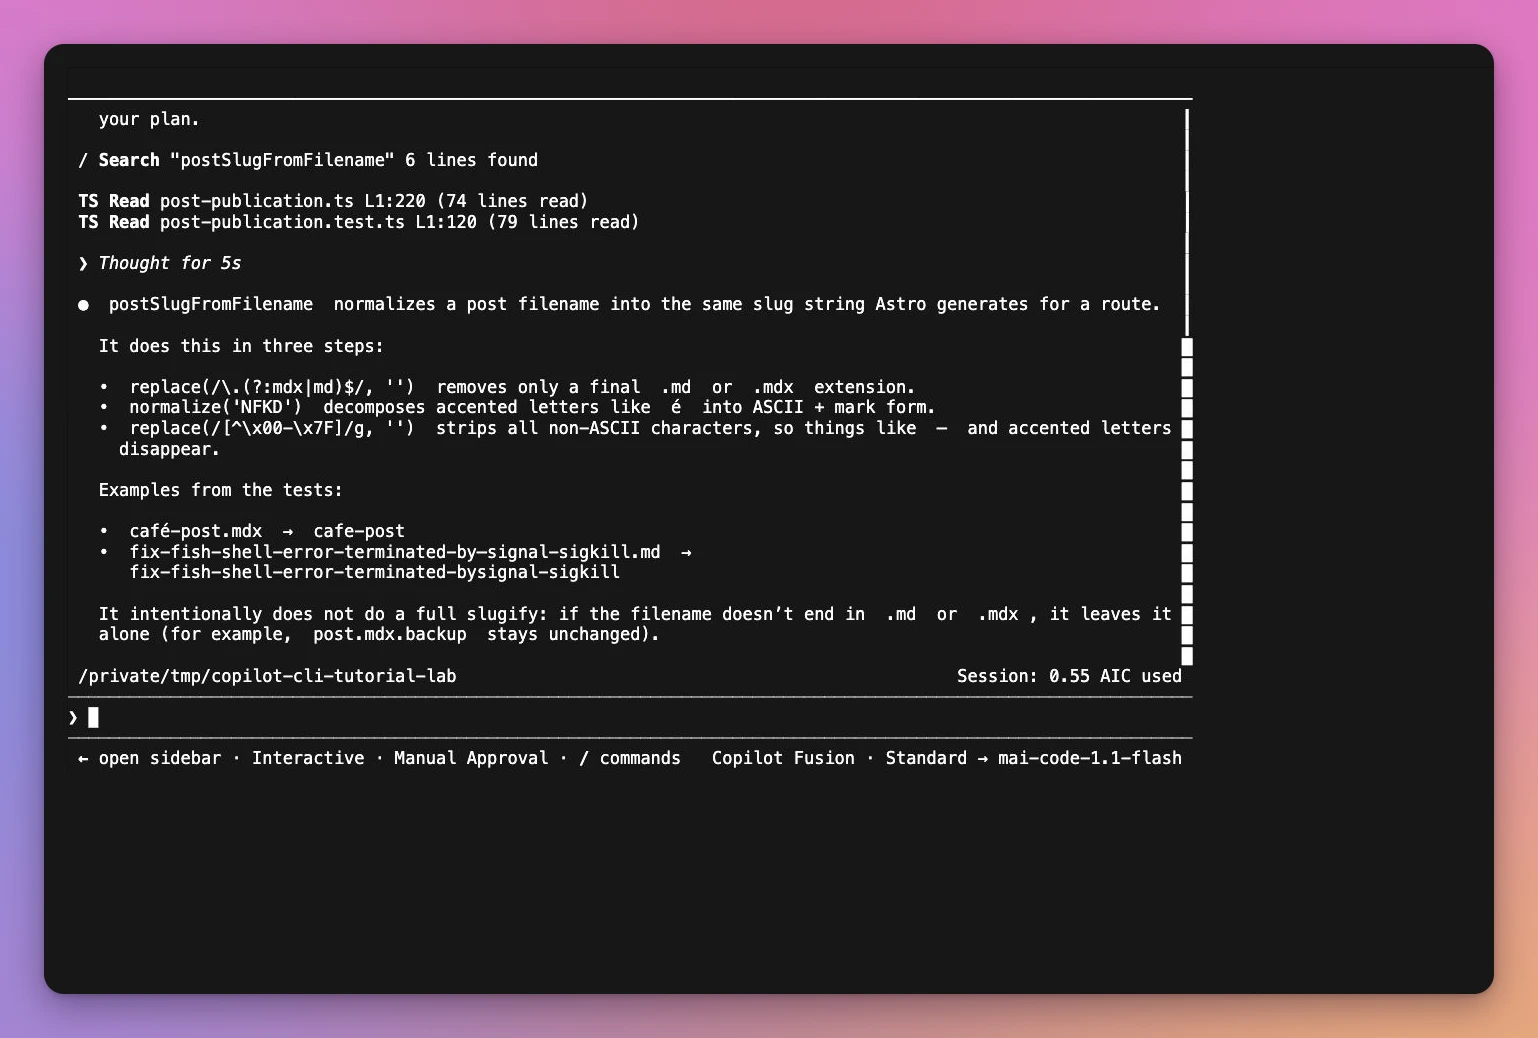
The following screenshot shows Copilot explaining the helper after the MDX change. The tool rows show which implementation and tests it read:
Ask for a precise code change
Give Copilot the behavior, the boundaries, and the check to run:
Extend postSlugFromFilename in post-publication.ts to strip a
trailing .mdx extension as well as .md.

Preserve accent normalization and only strip the extension at
the end.

Add tests in post-publication.test.ts for ordinary Markdown,
MDX, accented MDX filenames, and a filename containing .mdx
in the middle.

Run node --test post-publication.test.ts.

Change only those two files. Do not commit.
This leaves the implementation to Copilot, while making the expected behavior reviewable.
The instruction about the end of the filename matters. A broad string replacement could turn post.mdx.backup into post.backup, which would change more than the extension rule.
For a larger change, ask for a plan first:
Before editing, identify the files involved and propose a plan.
Include the behavior to preserve and the checks you will run.
Wait for me to review the plan.
You can also start the CLI in plan mode:
copilot --planUse that when you want to discuss the approach before implementation. A tiny filename change is small enough to review directly.
Approve actions deliberately
Keep Manual Approval while you learn. When Copilot asks to run a command, read the command and its working directory.
For this exercise, a request to run node --test post-publication.test.ts is expected. A request to install a dependency, push a branch, or edit your shell configuration needs an explanation because none of those actions is part of the task.
Inspect the permission mode with:
/permissions showSelect manual approval with:
/permissions manualIf you’ve accumulated permissions during a session, clear the approvals with:
/reset-allowed-toolsThis clears session tool and exact-path approvals, turns off allow-all, and clears saved approvals for the current location. Use it when you want to revisit permissions you’ve already granted. GitHub’s tool permission guide explains allow rules, deny rules, and persisted settings.
You can enforce a restriction on Git pushes when launching a session:
copilot --deny-tool 'shell(git push)'That denies the matching Git push action. It still leaves you responsible for the other capabilities you approve.
Review the actual diff
Inside Copilot, /diff opens the changes in the current directory. You can also ask its review agent for another pass:
/reviewTreat its findings as review suggestions and verify them against the code.
After Copilot finishes, return to your shell and inspect the change:
git diff -- post-publication.ts post-publication.test.tsThis was the implementation diff:
-    .replace(/\.md$/, '')
+    .replace(/\.(?:mdx|md)$/, '')
Copilot kept the end-of-string anchor, the Unicode normalization, and the non-ASCII filtering.
It also added these assertions inside the existing filename test:
assert.equal(postSlugFromFilename('ordinary-post.mdx'), 'ordinary-post')
assert.equal(postSlugFromFilename('café-post.mdx'), 'cafe-post')
assert.equal(postSlugFromFilename('post.mdx.backup'), 'post.mdx.backup')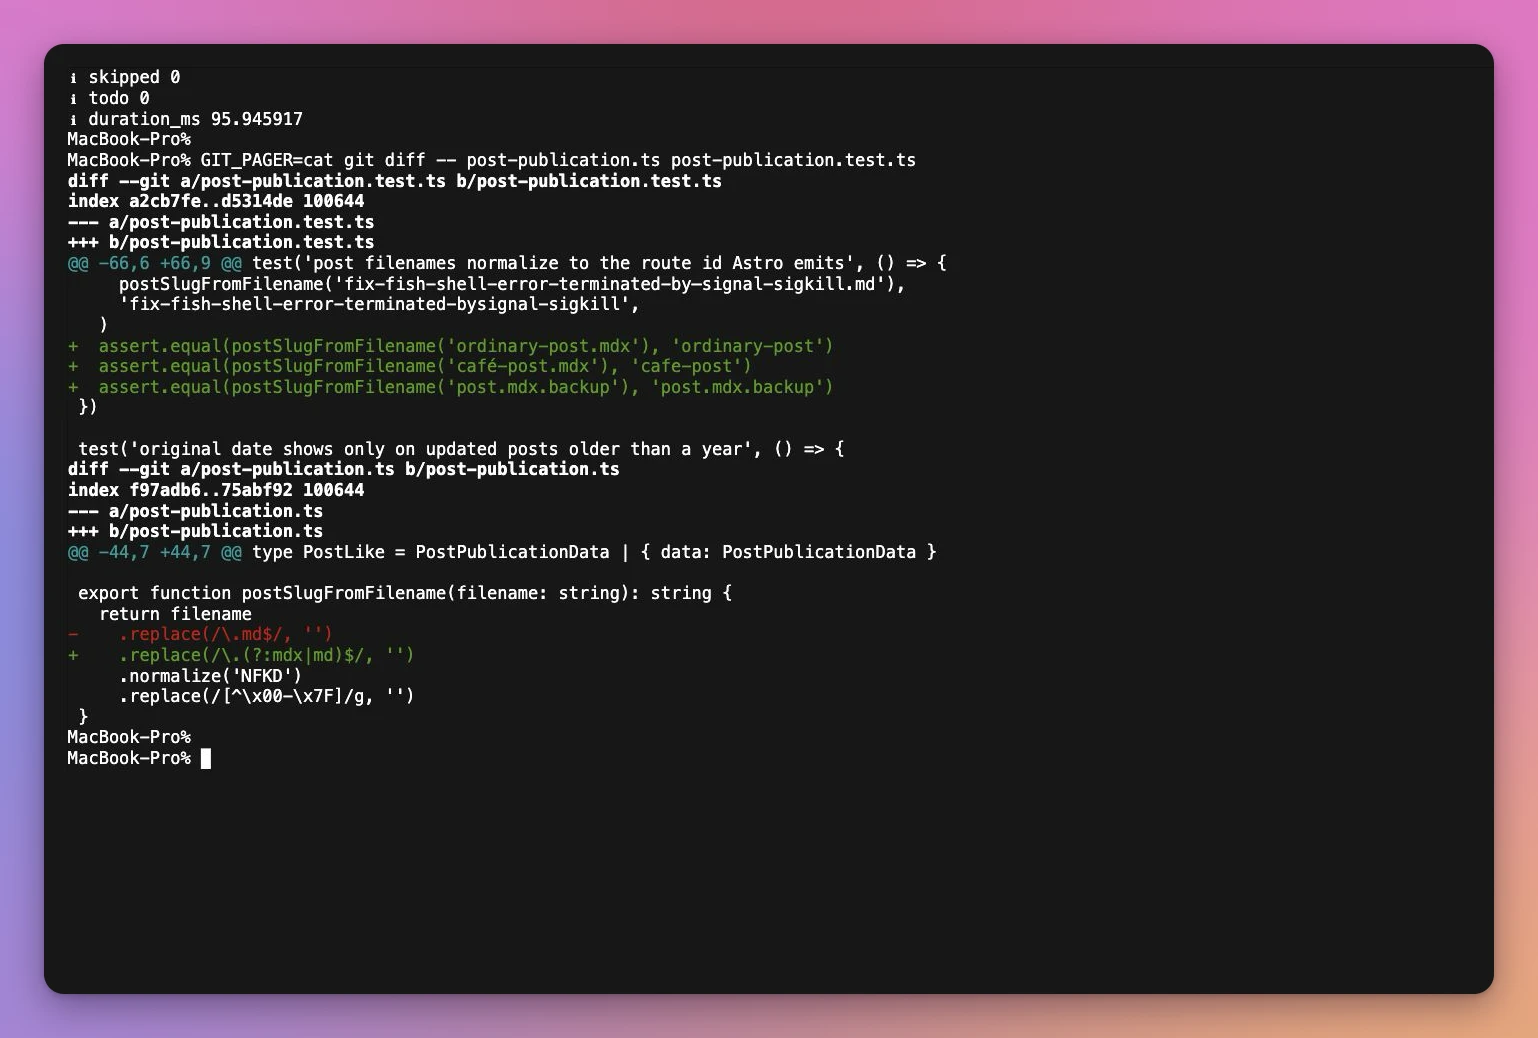
The existing Markdown assertion remained in place. Because Copilot added assertions to an existing test, the test runner still reports seven tests.
Here is the observed behavior before and after:
| Input | Original helper | After Copilot’s edit |
|---|---|---|
ordinary-post.md | ordinary-post | ordinary-post |
ordinary-post.mdx | ordinary-post.mdx | ordinary-post |
café-post.mdx | cafe-post.mdx | cafe-post |
post.mdx.backup | post.mdx.backup | post.mdx.backup |
Read both the implementation and the tests. A passing suite can miss the important case if the agent only tests the behavior it happened to implement.
Run the tests yourself
Run the same focused check from your shell:
node --test post-publication.test.tsThe edited files passed:
ℹ tests 7
ℹ suites 0
ℹ pass 7
ℹ fail 0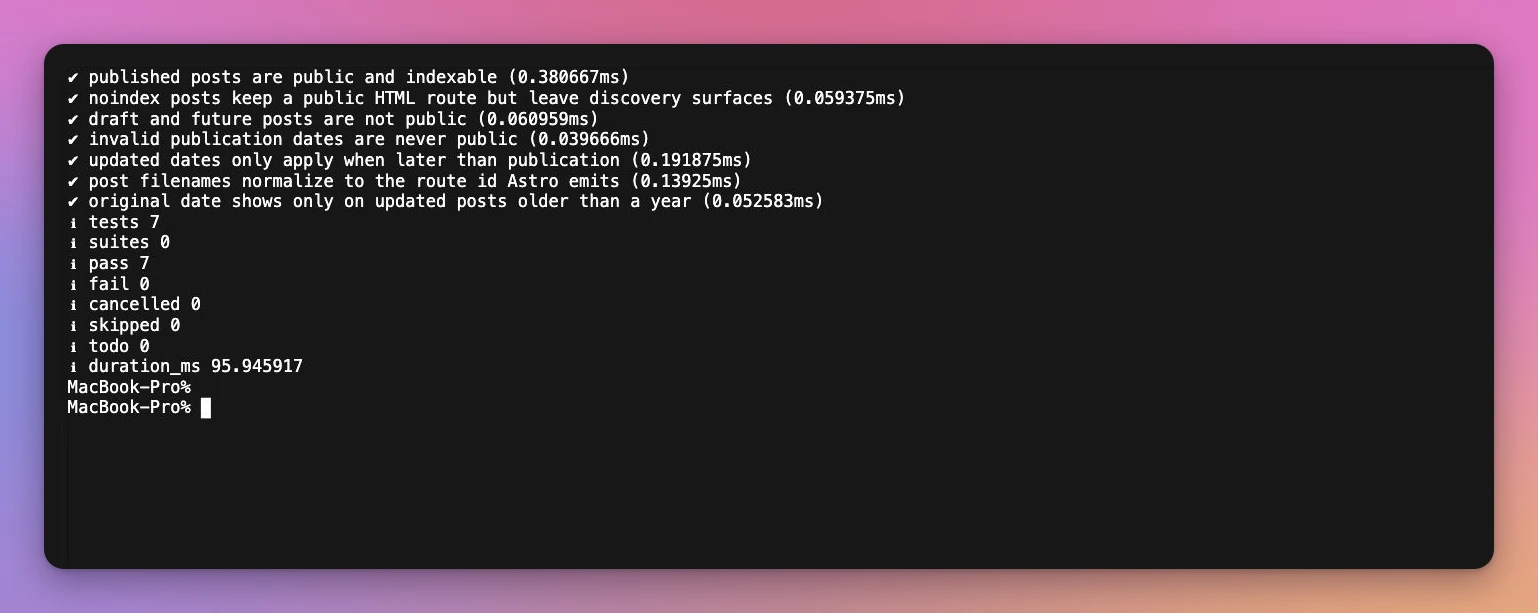
For a small function, also try the new input directly:
node --input-type=module -e "import { postSlugFromFilename } from './post-publication.ts'; console.log(postSlugFromFilename('café-post.mdx'))"The output is:
cafe-postThen check what changed:
git status --shortOnly the implementation and its test file should be modified in this exercise.
Commit when you’ve reviewed the result:
git add post-publication.ts post-publication.test.ts
git commit -m "Support MDX post filenames"
In a larger project, run its required checks too. A focused test gives quick feedback while editing; the project’s checks cover the rest of the integration.
When Copilot’s explanation is wrong
During the tutorial run, I also asked Copilot to explain this site’s check-post-visuals.mjs script.
It said:
It ignores draft posts and also ignores posts older than a cutoff dateThe relevant condition is:
if (data.draft !== true && new Date(data.date) < new Date(visualCoverageFrom)) return []That skips an old post only when it isn’t a draft. Drafts remain included.
Copilot correctly identified that missing diagrams produce warnings, but it misread this condition.
When an explanation sounds surprising, ask it to quote the relevant condition and walk through concrete inputs:
Your answer says drafts are ignored. Walk through the early-return
condition with draft: true. Does it actually return early?
Correct the explanation without editing the script.
You can do the same thing when reviewing a proposed fix: ask which input fails before the change and passes afterward. Then run that input.
Use Copilot from scripts with prompt mode
Interactive sessions are convenient when you want to discuss a change and approve actions as they happen.
Prompt mode takes one request from your shell:
copilot -p "Explain postSlugFromFilename without editing files"For an automated run, supply permissions explicitly. There is no person at the prompt to approve an unexpected tool request.
This command allows file reads, denies editing and shell execution, and asks for an explanation:
copilot -p "Explain post-publication.ts without editing files or running commands" \
  --allow-tool read \
  --deny-tool write \
  --deny-tool shell
That is the permission pattern used for the first read-only request in this tutorial. My local run also disabled unrelated configured MCP servers.
For machine-readable output, the CLI has a JSON output mode:
copilot -p "Explain postSlugFromFilename" \
  --allow-tool read \
  --deny-tool write \
  --deny-tool shell \
  --output-format=json
The output is a stream of JSON records. Parse it as JSON Lines rather than treating the whole response as one JSON object. The programmatic usage guide covers output handling and automation.
A permission error from the real run
In the edit session, my first shell rule was:
shell(node --test:*)Copilot edited the files but couldn’t run the test command. The tool log reported:
Permission denied because no interactive user response was available.The follow-up used this rule:
shell(node:*)With that rule, Copilot ran node --test post-publication.test.ts successfully.
You can reproduce the follow-up with:
copilot -p "Run node --test post-publication.test.ts and report the result. Do not edit or commit files." \
  --allow-tool 'shell(node:*)' \
  --allow-tool read \
  --deny-tool write
The rule approves Node commands, including arbitrary JavaScript executed through Node. Use it in the small lab, and choose permissions appropriate to the project when moving to real work.
The edit session also attempted git status --short. I had denied shell(git:*), so that command was blocked too. Denying all Git commands is broader than denying pushes; it also blocks useful inspection.
Read the tool log when a task stops halfway. The final answer should say which steps completed and which checks couldn’t run.
The initial edit run also returned The requested model is not supported after trying to delegate the test. I ran the focused check again in a separate prompt-mode request, and it passed. When a provider error interrupts a task, inspect the files already changed before retrying; the edit may have completed even though verification failed.
Choose a model and watch usage
Inside Copilot, open the model picker:
/modelAvailable choices depend on your account and organization settings. My Free account used Copilot Fusion, which selected a model automatically for each task. One prompt selected GPT-6 Luna; another selected MAI-Code-1.1-Flash.
The model isn’t the permission mode. Choosing a different model doesn’t authorize edits or switch the session into autonomous execution.
Use this command to inspect consumption:
/usage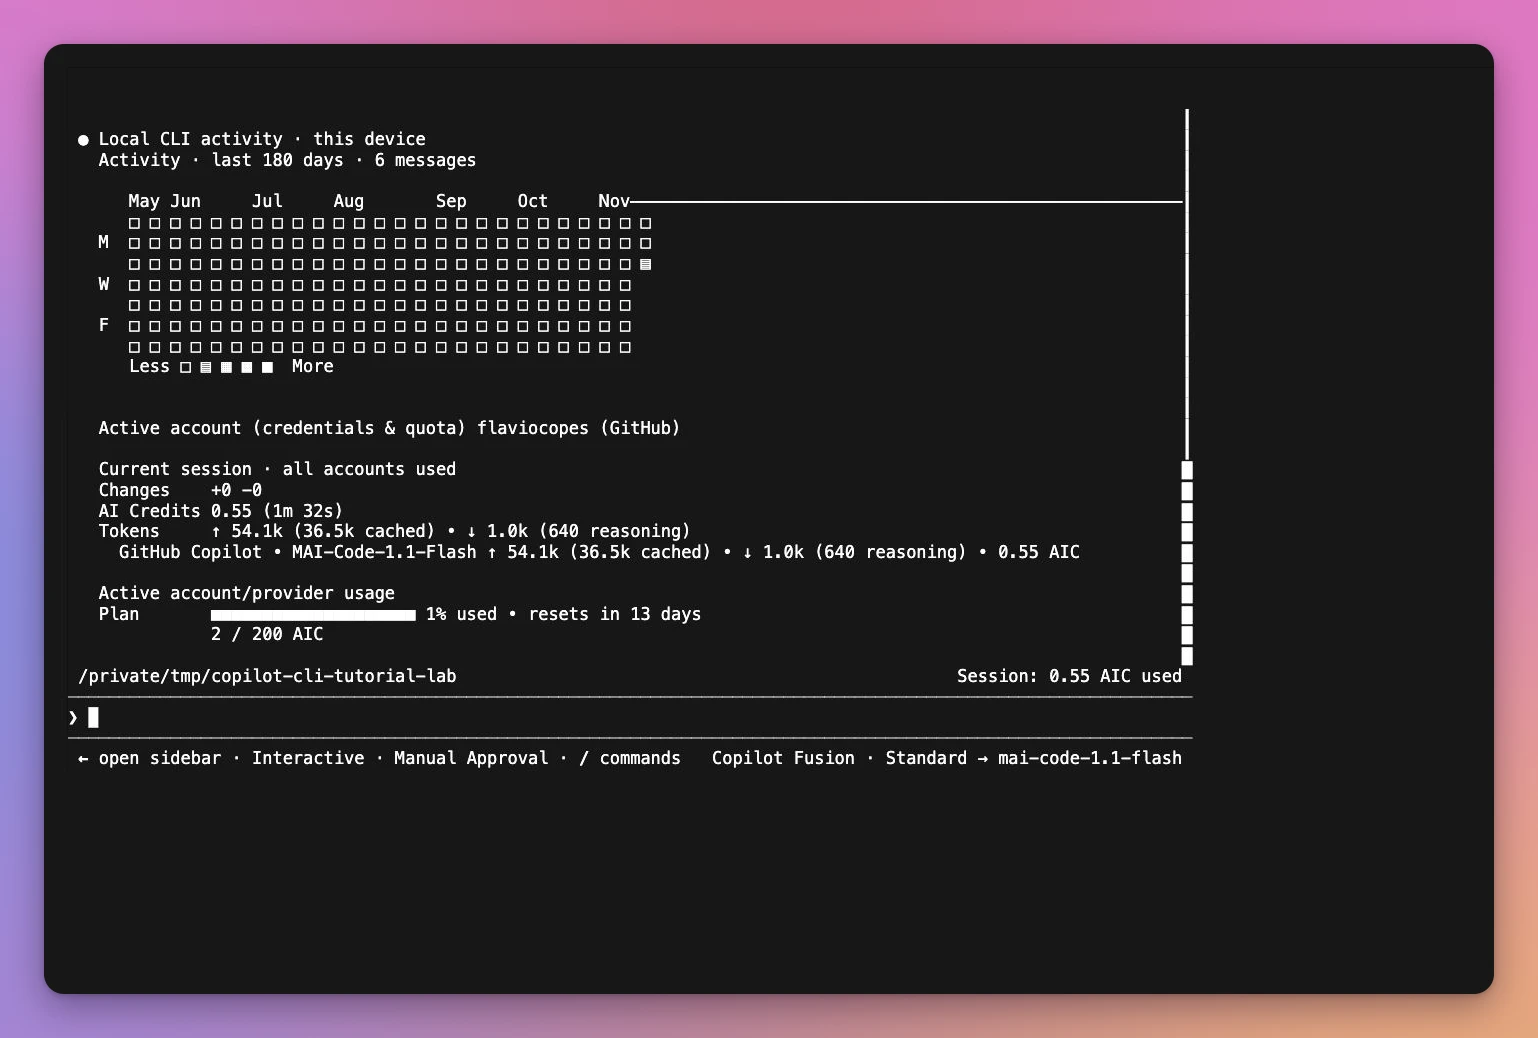
The pictured explanation session used 0.55 AI Credits, with 54.1k input tokens, including 36.5k cached, and about 1.0k output tokens. Those figures include the session context; they’re an observation from this run, rather than a price estimate for your next prompt.
Notice how much input context a small question can carry. Keeping a task focused helps with both comprehension and consumption.
Use /config model to choose a default for future sessions. GitHub’s model guide explains selection, and the plan page lists current allowances. Check the live allowance rather than budgeting from an old premium-request table.
Resume sessions and manage context
When you leave a session, Copilot prints a command that resumes it. You can also reopen the latest session:
copilot --continueOr open the session picker:
copilot --resumeA previous conversation is useful when you’re continuing the same task. For unrelated work, start a new session so old assumptions don’t keep following you.
Inside the CLI, these commands help:
| Command | Purpose |
|---|---|
/rename mdx-filenames | Give the session a recognizable name |
/context | Inspect context usage |
/compact | Summarize the conversation to reduce context use |
/new | Start a new conversation |
/usage | Inspect session consumption |
/help | Find commands available in your installed version |
Before compacting a long debugging session, make the current state explicit:
Summarize the failing input, the files changed, the last test result,
and the next check. Keep the exact commands and remaining uncertainty.
Keep lasting project rules in files. A conversation summary is useful for the current task; your test command and coding conventions belong with the project.
GitHub’s session history guide covers saved sessions and history.
Add project instructions
Create .github/copilot-instructions.md for instructions that apply across the repository.
For the lab, a useful file would be:
# Project instructions

Use the existing TypeScript helpers and Node's built-in test runner.

Run node --test post-publication.test.ts after changing publication logic.

Preserve filename normalization unless the task explicitly changes it.

Do not add dependencies for small string-processing changes.

Show the final diff and test result before committing.
These instructions explain how to work in this project. Keep them short enough that someone joining the project could use them too.
Copilot can also discover AGENTS.md, CLAUDE.md, and GEMINI.md. Inspect what it actually loaded with:
/instructionsAvoid writing conflicting rules into several instruction files. Applicable instructions can combine, and a contradiction makes the task harder to interpret.
For larger repositories, path-specific files under .github/instructions/ can describe rules for particular parts of the tree. GitHub’s custom instructions documentation explains their applyTo patterns.
My AGENTS.md guide goes deeper into writing project instructions that help an agent make useful decisions.
Add a skill for a repeated task
A skill packages instructions for a task you repeat. For this lab, that could be reviewing filename normalization changes.
Create .github/skills/filename-review/SKILL.md:
---
name: filename-review
description: Review filename normalization changes for extension handling and Unicode regressions.
---

Read the implementation and its tests.

Check plain Markdown, MDX, accented names, and extension-like text
in the middle of a filename.

Run the focused tests when permitted. Report the command and result.

Keep the review read-only. Explain any missing regression coverage.
Reload skills after adding it:
/skills reloadThen inspect the catalog:
/skills listInvoke the skill with your request:
/filename-review Review the current filename helper change.The description helps Copilot discover the skill when a task matches it. The body gives the steps to follow. GitHub’s skills guide lists supported locations and management commands.
A skill is useful when the process is worth repeating. The one-line MDX change works fine without it; use this pattern for checks you keep explaining across tasks.
Install Ponytail as a plugin
A plugin can bundle skills and other extensions. Ponytail is a practical example because it brings a reusable coding and review workflow.
From your shell, add its marketplace:
copilot plugin marketplace add DietrichGebert/ponytailThen install the plugin:
copilot plugin install ponytail@ponytailStart a new session and inspect installed plugins:
copilot plugin listPonytail’s Copilot commands use a namespace. To select its ultra mode:
/ponytail:ponytail ultraFor its review command:
/ponytail:ponytail-reviewFollow the upstream Copilot installation instructions for its current commands. My Ponytail guide explains its workflow in more detail.
This is an optional extension after you’ve learned the basic loop. The helper edit above used Copilot’s built-in capabilities.
GitHub’s plugin guide covers marketplace installation and management. Review what a plugin installs, particularly hooks and external tools, before adding it to a project you care about.
Connect external tools with MCP
MCP connects an agent to additional tools and data. Copilot includes GitHub integration, and you can configure other servers for services your work needs.
Inspect the configured servers inside a session:
/mcp listThen inspect one server by name:
/mcp show sentryFor example, GitHub documents this command for adding Sentry’s remote server:
copilot mcp add --transport http sentry https://mcp.sentry.dev/mcpAdding a server and authorizing its account are separate steps. Follow the service’s authentication flow and give it the access the task needs.
The default user configuration file is ~/.copilot/mcp-config.json. GitHub’s MCP guide also describes repository configuration and local servers.
Start with the built-in file and shell tools for a code change. Add MCP when the task needs something outside the repository, such as a specific error report. This keeps the available context relevant.
Troubleshoot common problems
These are the first checks I would make:
| Problem | What to check |
|---|---|
copilot isn’t found | Open a new shell, check command -v copilot, and confirm the package manager’s executable directory is on PATH |
| Login works but Copilot is unavailable | Confirm the selected account’s Copilot access and the organization’s CLI policy |
| A prompt-mode task edits files but doesn’t run tests | Read the tool denial, then rerun the check with an appropriate shell rule or approve it interactively |
| A model is missing | Inspect /model and the account’s available models |
| Startup reports a failed skill | Open /skills and inspect its diagnostic before relying on that skill |
| An MCP server times out | Use /mcp list, inspect the named server, and disable it for the run if the task doesn’t need it |
| Copilot misunderstood a function | Ask it to walk through the relevant condition using concrete inputs, then verify those inputs yourself |
| A task expands into unrelated files | Interrupt it, inspect the diff, and restate the allowed files and desired behavior |
The real session reported two skill-loading failures from existing local skills. One description was too long; another file had invalid YAML frontmatter. The CLI could still complete the helper task, but those skills weren’t available as intended.
An unrelated configured MCP server also timed out. I disabled that server for the later example runs. You can disable a named server for one invocation with --disable-mcp-server:
copilot --disable-mcp-server railwayUse the name from your own server list. The flag affects that invocation; it helps isolate a coding task from a connection it doesn’t need.
How I would use Copilot CLI
I would start with a bounded maintenance task in an existing repository: add a missing input case, explain a failing test, or update a small integration. The filename exercise is the kind of change that makes the review loop easy to inspect.
I would keep the test command in project instructions, ask Copilot to point to relevant files before editing, and review the resulting diff in Git. For repeated work, I would add one useful skill rather than a large collection of overlapping instructions.
The terminal fits well when the work is mostly code, tests, and command output. For a change whose success depends on visual layout or clicking through an app, I would add an actual browser or app check to the task.
For your next exercise, change one requirement in the lab. Ask Copilot to add a failing test for it first, inspect that failure, then let it update the implementation. Keep the change small enough that you can explain every line in the final diff.
Want me to talk about your product? You can sponsor this site.
Related posts about ai: