Give your Raspberry Pi a static IP address
By Flavio Copes
Learn how to give your Raspberry Pi a static IP address, with a DHCP reservation on your router or with nmcli and NetworkManager on the Pi itself.
I recently got a Raspberry Pi for testing, and to build some projects ideas I have, and right after installing Raspbian (now called Raspberry Pi OS), the Linux version of Debian specifically made for the Raspberry Pi, I had a problem.
I attached the Raspberry Pi to the TV, using the HDMI cable, and I attached an USB mouse and USB keyboard to install the OS and get all “wired up”.
I then set up the VNC Server on the Pi to be able to connect to it from the Mac.
As I was removing all those cables, so that only the Raspberry Pi was left attached to the power cable, I realized that as soon as I restarted it, the IP address assigned to it would change.
This is because of DHCP, the protocol the WiFi router uses. It does not assign a fixed IP to every device connected: the IP changes all the time.
Sometimes it’s 192.168.1.2.
Sometimes it’s 192.168.1.30.
Sometimes it’s 192.168.1.43.
I don’t really want to spend time every time to find what’s the Raspberry Pi IP address, right? It’s annoying.
By the way, all those 192.168.1.x addresses come from your router’s subnet. If you want to understand how IP ranges and netmasks work, I built a free CIDR calculator that shows it visually.
So I found out that I can assign a fixed IP to a specific device, by identifying its MAC address. The MAC address, aka Media Access Control Address, is a unique identifier. Every device has a different one.
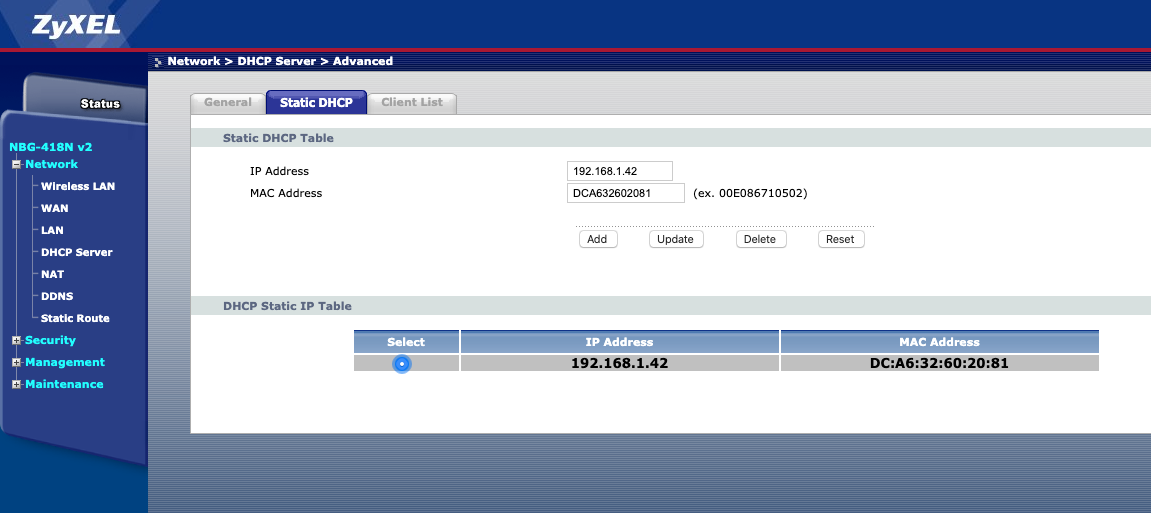
So I connected to my WiFi router, which is running on IP 192.168.1.1 on my local network, and I went to the DHCP Server menu.
In there, I clicked “Static DHCP” and I was able to assign a specific IP to the MAC address of my Raspberry Pi:
How did I find the MAC address of the Pi?
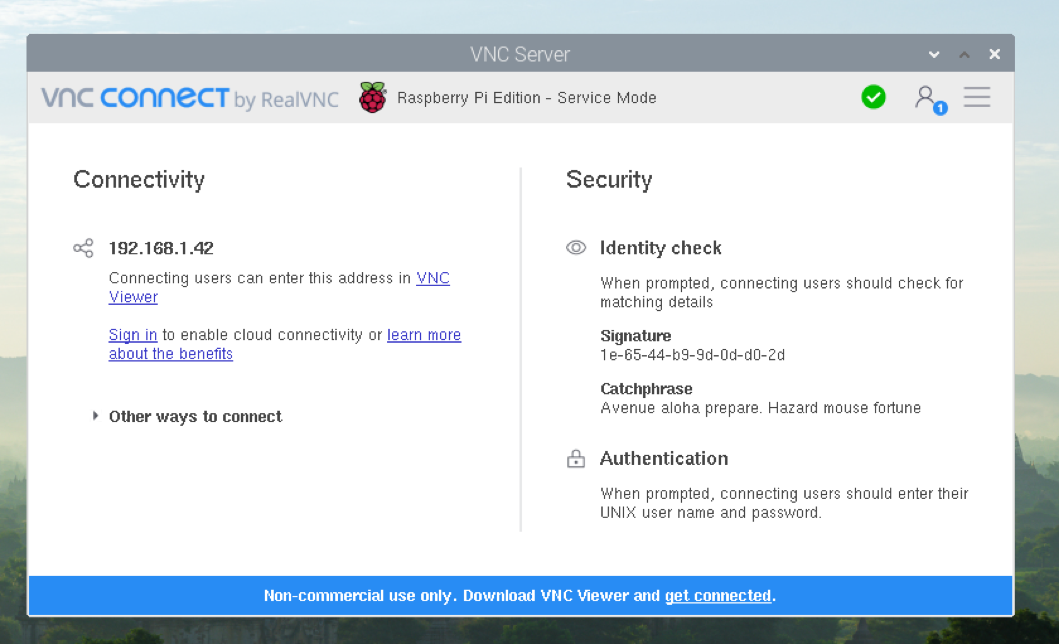
I knew the IP address because the VNC Server panel on the Raspberry Pi showed it:
Then using my MacBook Air I scanned the network using:
ifconfig | grep broadcast | arp -aThis printed the IP and MAC addresses of all devices connected to the network, including the one I was interested in, the Raspberry PI:
? (192.168.1.42) at dc:a6:32:60:20:81 on en0 ifscope [ethernet]What about setting the IP on the Pi itself?
You can also set a static IP directly on the Raspberry Pi. The Raspberry Pi docs recommend the router method above instead, because it keeps all the addresses managed in one place.
Lots of tutorials online edit /etc/dhcpcd.conf for this. That doesn’t work anymore, because Raspberry Pi OS has used NetworkManager for networking since Bookworm.
On a recent Pi you set the address with nmcli, the NetworkManager command line tool, and you type the IP, the subnet mask, the gateway and the DNS by hand. Let’s do it step by step.
Pick an address outside the DHCP pool
Your router hands out addresses from a range, called the DHCP pool. You’ll find it in the same DHCP Server page of the router admin panel. Say the pool goes from 192.168.1.2 to 192.168.1.100.
If you give the Pi 192.168.1.42 by hand, sooner or later the router will hand that same address to your phone, and two devices with the same IP don’t work reliably.
So pick an address outside the pool, like 192.168.1.200. I’ll use it in the examples below.
You also need two more values:
- the gateway, which is your router’s IP (
192.168.1.1in my case) - the subnet size, which on a home network is almost always
/24, the same as the netmask255.255.255.0
Find the connection name
NetworkManager stores the settings in connection profiles, and you edit a profile, not the network card.
List them with:
nmcli connection showYou’ll see something like this:
NAME                UUID                                  TYPE      DEVICE
Wired connection 1  4f2b1c3a-8d6e-4c1f-9a2b-7e5d3c1b0a9f  ethernet  eth0
preconfigured       a1b2c3d4-e5f6-4a7b-8c9d-0e1f2a3b4c5d  wifi      wlan0
lo                  9c8b7a6d-5e4f-4a3b-2c1d-0e9f8a7b6c5d  loopback  lo
The DEVICE column tells you which profile is active on each interface: eth0 is the ethernet port and wlan0 is WiFi.
The names depend on how the network was set up. In the output above, Wired connection 1 is the profile NetworkManager creates on its own for the ethernet port, and preconfigured is the WiFi profile Raspberry Pi Imager writes on Bookworm. If you set up WiFi in Imager on a current, Trixie-based image, the profiles come from netplan, so their names start with netplan-, like netplan-eth0. A WiFi network you join from the desktop gets a profile named after the network.
Copy the exact name, spaces included.
Set the static address
Now we switch the profile from DHCP (auto) to manual and give it the values. This example uses the ethernet profile:
sudo nmcli connection modify "Wired connection 1" \
  ipv4.method manual \
  ipv4.addresses 192.168.1.200/24 \
  ipv4.gateway 192.168.1.1 \
  ipv4.dns "192.168.1.1 1.1.1.1"
For WiFi it’s the same command with the WiFi profile name, like "preconfigured".
For DNS the example uses the router, plus Cloudflare’s 1.1.1.1 as a backup. Use whatever your network already uses.
modify saves the change without applying it. To apply it, bring the connection up again:
sudo nmcli connection up "Wired connection 1"The setting survives reboots, because it lives in the profile.
Check that it worked
Print the Pi’s addresses:
hostname -IYou should see 192.168.1.200 in the output. For more detail, look at the interface and the default route:
ip -4 addr show eth0
ip route
ip route should show a line starting with default via 192.168.1.1. If it’s missing, the gateway is wrong, and the Pi can reach your LAN but not the internet.
You can also ask NetworkManager what it has saved:
nmcli -g ipv4.method,ipv4.addresses,ipv4.gateway connection show "Wired connection 1"Careful if you’re connected over SSH
If you run nmcli connection up over SSH, your session will freeze, because the Pi just moved to a new address.
Open a new terminal and connect to the new IP, ssh [email protected].
If you made a typo in the address or gateway, you may lock yourself out, and you’ll need a keyboard and screen to fix it. Raspberry Pi Connect or VNC won’t save you here, since they also go through the network.
Each profile also has its own settings. If you set a static IP on the ethernet profile and later unplug the cable, the Pi goes back to DHCP on WiFi, so configure the profile you actually use.
Going back to DHCP
Changed your mind? Switch the profile back to auto and clear the manual values:
sudo nmcli connection modify "Wired connection 1" \
  ipv4.method auto \
  ipv4.addresses "" \
  ipv4.gateway "" \
  ipv4.dns ""
sudo nmcli connection up "Wired connection 1"
Prefer a menu? Use nmtui
If you don’t want to type all of that, run:
sudo nmtuiIt opens a menu in the terminal. Pick Edit a connection, choose your profile, set IPv4 configuration to Manual, and fill in the same address, gateway and DNS. Then use Activate a connection to apply it.
It writes the same profile nmcli does, so the checks above work the same way.
Want me to talk about your product? You can sponsor this site.
Related posts about computers: