How to build an LLM from scratch
By Flavio Copes
A practical guide for software engineers to build and train a small GPT-style language model on a Mac with Language Model Builder.
Paul Graham recently said that if he were 17 today, he would learn how to build LLMs from scratch and train the strongest one his hardware allowed.
I think this is very good advice, so in this guide we do exactly that. We train a small GPT-style language model on a Mac, starting from random weights.
I’m a software engineer, not a machine learning researcher, and I write for other software engineers. So this is not a data science tutorial. There are no equations to derive and no matrix multiplication to implement, and you don’t need to spend weeks learning a machine learning framework first.
Instead we treat the language model as a software system. It has inputs, an internal representation, a processing pipeline, persisted state, build artifacts, runtime settings and failure modes, like any other system we work on. We look at each of those in turn.
The tool is Language Model Builder, a free Mac app. I wrote a shorter overview of it in Build a language model on your Mac with Language Model Builder. We won’t write Python and we won’t download a finished model. We train on the Mac, look at the checkpoints, fine-tune the behavior and test the result.
This is the blog-post version of my free Build a Language Model on Your Mac course, which splits the same project into lessons, exercises and quizzes.
What we are building
We are going to build a small GPT-style language model.
It will receive a sequence of tokens and predict the next token. It will append that token and repeat the process to generate text.
Here is the inference path:
text
  ↓
token IDs
  ↓
embeddings
  ↓
Transformer blocks
  ↓
next-token probabilities
  ↓
generated text
Training runs the same model, then adds a feedback loop:
prediction
  ↓
compare with the real next token
  ↓
measure the error
  ↓
update the weights
If you are a software engineer, you already know many of the ideas around this system. They just have different names.
| Software engineering concept | Language model concept |
|---|---|
| input encoding | tokenizer |
| internal data representation | embeddings |
| processing pipeline | Transformer blocks |
| persisted application state | weights |
| versioned build artifact | checkpoint |
| held-out test fixtures | validation data |
| runtime options | sampling settings |
The mapping is not perfect, but it’s a useful place to start.
What “from scratch” means
“From scratch” does not mean writing every layer of the stack ourselves.
Language Model Builder uses MLX, Apple’s machine learning framework for Apple Silicon. MLX handles tensors, gradients, and the low-level work needed to run the model.
This is similar to building a web application without implementing TCP, a database engine, and an operating system first.
We will use the framework, but create the model state ourselves.
Our project will have:
- a tokenizer selected for our data
- a new Transformer architecture
- randomly initialized weights
- our chosen training data
- checkpoints produced on our Mac
We will not import pretrained weights, and that’s what makes this “from scratch”.
What you need
Language Model Builder currently requires:
- an Apple Silicon Mac
- macOS 15 or later
- free disk space for datasets and checkpoints
- time for a training run
The app is free. You don’t need an account, API key, cloud GPU, or Python environment.
Download it from languagemodelbuilder.com.
Move it to your Applications folder and launch the app.
You will see three choices:
- Learn about models
- Build a model
- Open an existing project
We will use the first two.
Define the experiment before pressing Train
Click Build a model and create a project. I used the default name, My First Model.
Don’t start training yet. Training takes hours, and it is worth spending five minutes deciding what we want to learn from the run before we spend them.
Write down this goal:
Observe how a small Transformer changes during pre-training,
then test whether fine-tuning improves its responses.
This is the equivalent of defining acceptance criteria before implementation.
Our model will not replace ChatGPT or Claude. We only need to prove that it moves from random output toward the patterns in its data.
Create three test prompts
Save these prompts:
Once upon a time, a small fox
The robot opened the door and
Mia looked at the sky because
We will run them against several checkpoints with the same runtime settings.
Before training, the output should be random. That gives us a baseline.
Create a run log
Create a Markdown file named model-lab.md.
Add these headings:
# My First Model

## Goal
## Mac and app version
## Model configuration
## Tokenizer and dataset
## Training log
## Checkpoint samples
## Fine-tuning
## Final comparison
## Limitations
## Next experiment
Record your Mac chip, unified memory, macOS version, and app version.
Paste the goal and test prompts into the file.
Think of this as a short runbook. It records the inputs, configuration, outputs, and decisions needed to reproduce the run.
Do not import a base model
The Base models section lets you import models such as SmolLM2 or Qwen2.5.
That is useful when you want to fine-tune an existing open-weight model. It is not the path we want here.
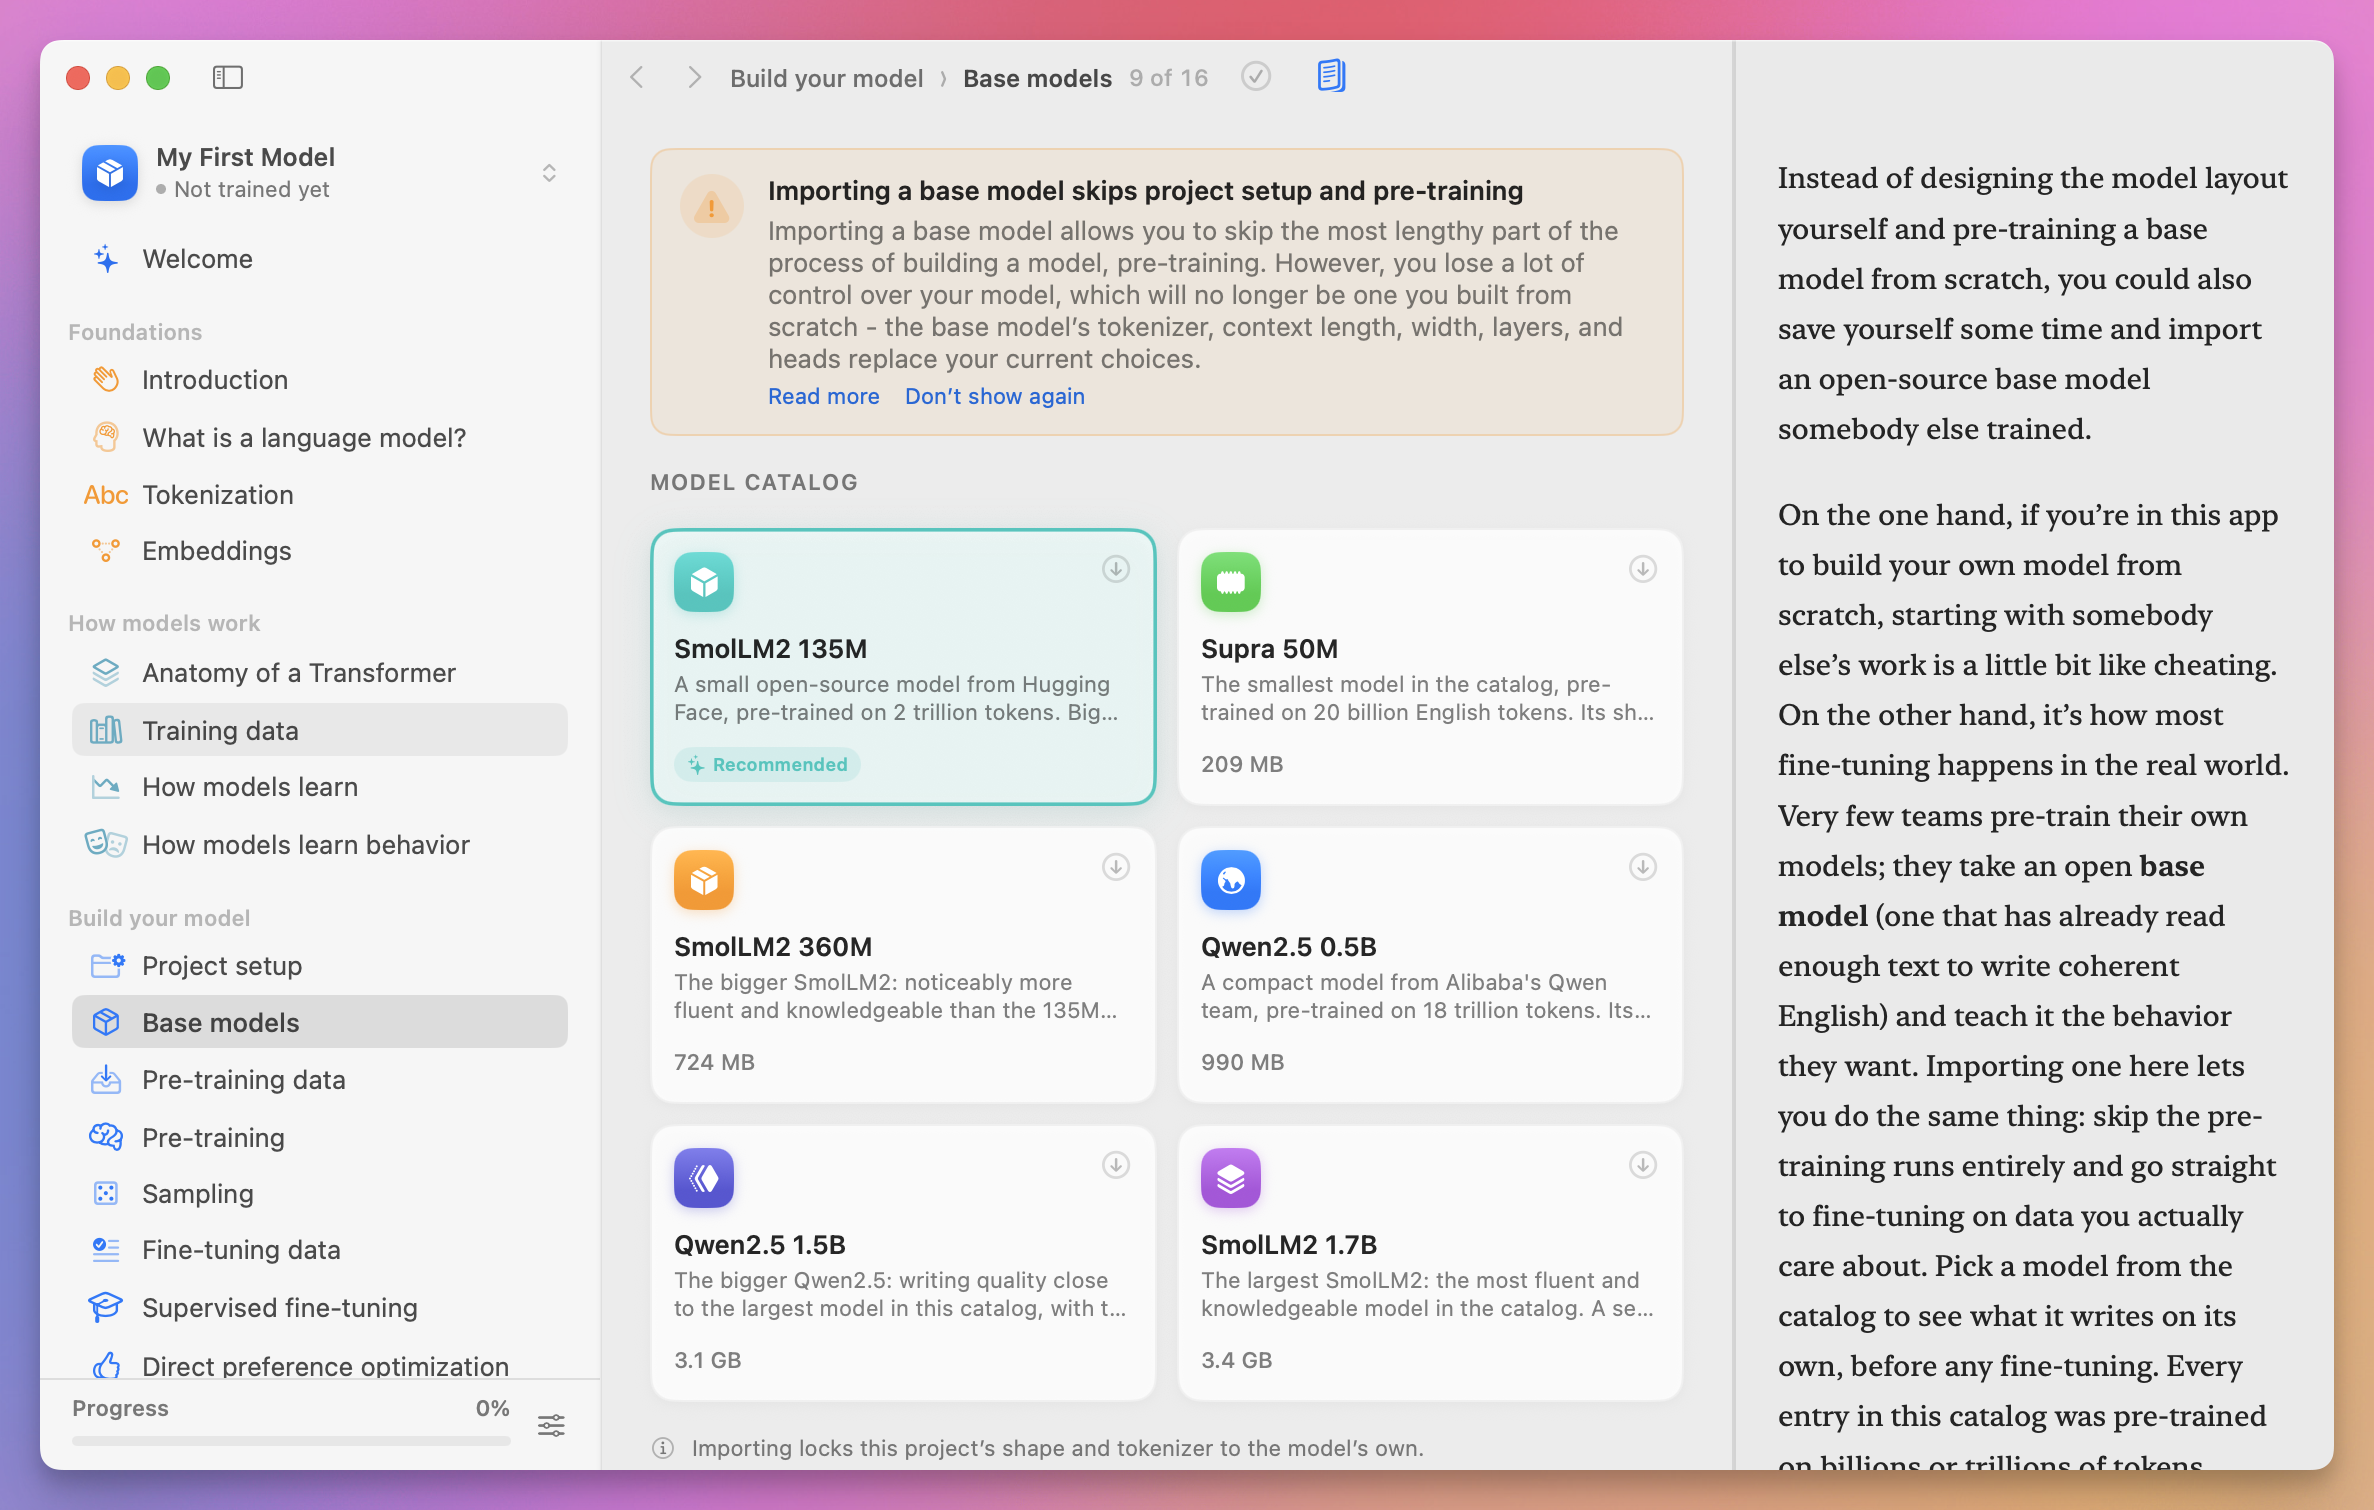
An imported model arrives with an architecture, tokenizer, and learned weights. We want to watch the weights develop from random values.
Use the embedded guide as architecture documentation
Open Learn about models.
Language Model Builder includes an interactive guide that takes about 90 minutes.
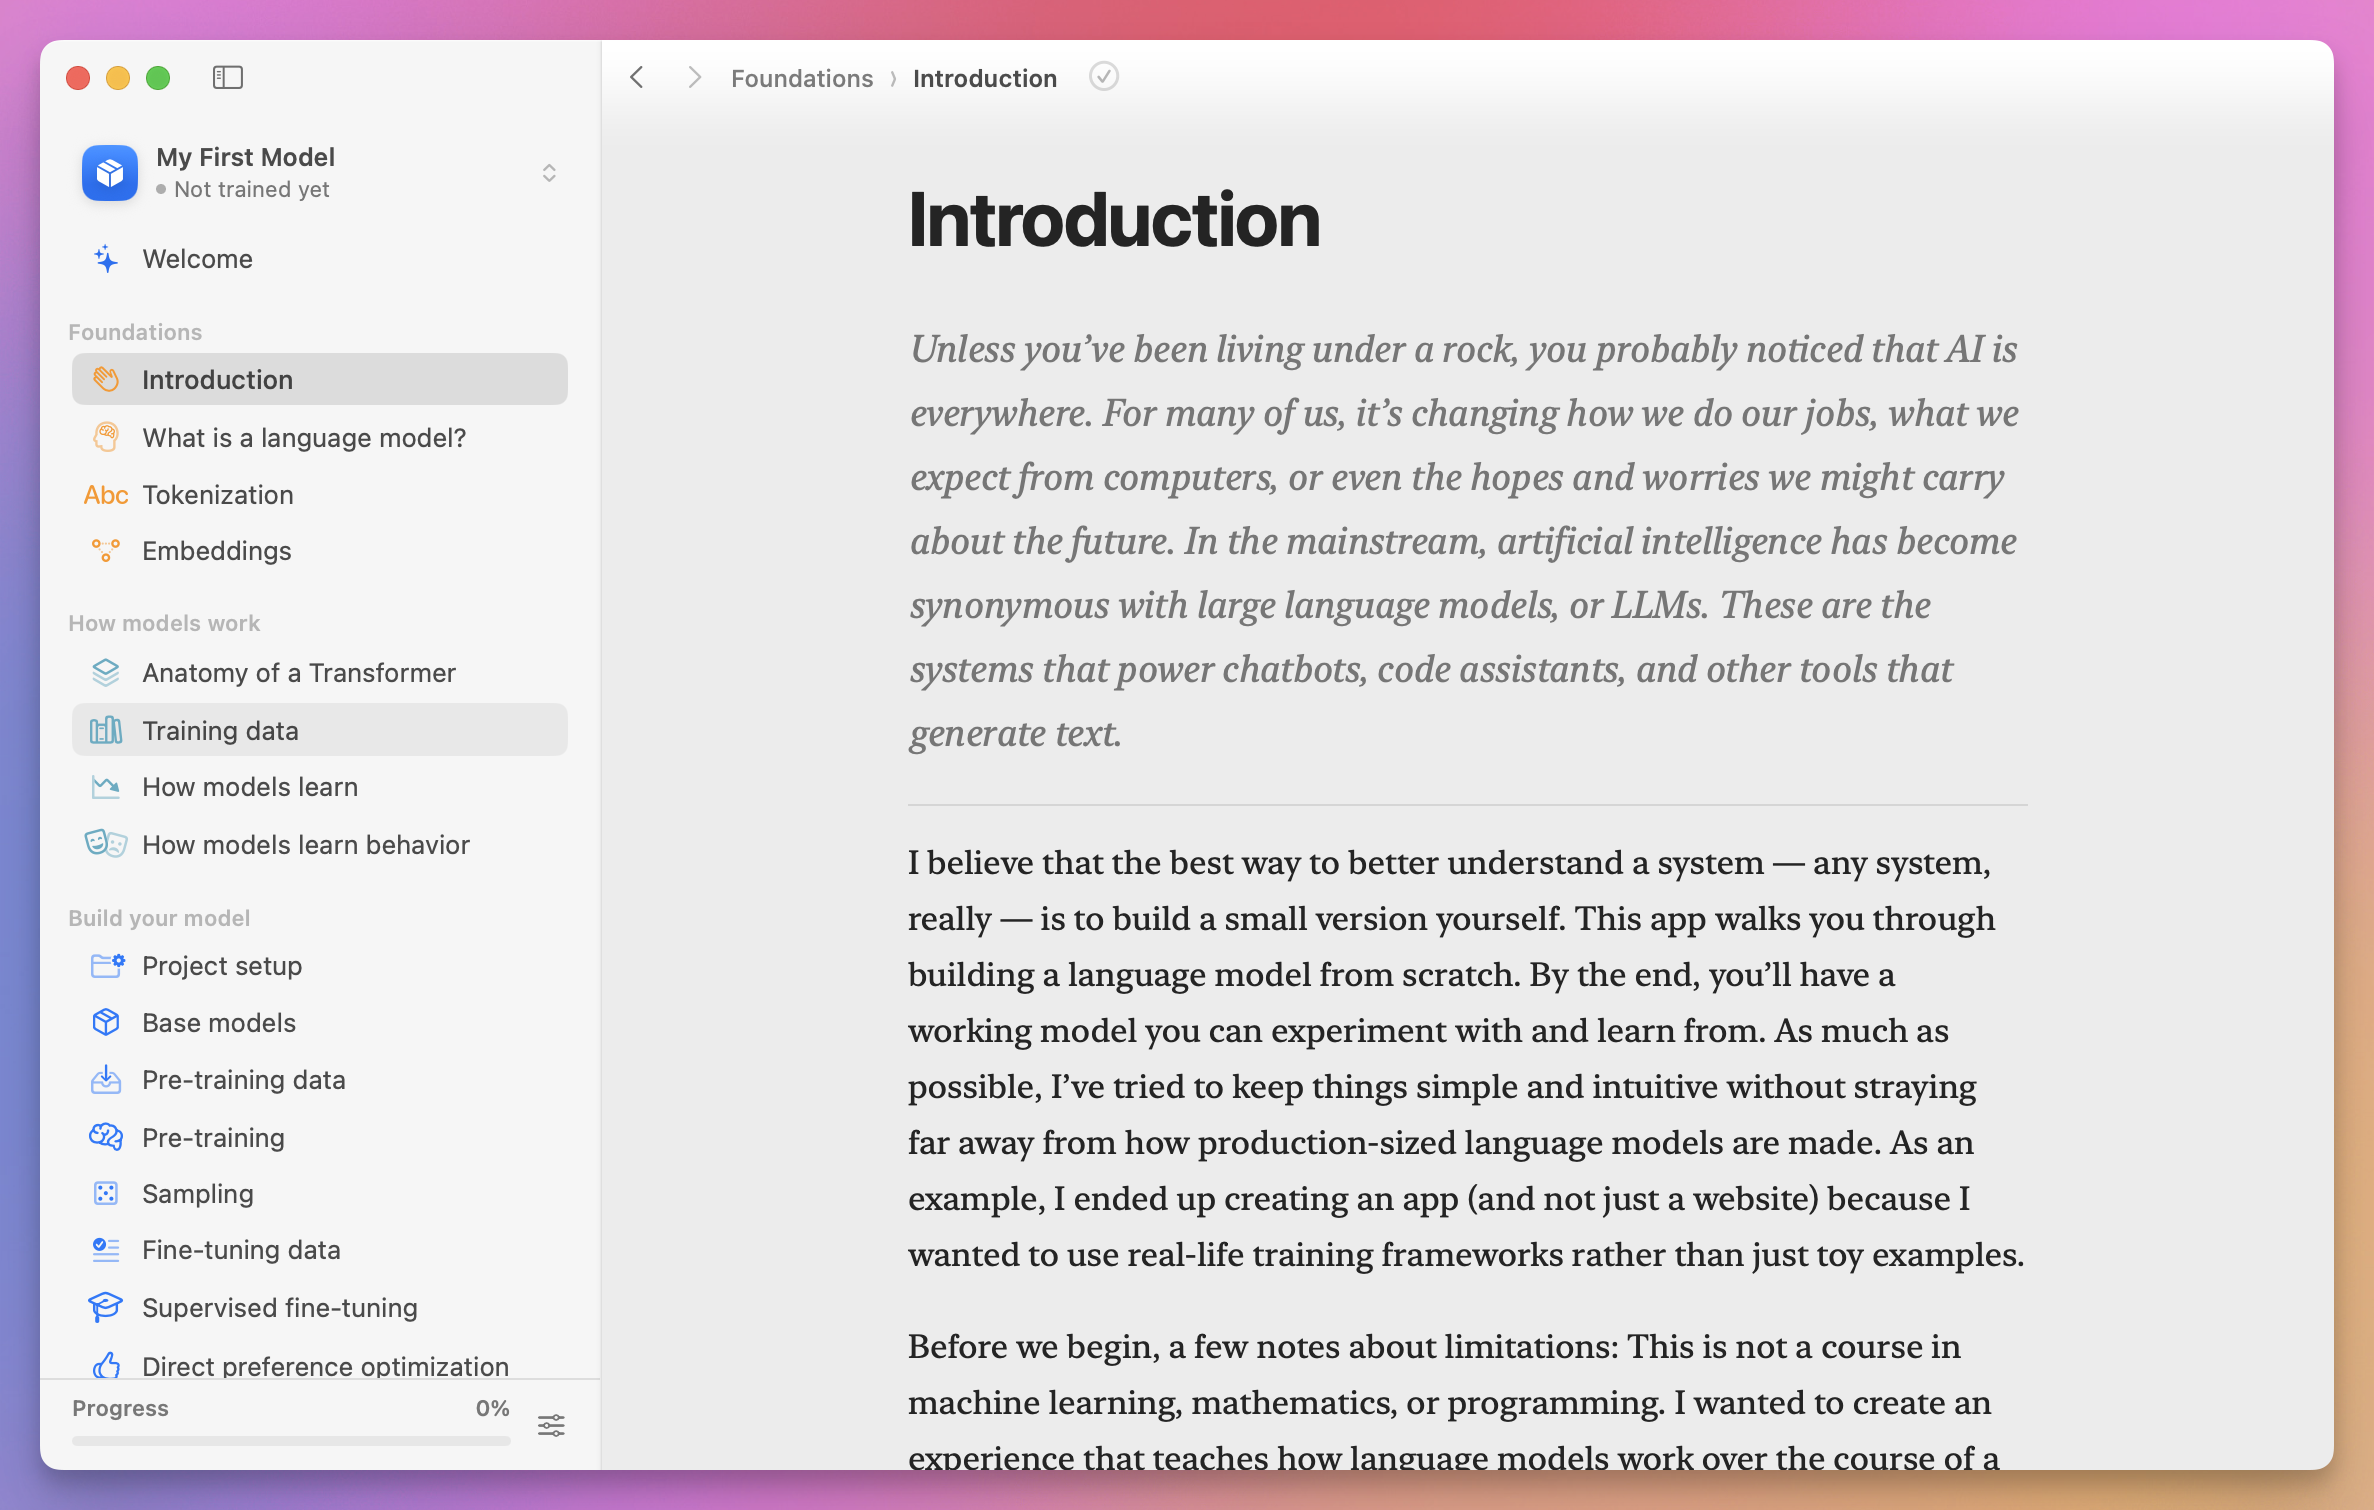
My advice is to go through it once before starting the long training job.
You do not need to become a machine learning researcher. Focus on the system boundaries:
- how text becomes model input
- what representation moves through the model
- where context is combined
- what the model returns
- how training changes persisted state
Let’s translate the important parts into software-engineering terms.
The tokenizer is the input layer
A language model does not receive a string directly.
A tokenizer splits text into reusable pieces and maps every piece to an integer ID.
For example:
the little cat playedmight become:
the | little | cat | play | edThe model receives the IDs for those pieces.
You can think of the tokenizer as a codec or parser at the system boundary. Both the producer and consumer must agree on the format.
Language Model Builder includes a byte pair encoding playground. It starts with small pieces and repeatedly merges the most common adjacent pair.
At zero merges, every character is a separate token.
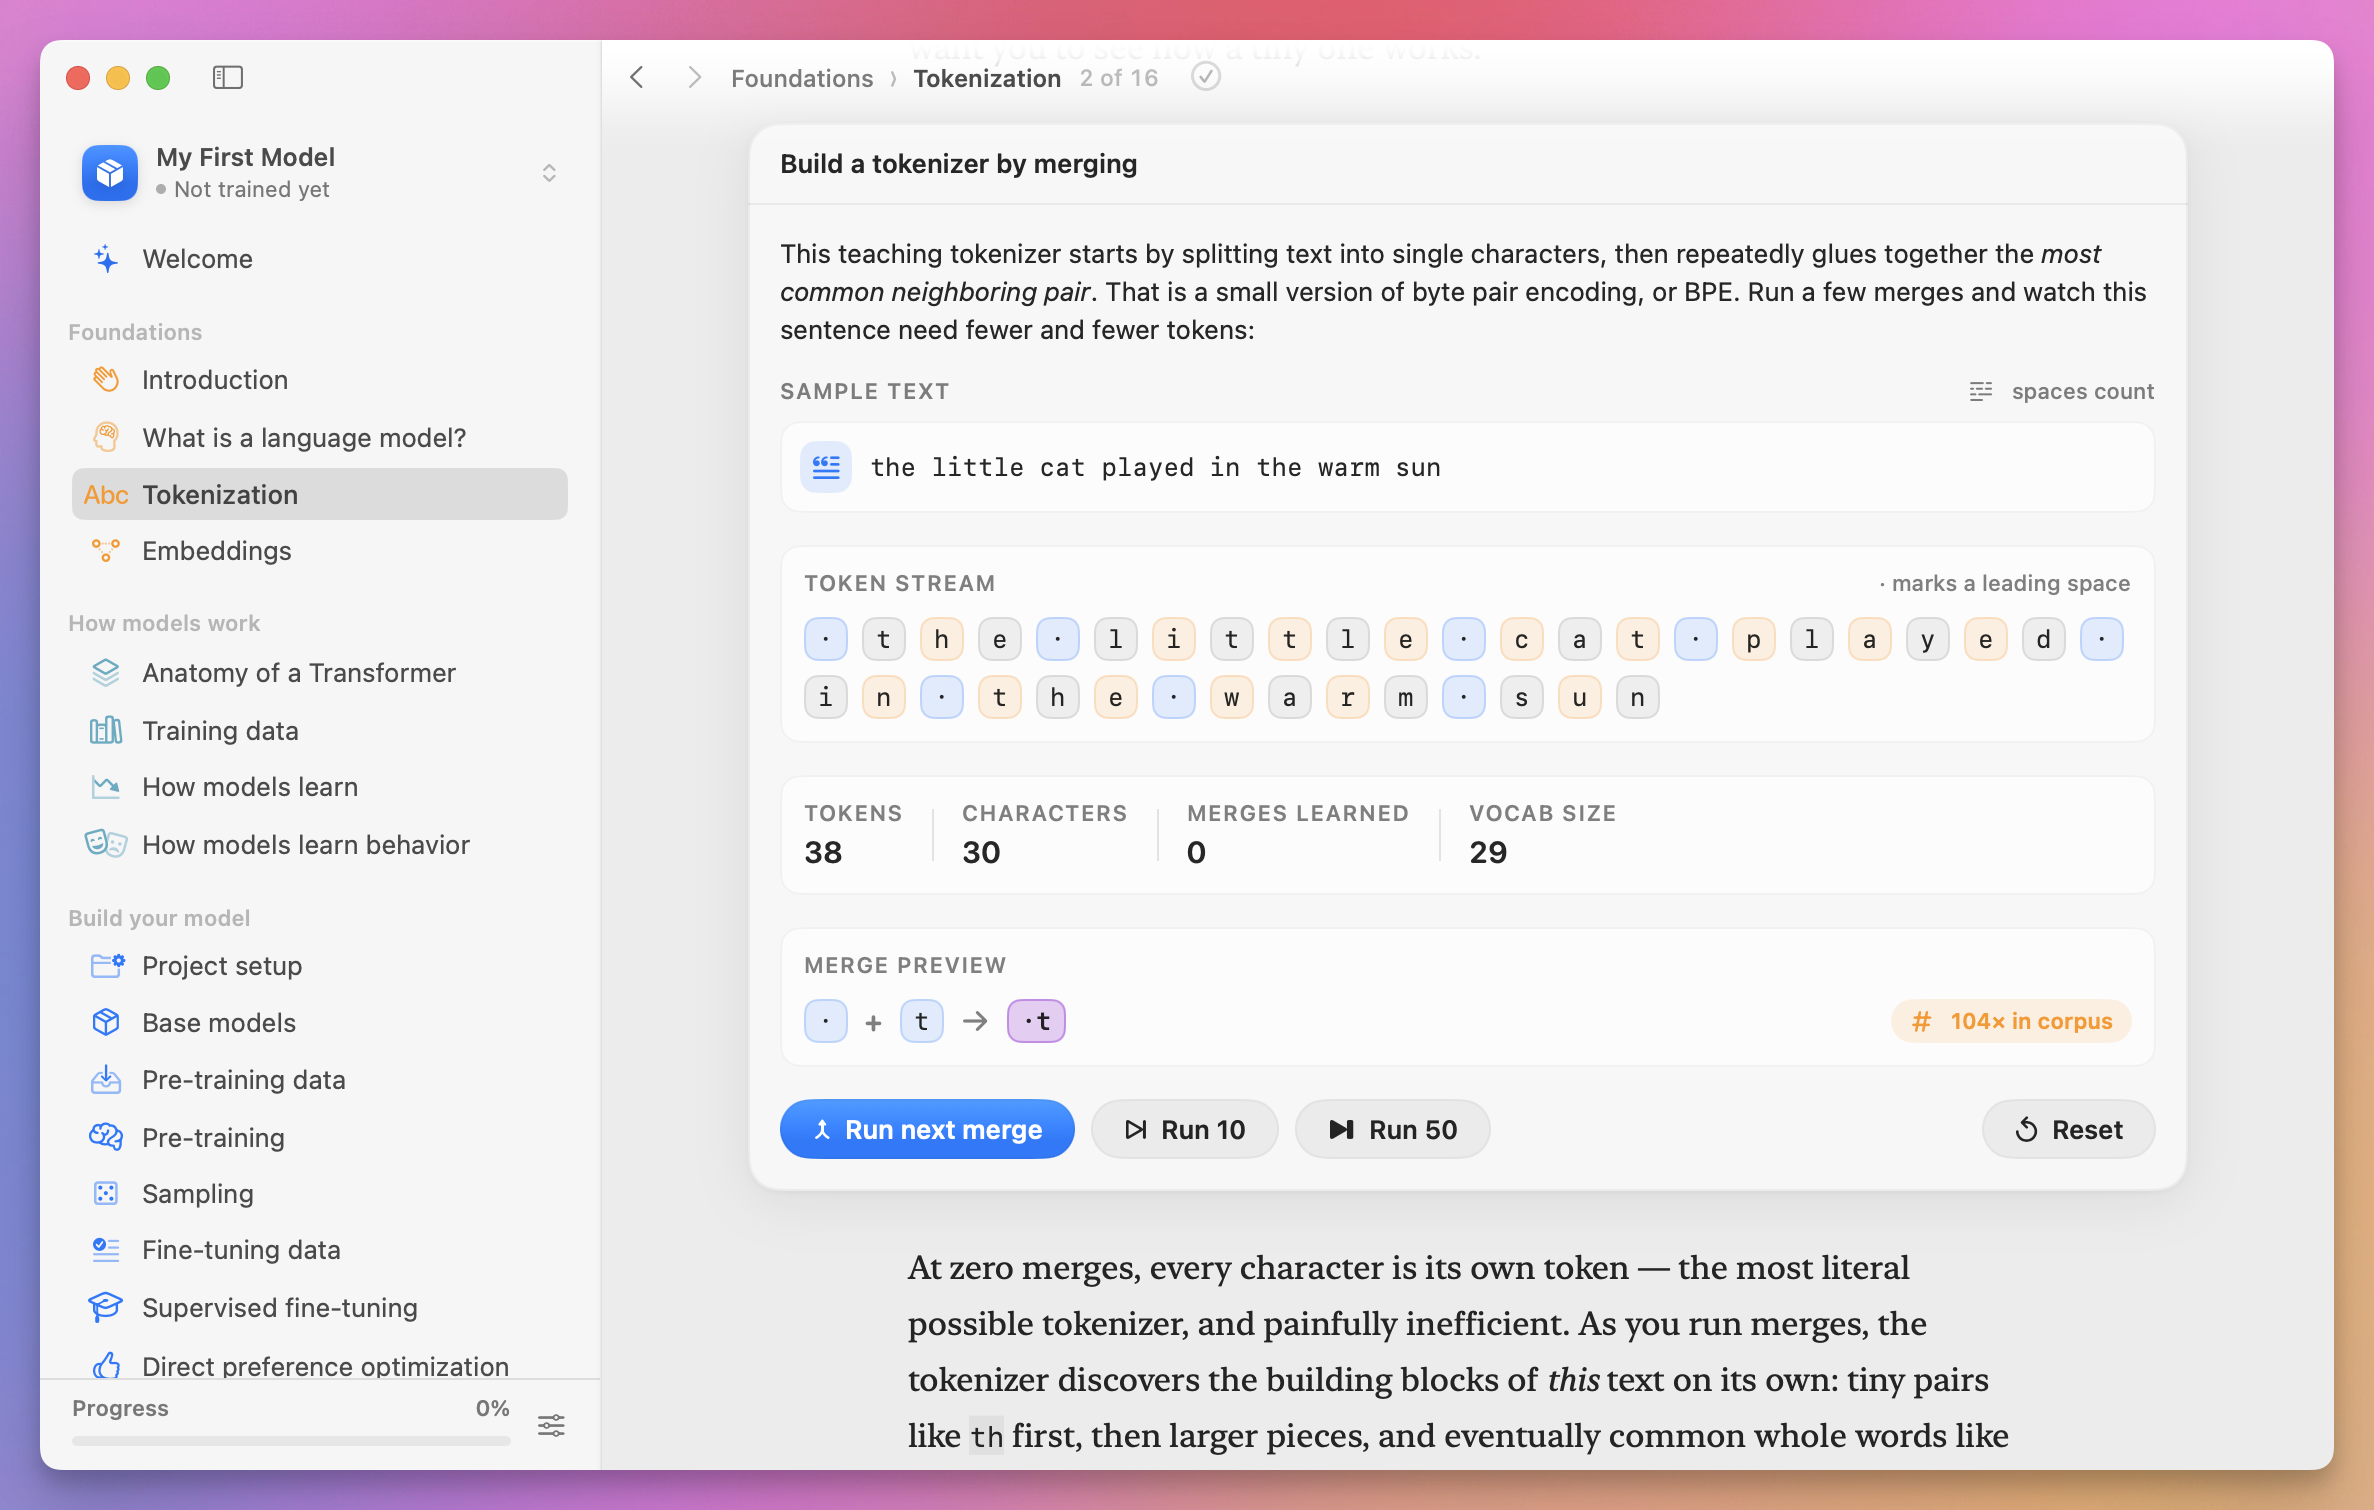
Click Run next merge a few times.
Watch repeated character sequences become single tokens. Then run 10 or 50 merges and compare the result.
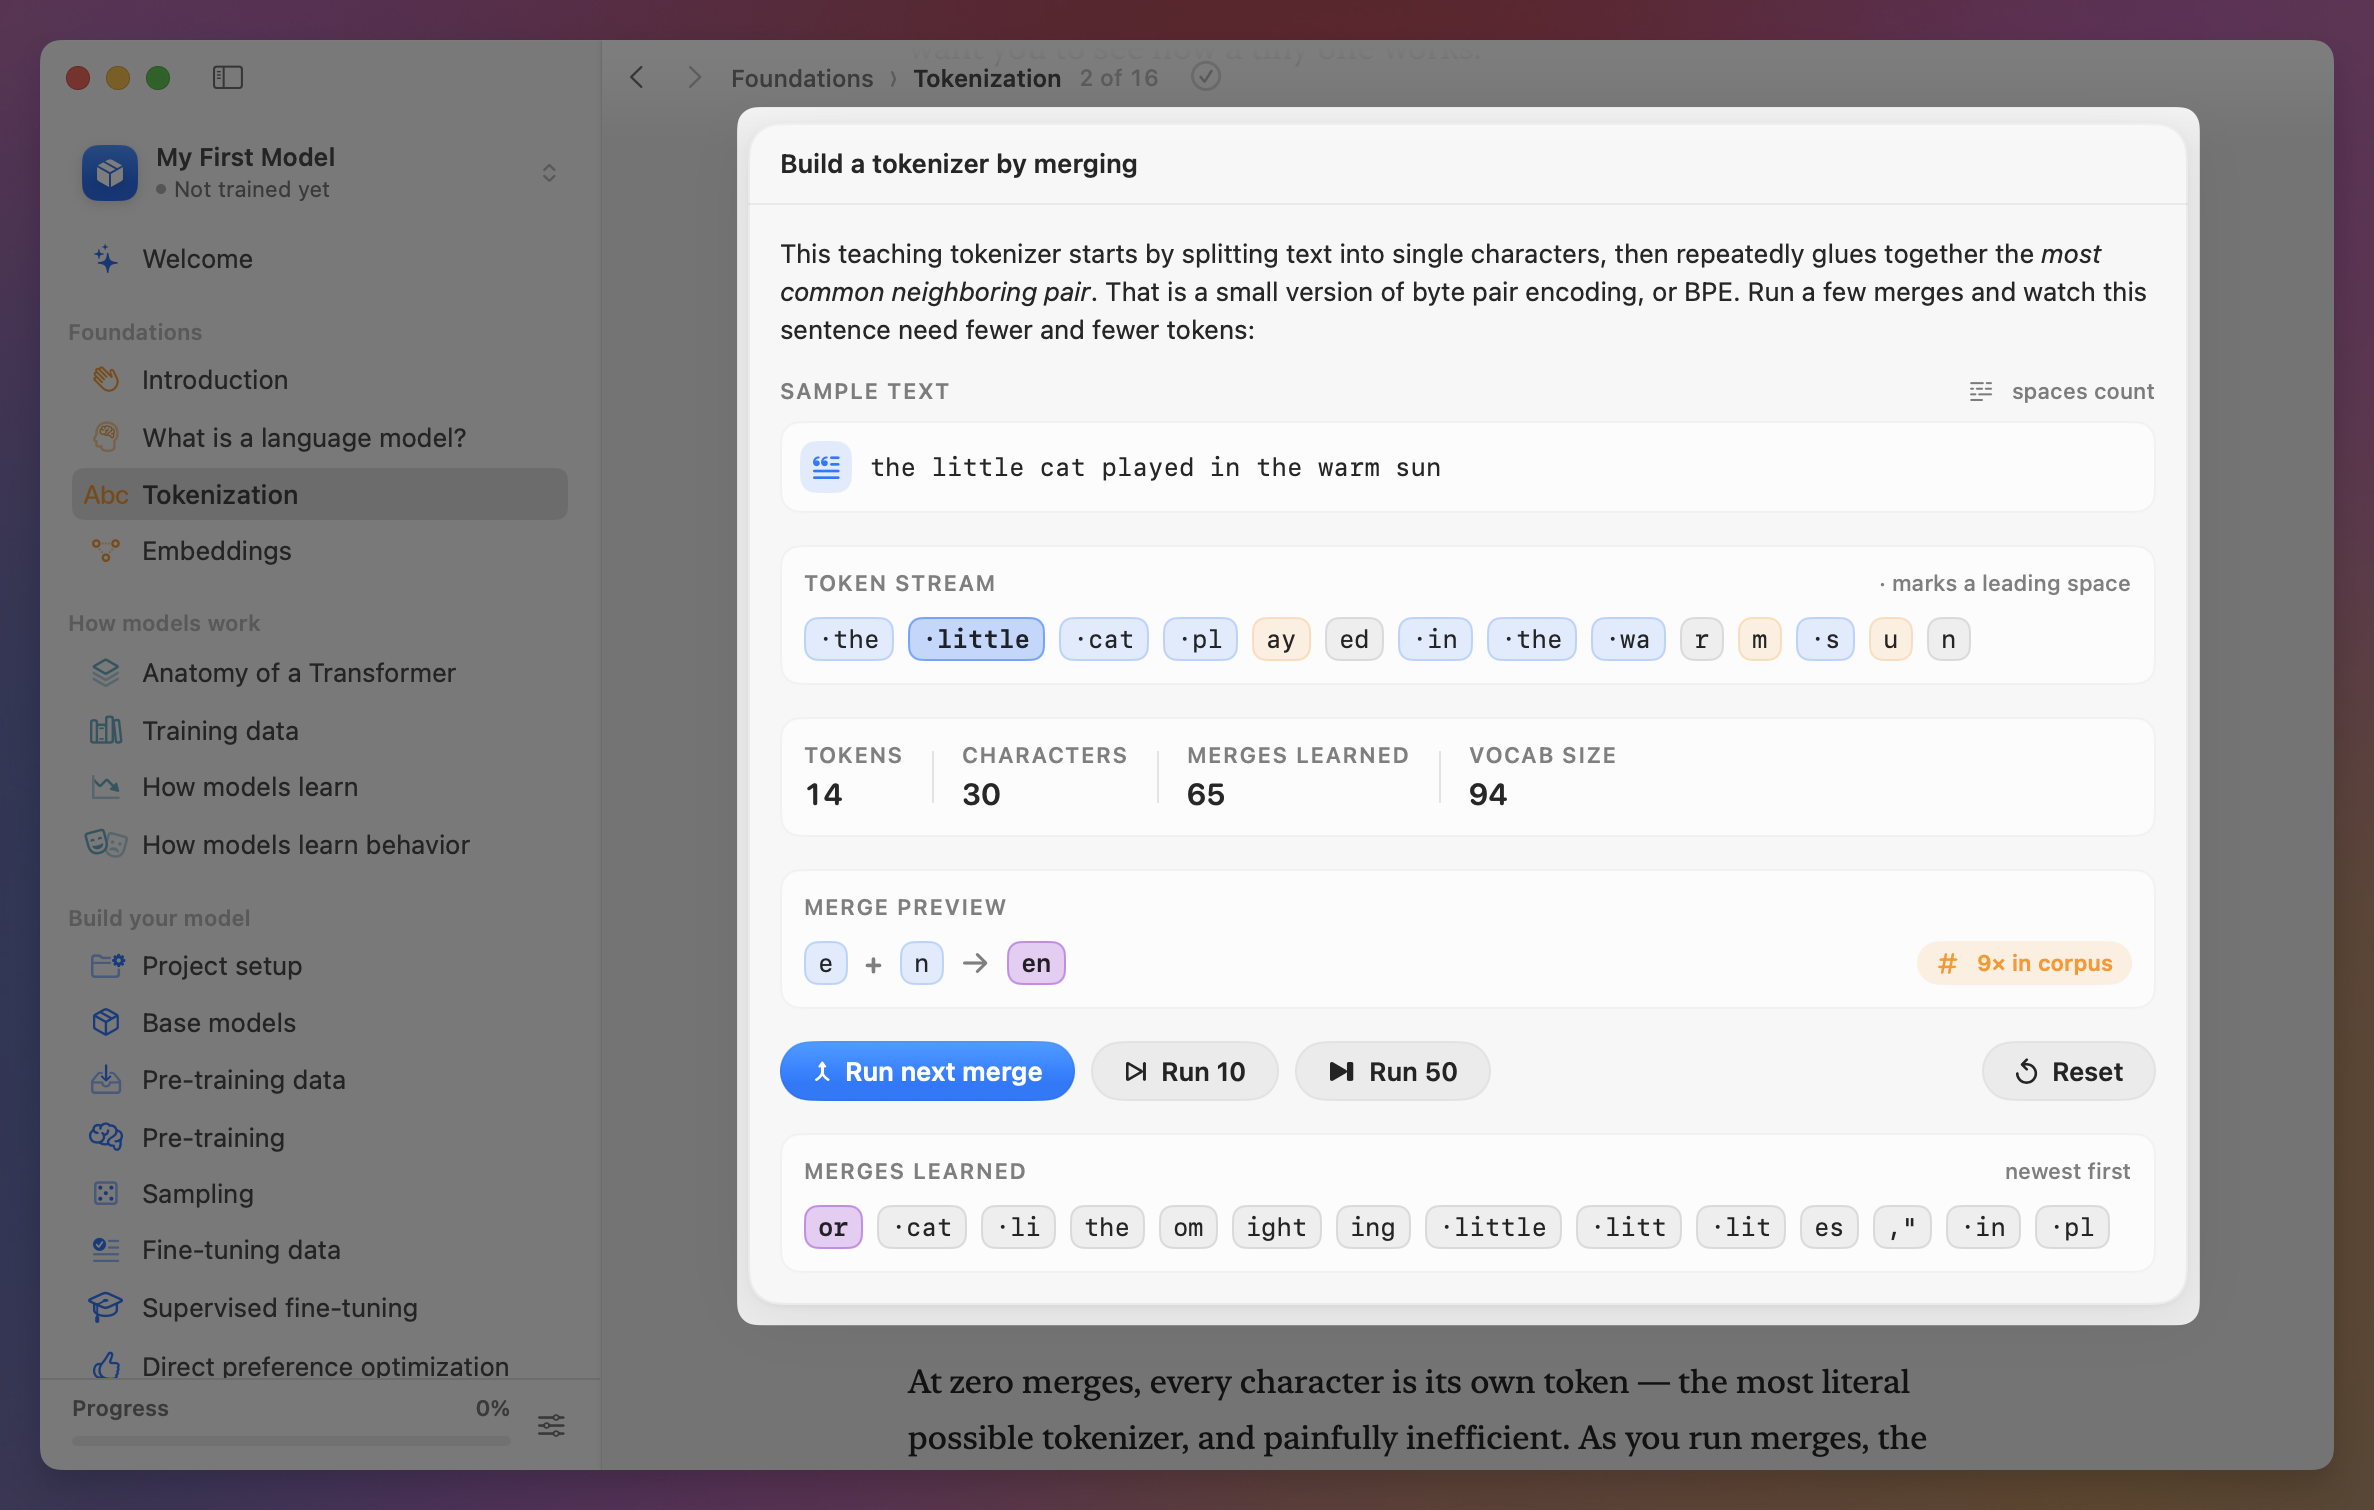
A larger vocabulary can represent familiar text with fewer tokens. But the model must also produce one output score for every vocabulary entry, so the output layer grows with it. There is no right answer here, only a tradeoff.
Keep this rule in mind:
A checkpoint only works with the tokenizer and token IDs used to train it.
Change the token mapping and the saved weights no longer mean the same thing.
Embeddings are the internal representation
Token IDs are identifiers. The numeric distance between two IDs has no useful meaning.
An embedding converts each token into a vector: a list of learned numbers the model can process.
This is the model’s internal data representation.
During training, tokens used in similar contexts can develop similar vectors.
The app projects a 50-dimensional embedding space into two dimensions so we can see it.
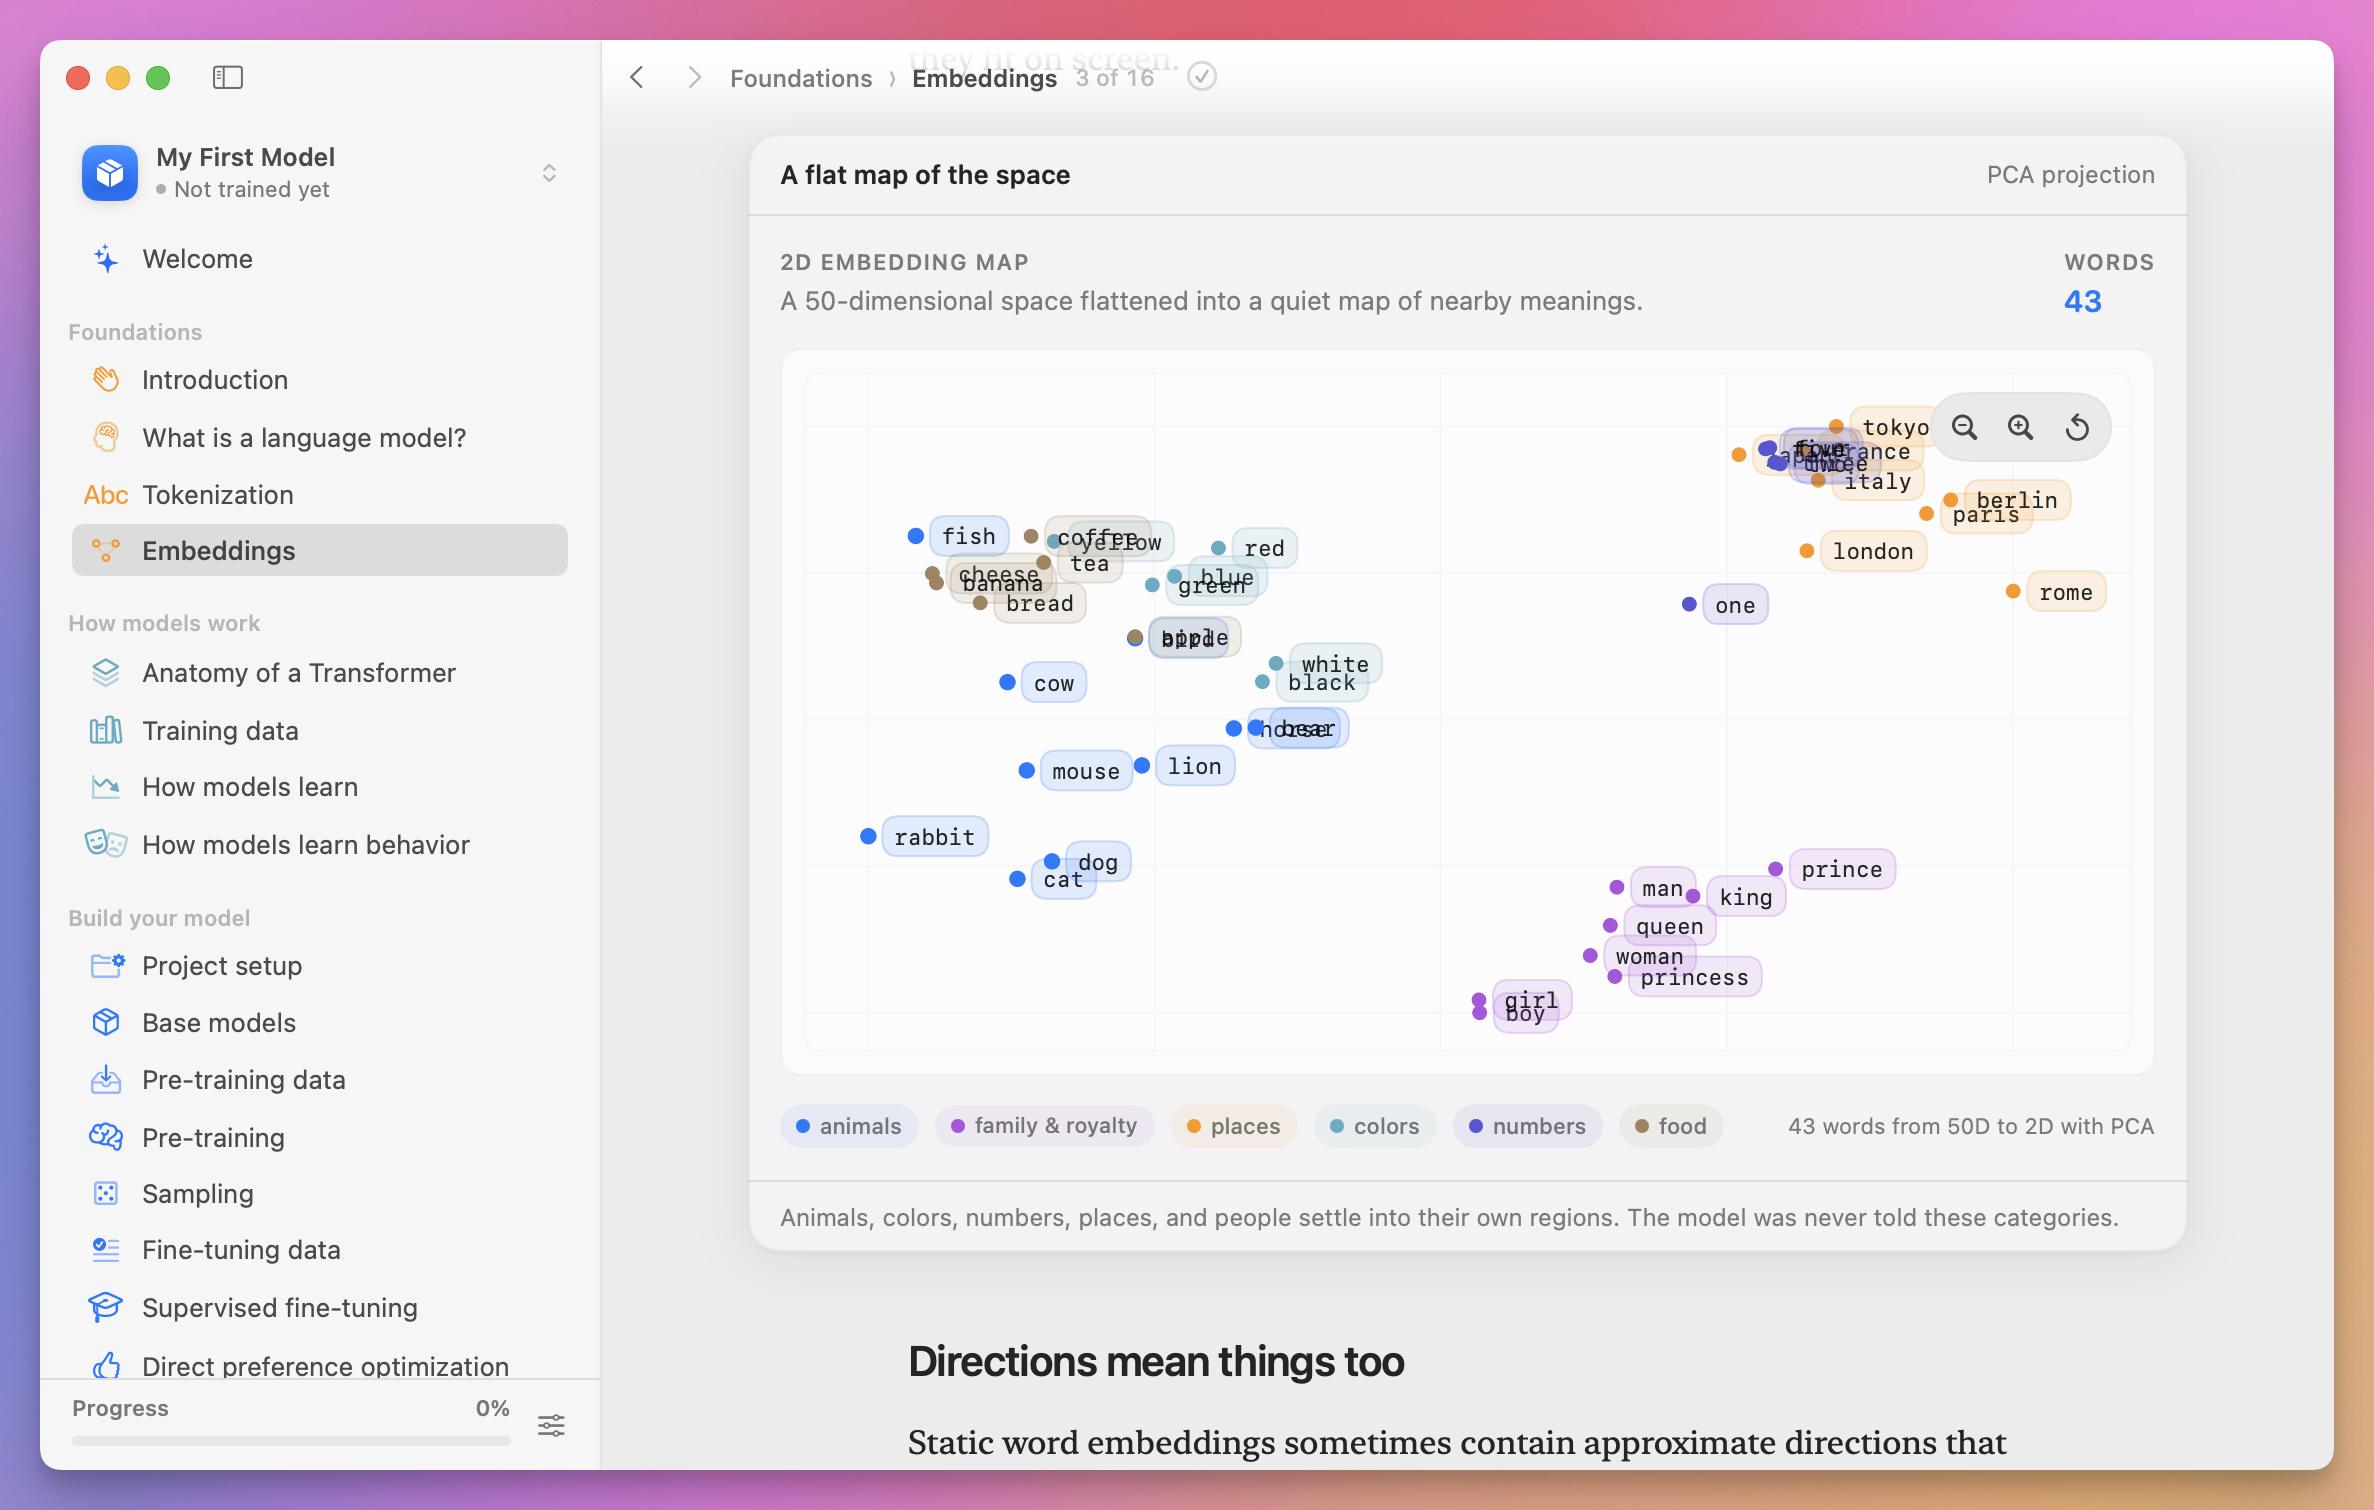
Animals, colors, places, and family words form visible groups.
Nobody hardcoded those categories. The positions emerged from usage patterns in the data.
Remember that the map is a debugging visualization. Flattening many dimensions into two distorts some distances.
The Transformer is the processing pipeline
The Transformer is the architecture that processes the token sequence.
Each Transformer block contains attention and a small feed-forward network. Several blocks run one after another.
Attention lets each position use information from other relevant positions in the current context.
Consider this sentence:
The book did not fit in the bag because it was too large.The token for it needs information from earlier tokens. Attention gives the model a way to combine that context.
A model generating text from left to right cannot read future tokens. It can only use itself and earlier positions.
This is called causal attention.
The complete processing path is:
token IDs
  ↓
token and position embeddings
  ↓
repeated Transformer blocks
  ↓
one score for every possible next token
  ↓
probabilities
Instead of a stored answer, the model returns a distribution of possible next tokens.
The weights are persisted application state
The architecture defines the code path and data shapes.
The weights are the numbers changed during training. They contain what the model learned from the data.
At the beginning, those numbers are random.
During training, the system repeatedly:
- reads a batch of token sequences
- predicts the next tokens
- compares the predictions with the real tokens
- measures the error
- changes the weights slightly
The error value is called the loss.
We do not need to implement gradient calculation to understand the contract. The training framework receives a loss and updates the state in a direction that should reduce it.
Training is an offline job that produces a new model artifact.
Generation is the runtime that uses that artifact.
Keeping those two phases separate makes the rest of the app much easier to understand.
The model blueprint is a compatibility contract
Return to the project and open Project setup.
The blueprint I used for this run was:
tokenizer       GPT-2 BPE
vocabulary      50,261 tokens
context         512 tokens
embedding width 256
blocks          8
attention heads 4
parameters      about 19.3 million
weights on disk 36.8 MB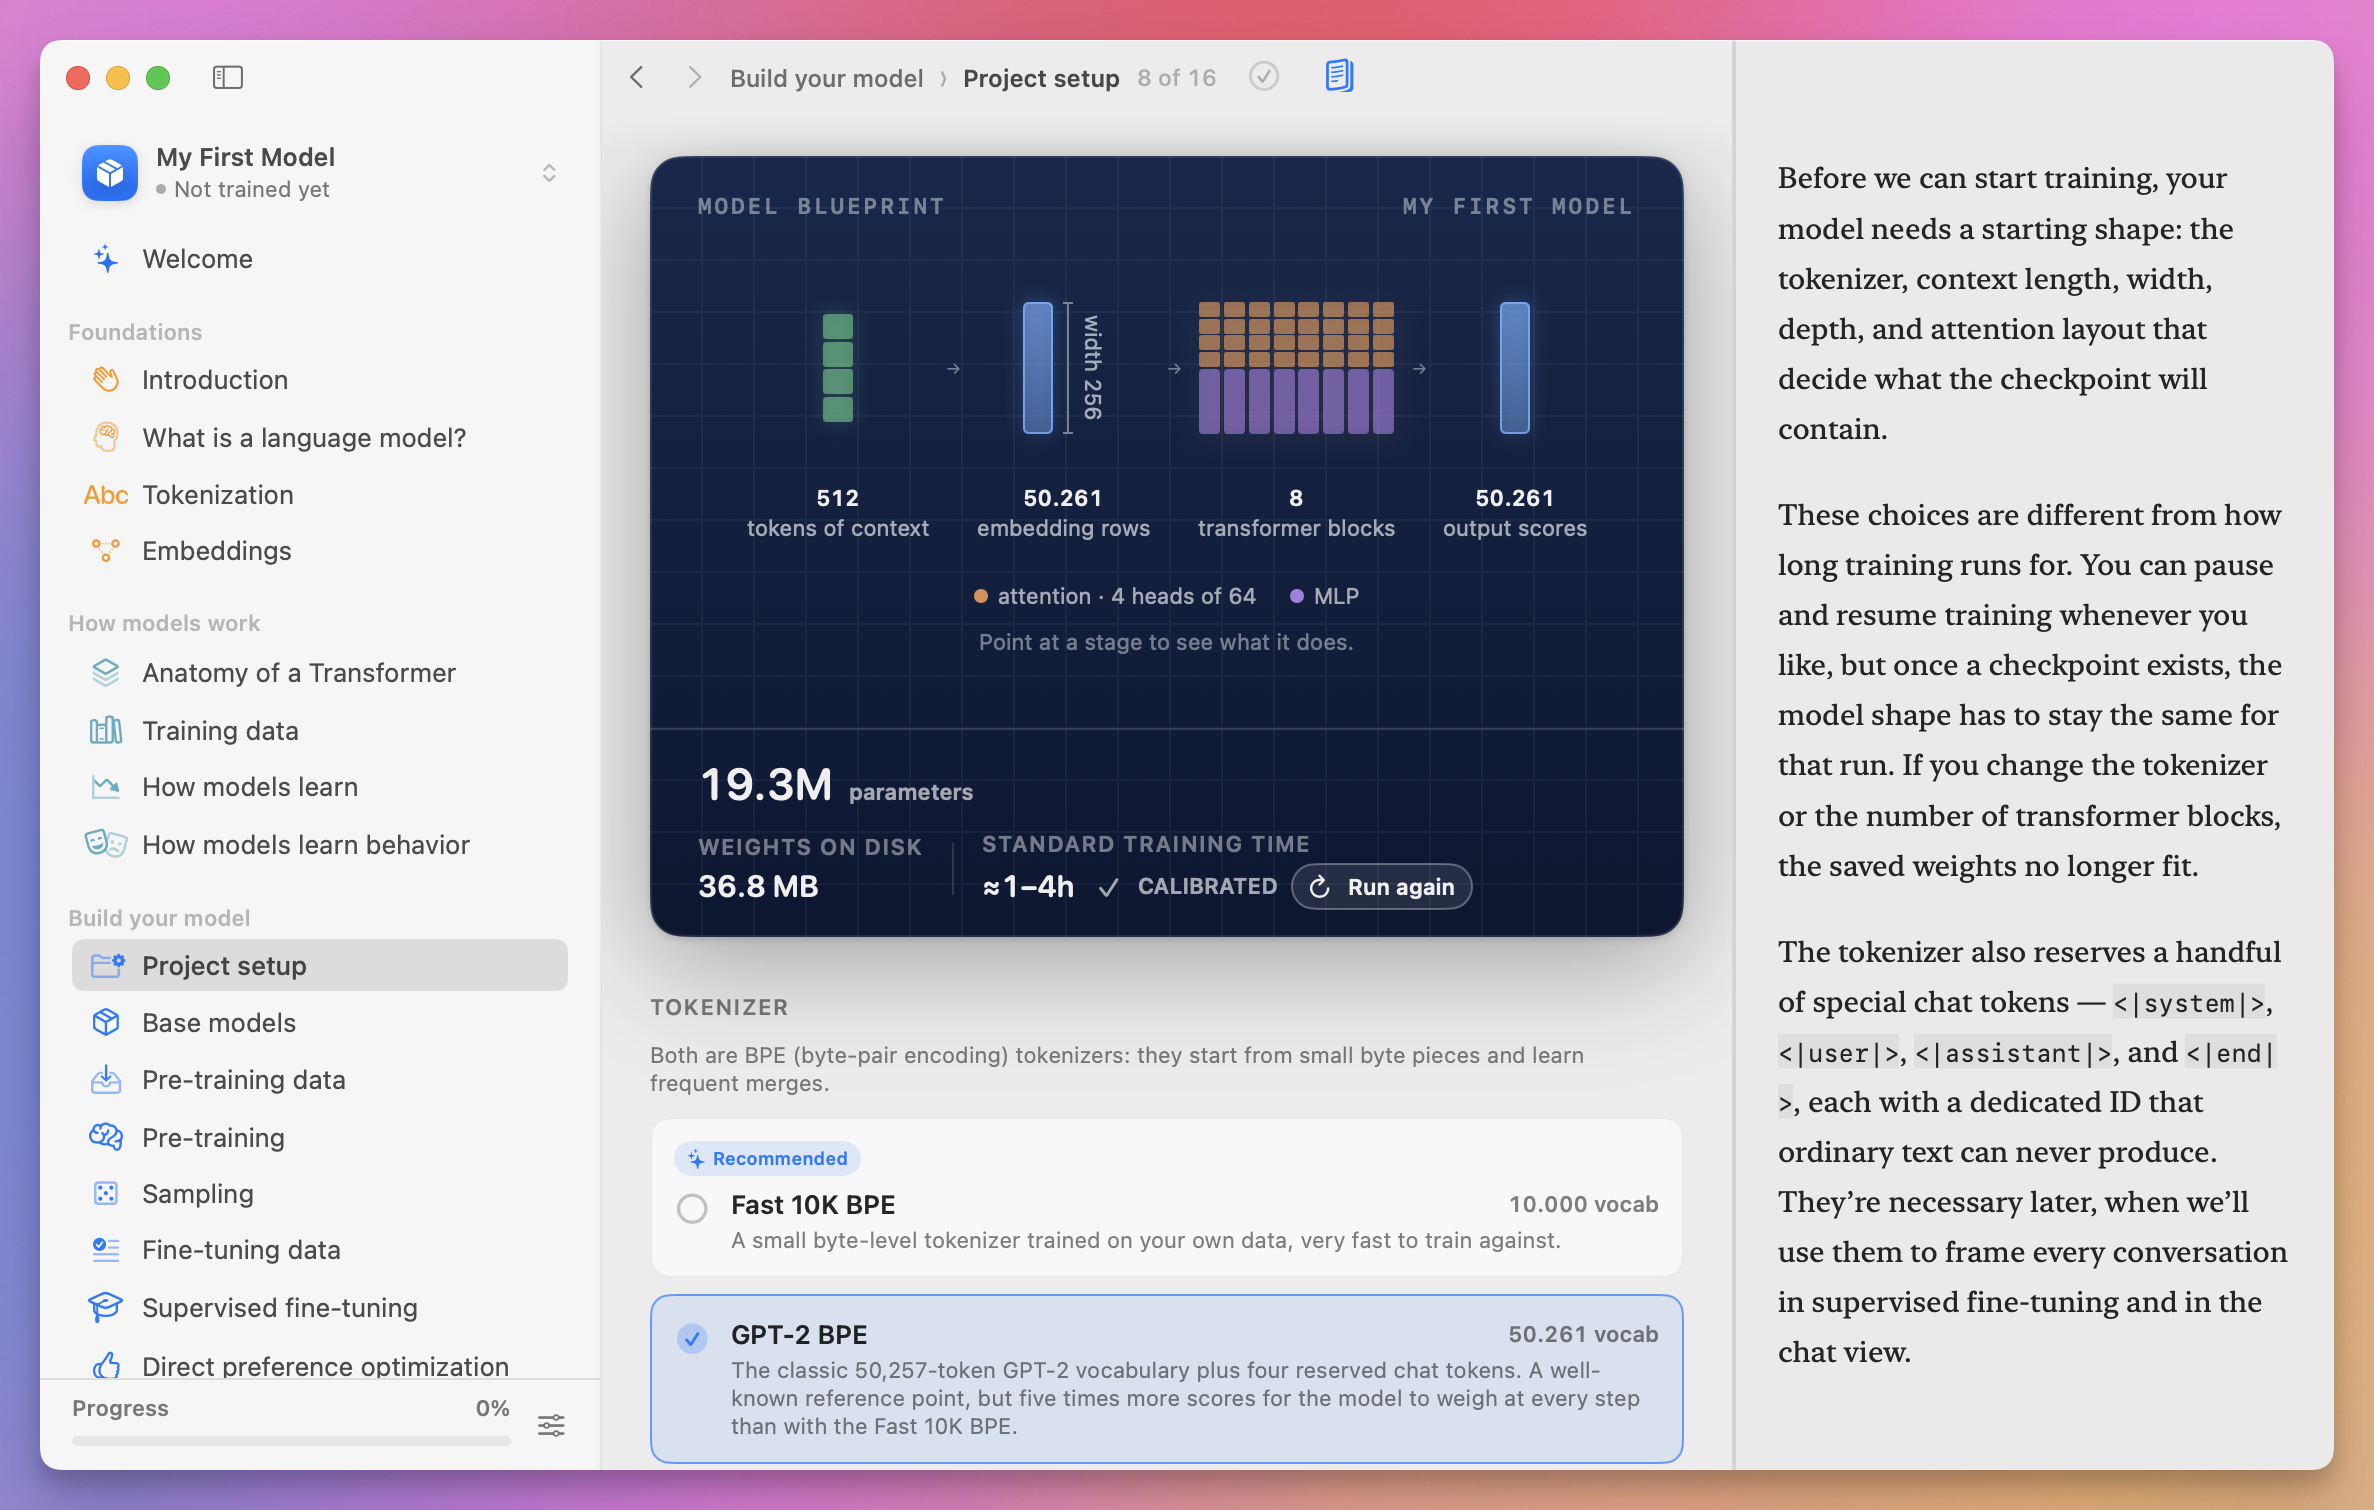
These values define the shapes of the data moving through the model.
The vocabulary sets the number of input embeddings and output scores. The context length is how many recent tokens the model can process at once.
The embedding width is the size of the internal representation, and the number of Transformer blocks is the depth of the processing pipeline. The attention heads let the model calculate several attention patterns in parallel.
Together, these choices produce the parameter count.
Once a checkpoint exists, you cannot change these shapes and load the old state into the new architecture.
This is similar to changing an application’s serialized data format without a migration.
Record the complete blueprint in model-lab.md.
Choose the tokenizer before training
Language Model Builder recommends Fast 10K BPE for a smaller first model.
I selected GPT-2 BPE for the run shown in these screenshots. Its vocabulary contains about 50,000 tokens, so it makes the input and output layers larger.
That choice increased my model from about 9 million to 19.3 million parameters. It also made training take longer.
You can choose Fast 10K BPE if you want a faster first experiment. The important part is to record the choice and keep it unchanged for the whole run.
Treat the dataset as an input dependency
Open Pre-training data.
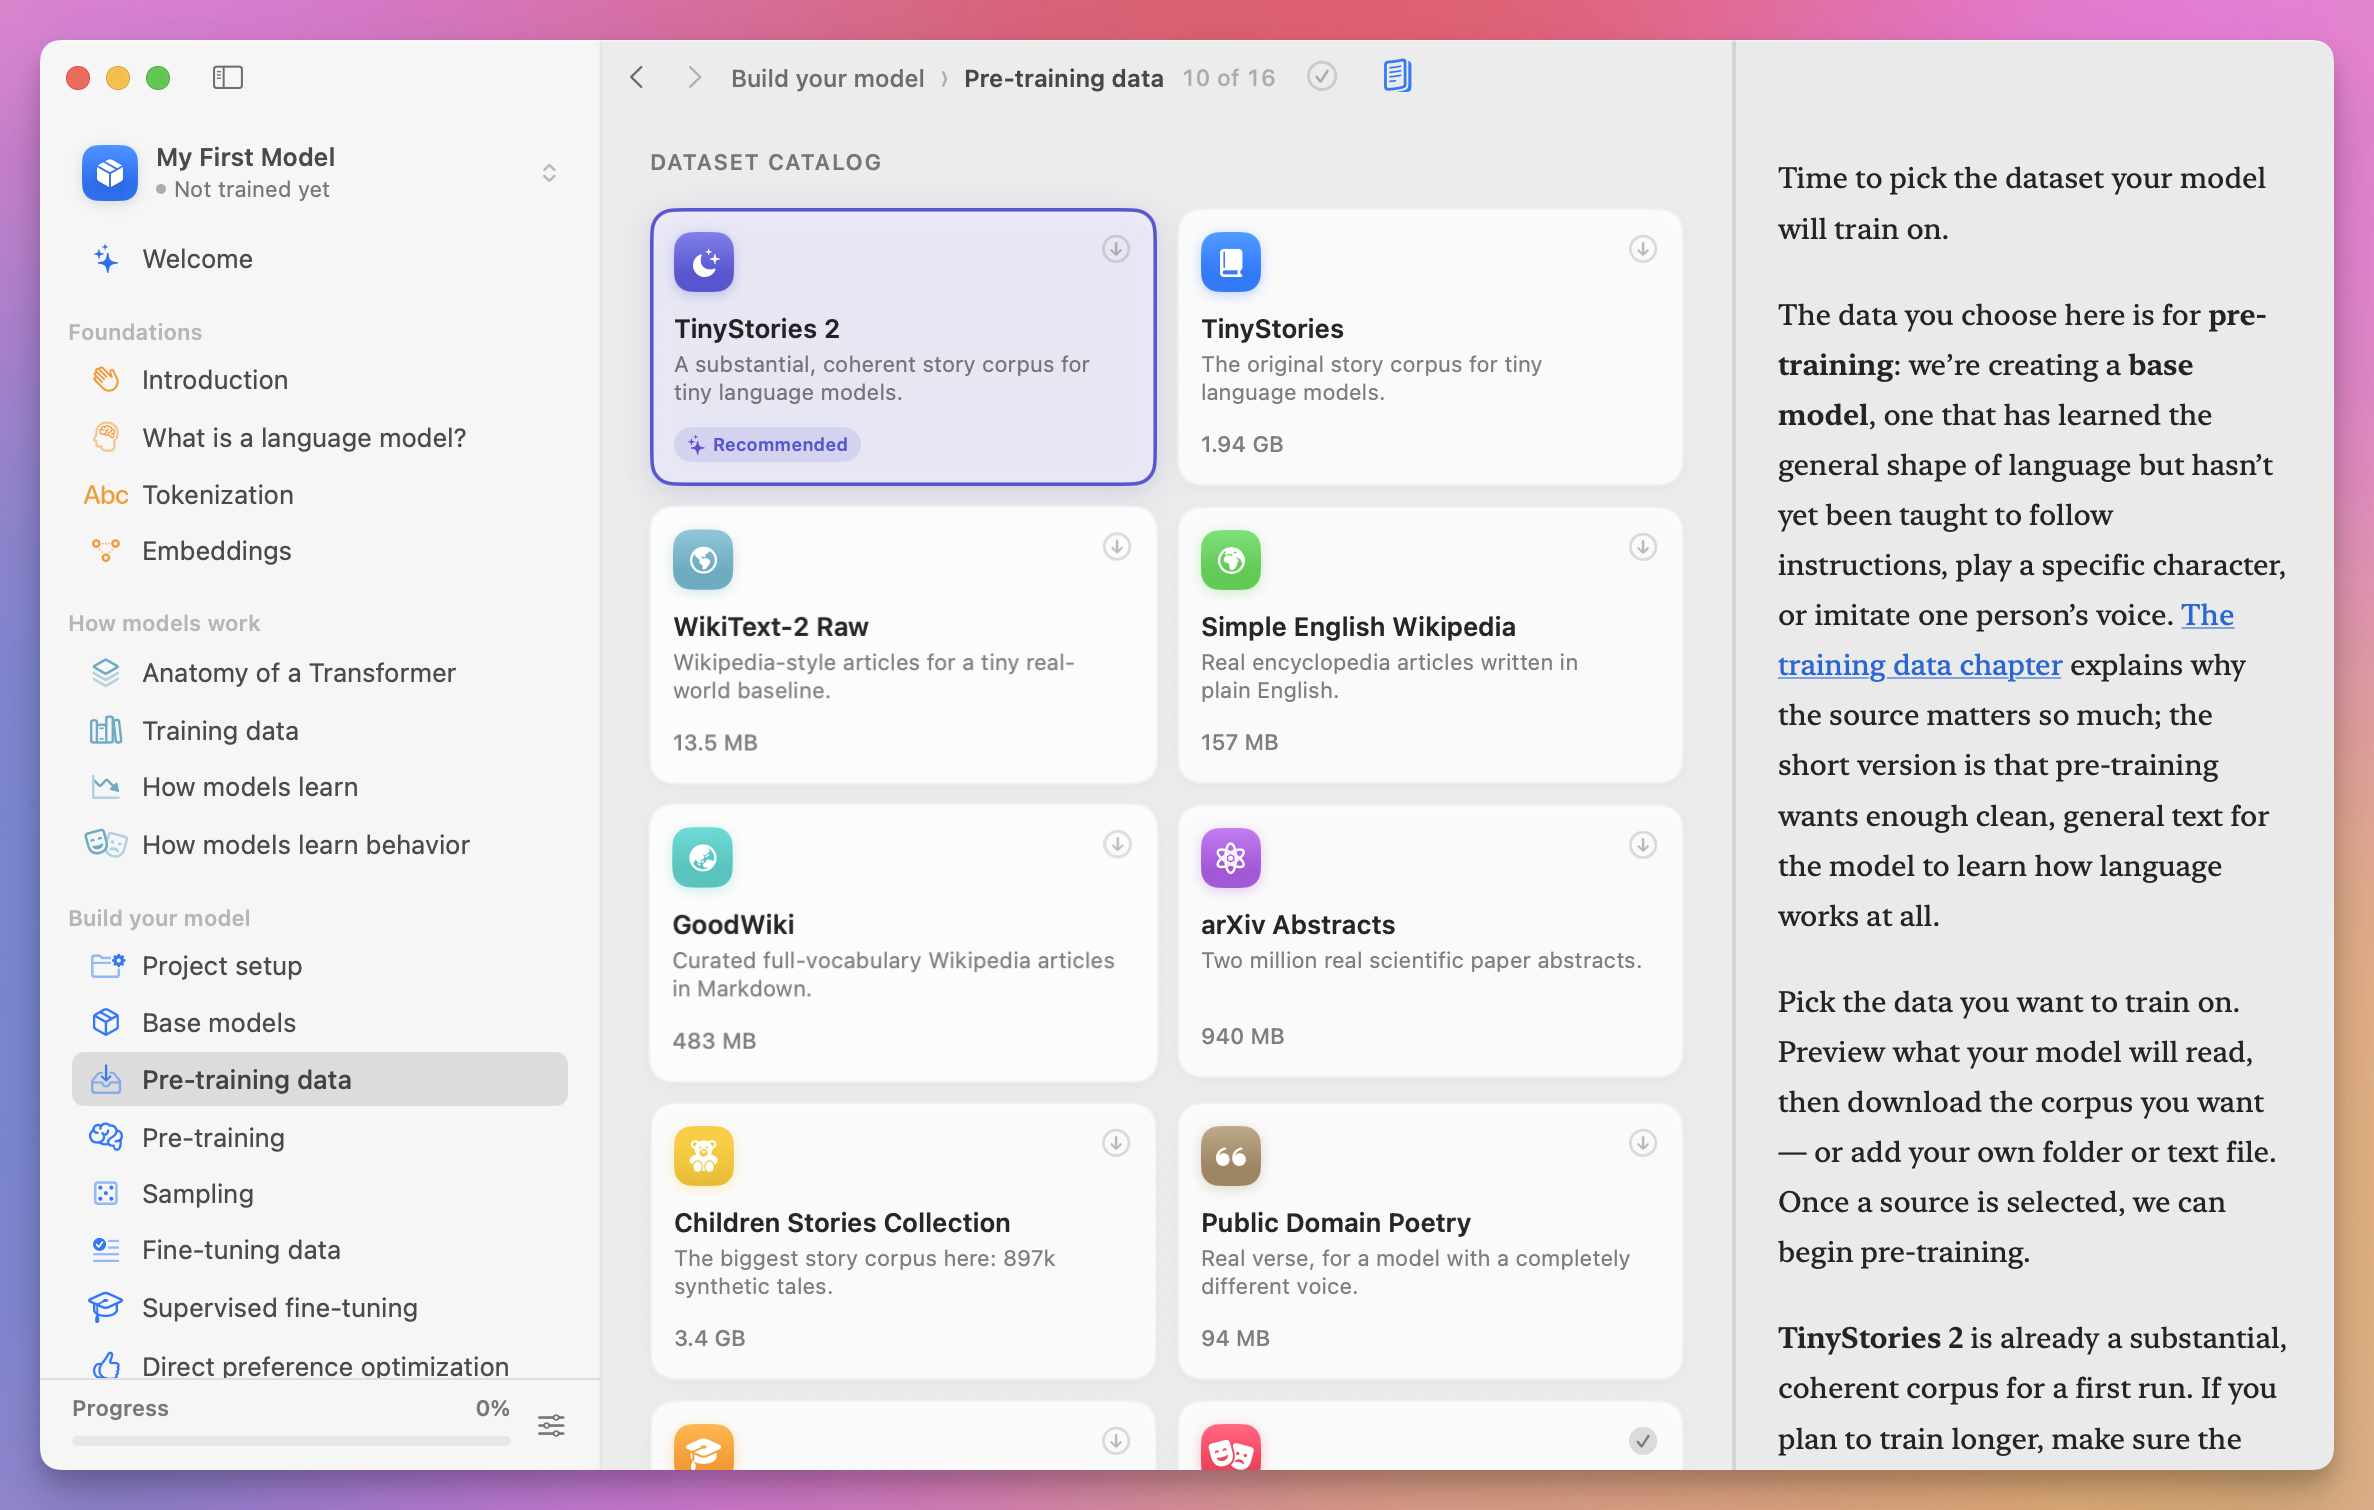
The catalog includes TinyStories, WikiText, Simple English Wikipedia, scientific abstracts, poetry, and other collections.
Choose TinyStories 2.
It contains short stories with a limited vocabulary. This gives a small model a narrow target it can start learning on one Mac.
Inspect the dataset before downloading it.
Check:
- source
- license
- size
- sample records
- repeated boilerplate
- broken text
- private or unwanted content
The model can only learn patterns that exist in its data. Train on stories and you get a storyteller. Train on scientific abstracts and you get something very different. So the dataset is one of the main inputs to the build, and it deserves the same attention as the architecture.
If you later use your own data, keep the exact input or a versioned manifest of it. Otherwise, you cannot reproduce the result.
Pre-training is a long-running background job
Open Pre-training.
Before starting, confirm the summary matches your notes:
- dataset
- tokenizer
- parameter count
- number of steps
- estimated duration
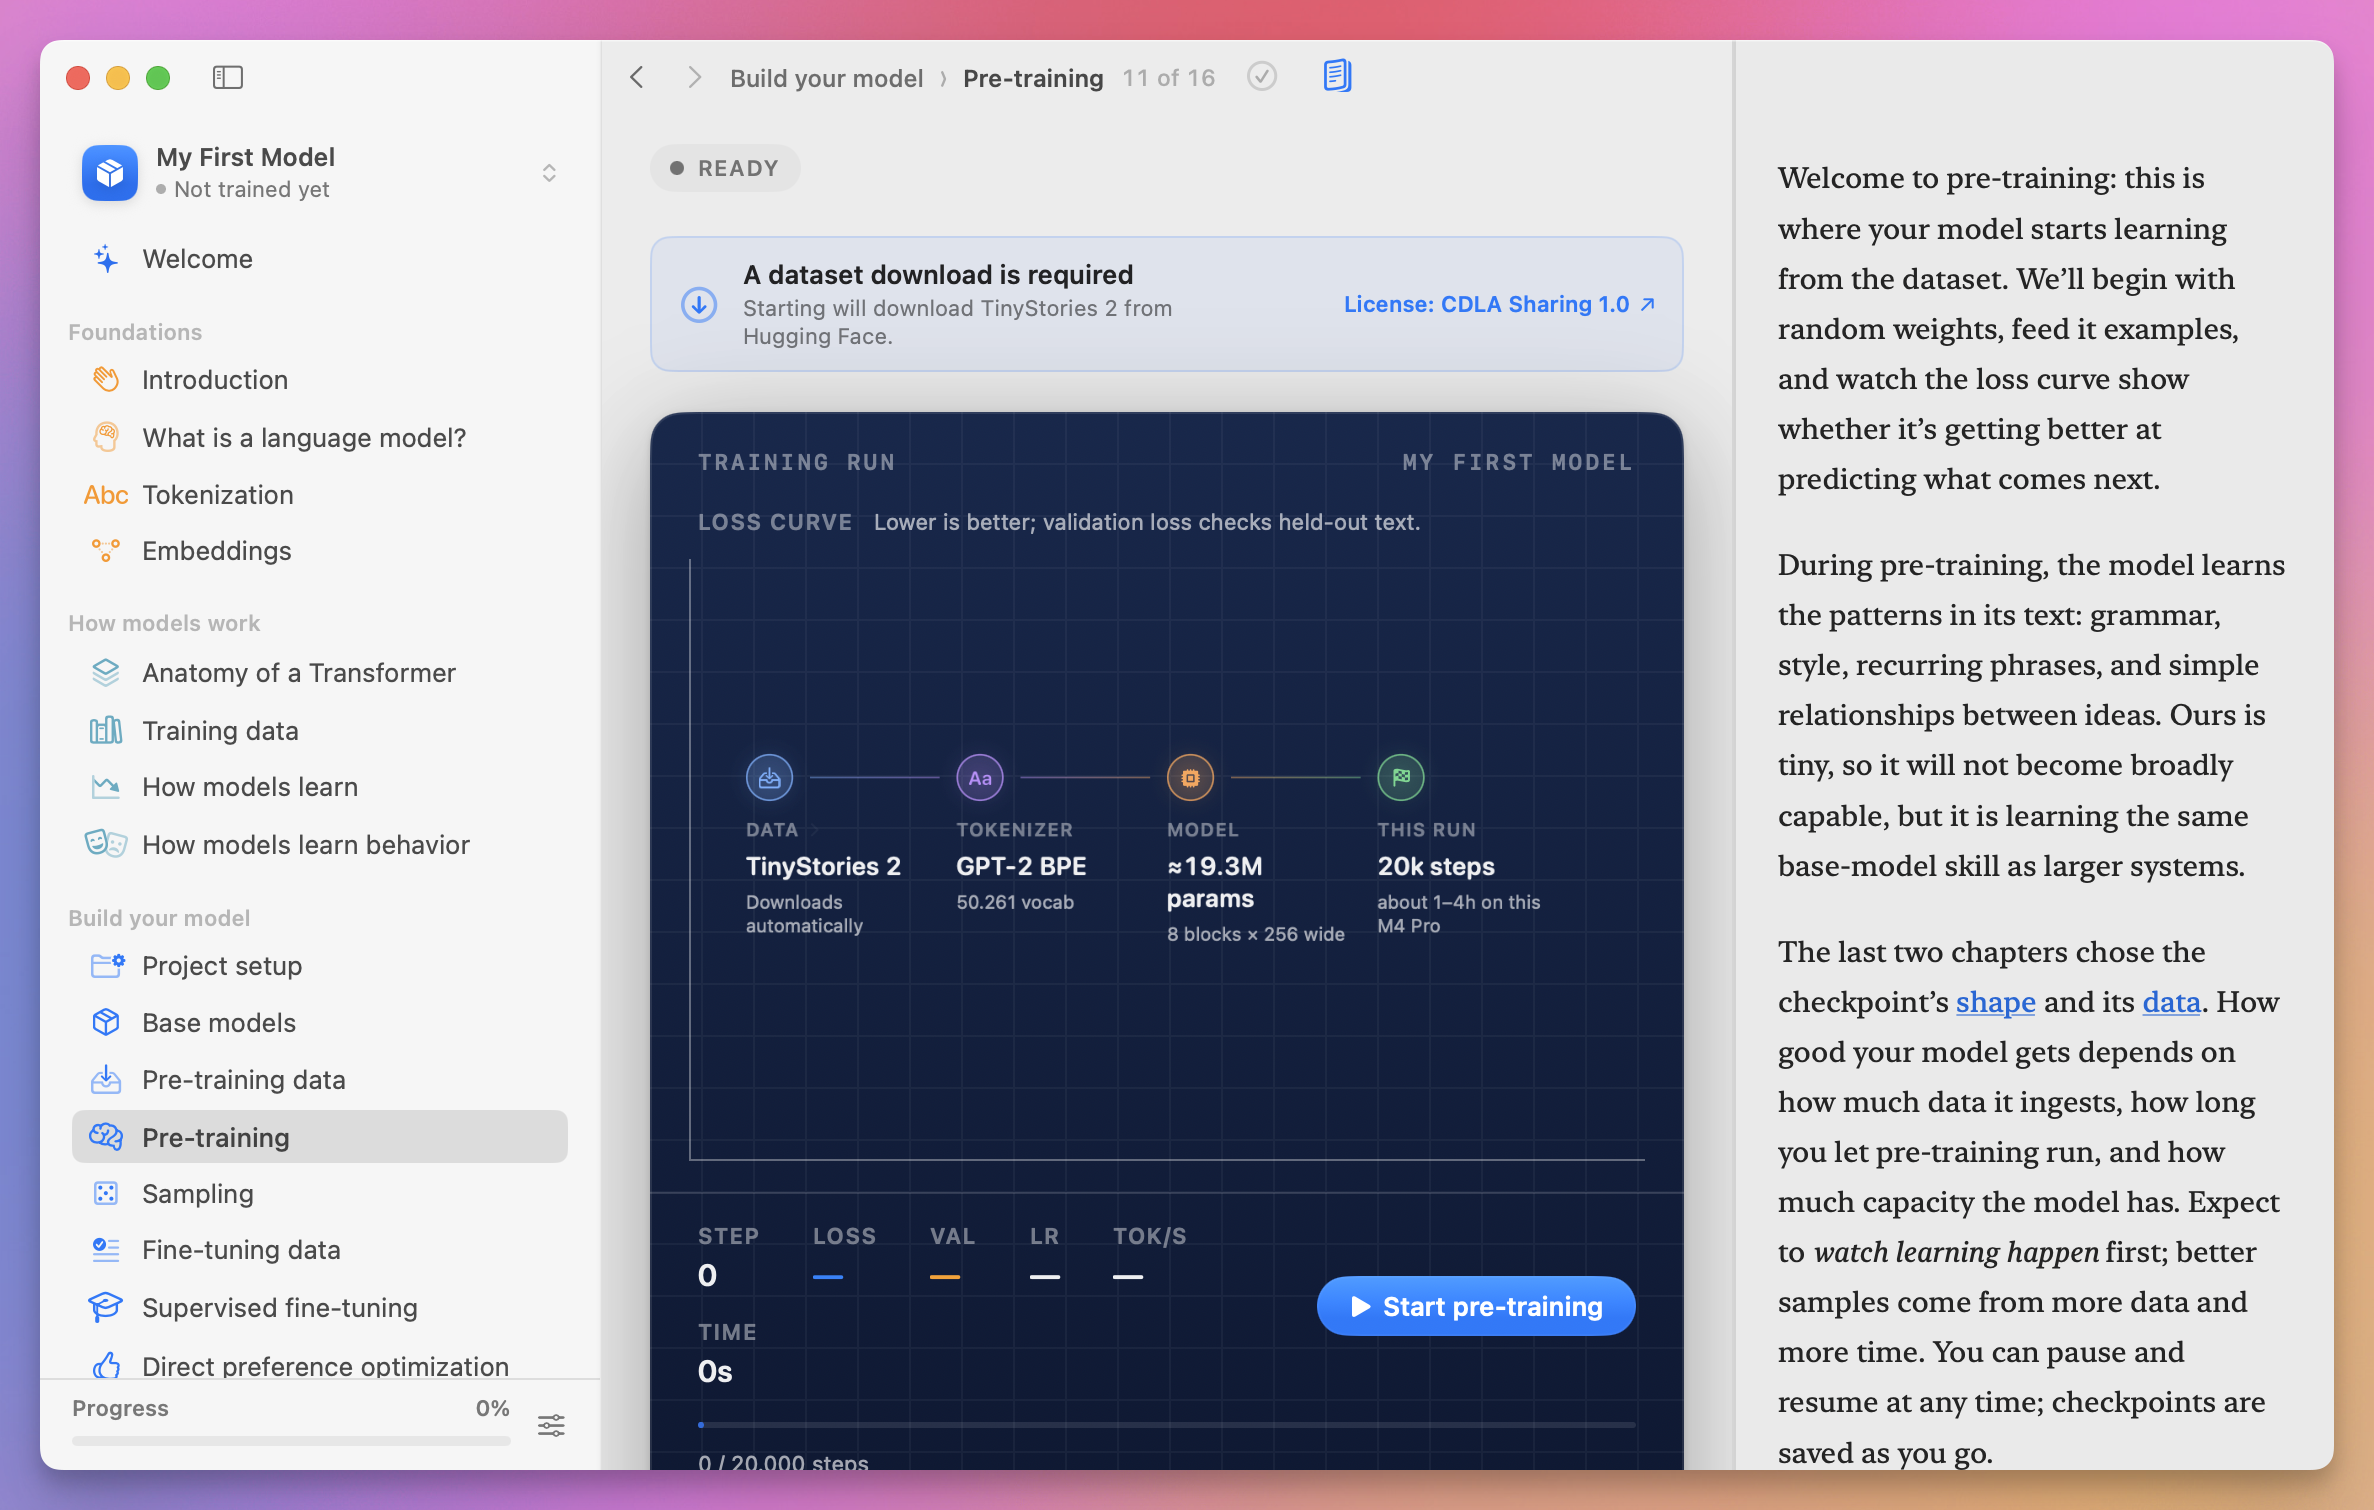
The recommended run uses 20,000 steps.
On my M4 Pro, the app estimated between one and four hours. Your estimate will depend on the model, tokenizer, and Mac.
Connect the Mac to power, then click Start pre-training.
Training does not begin immediately.
The app must first download the data the model needs. In my run, it downloaded about 2.1 GB of TinyStories 2 data from Hugging Face.
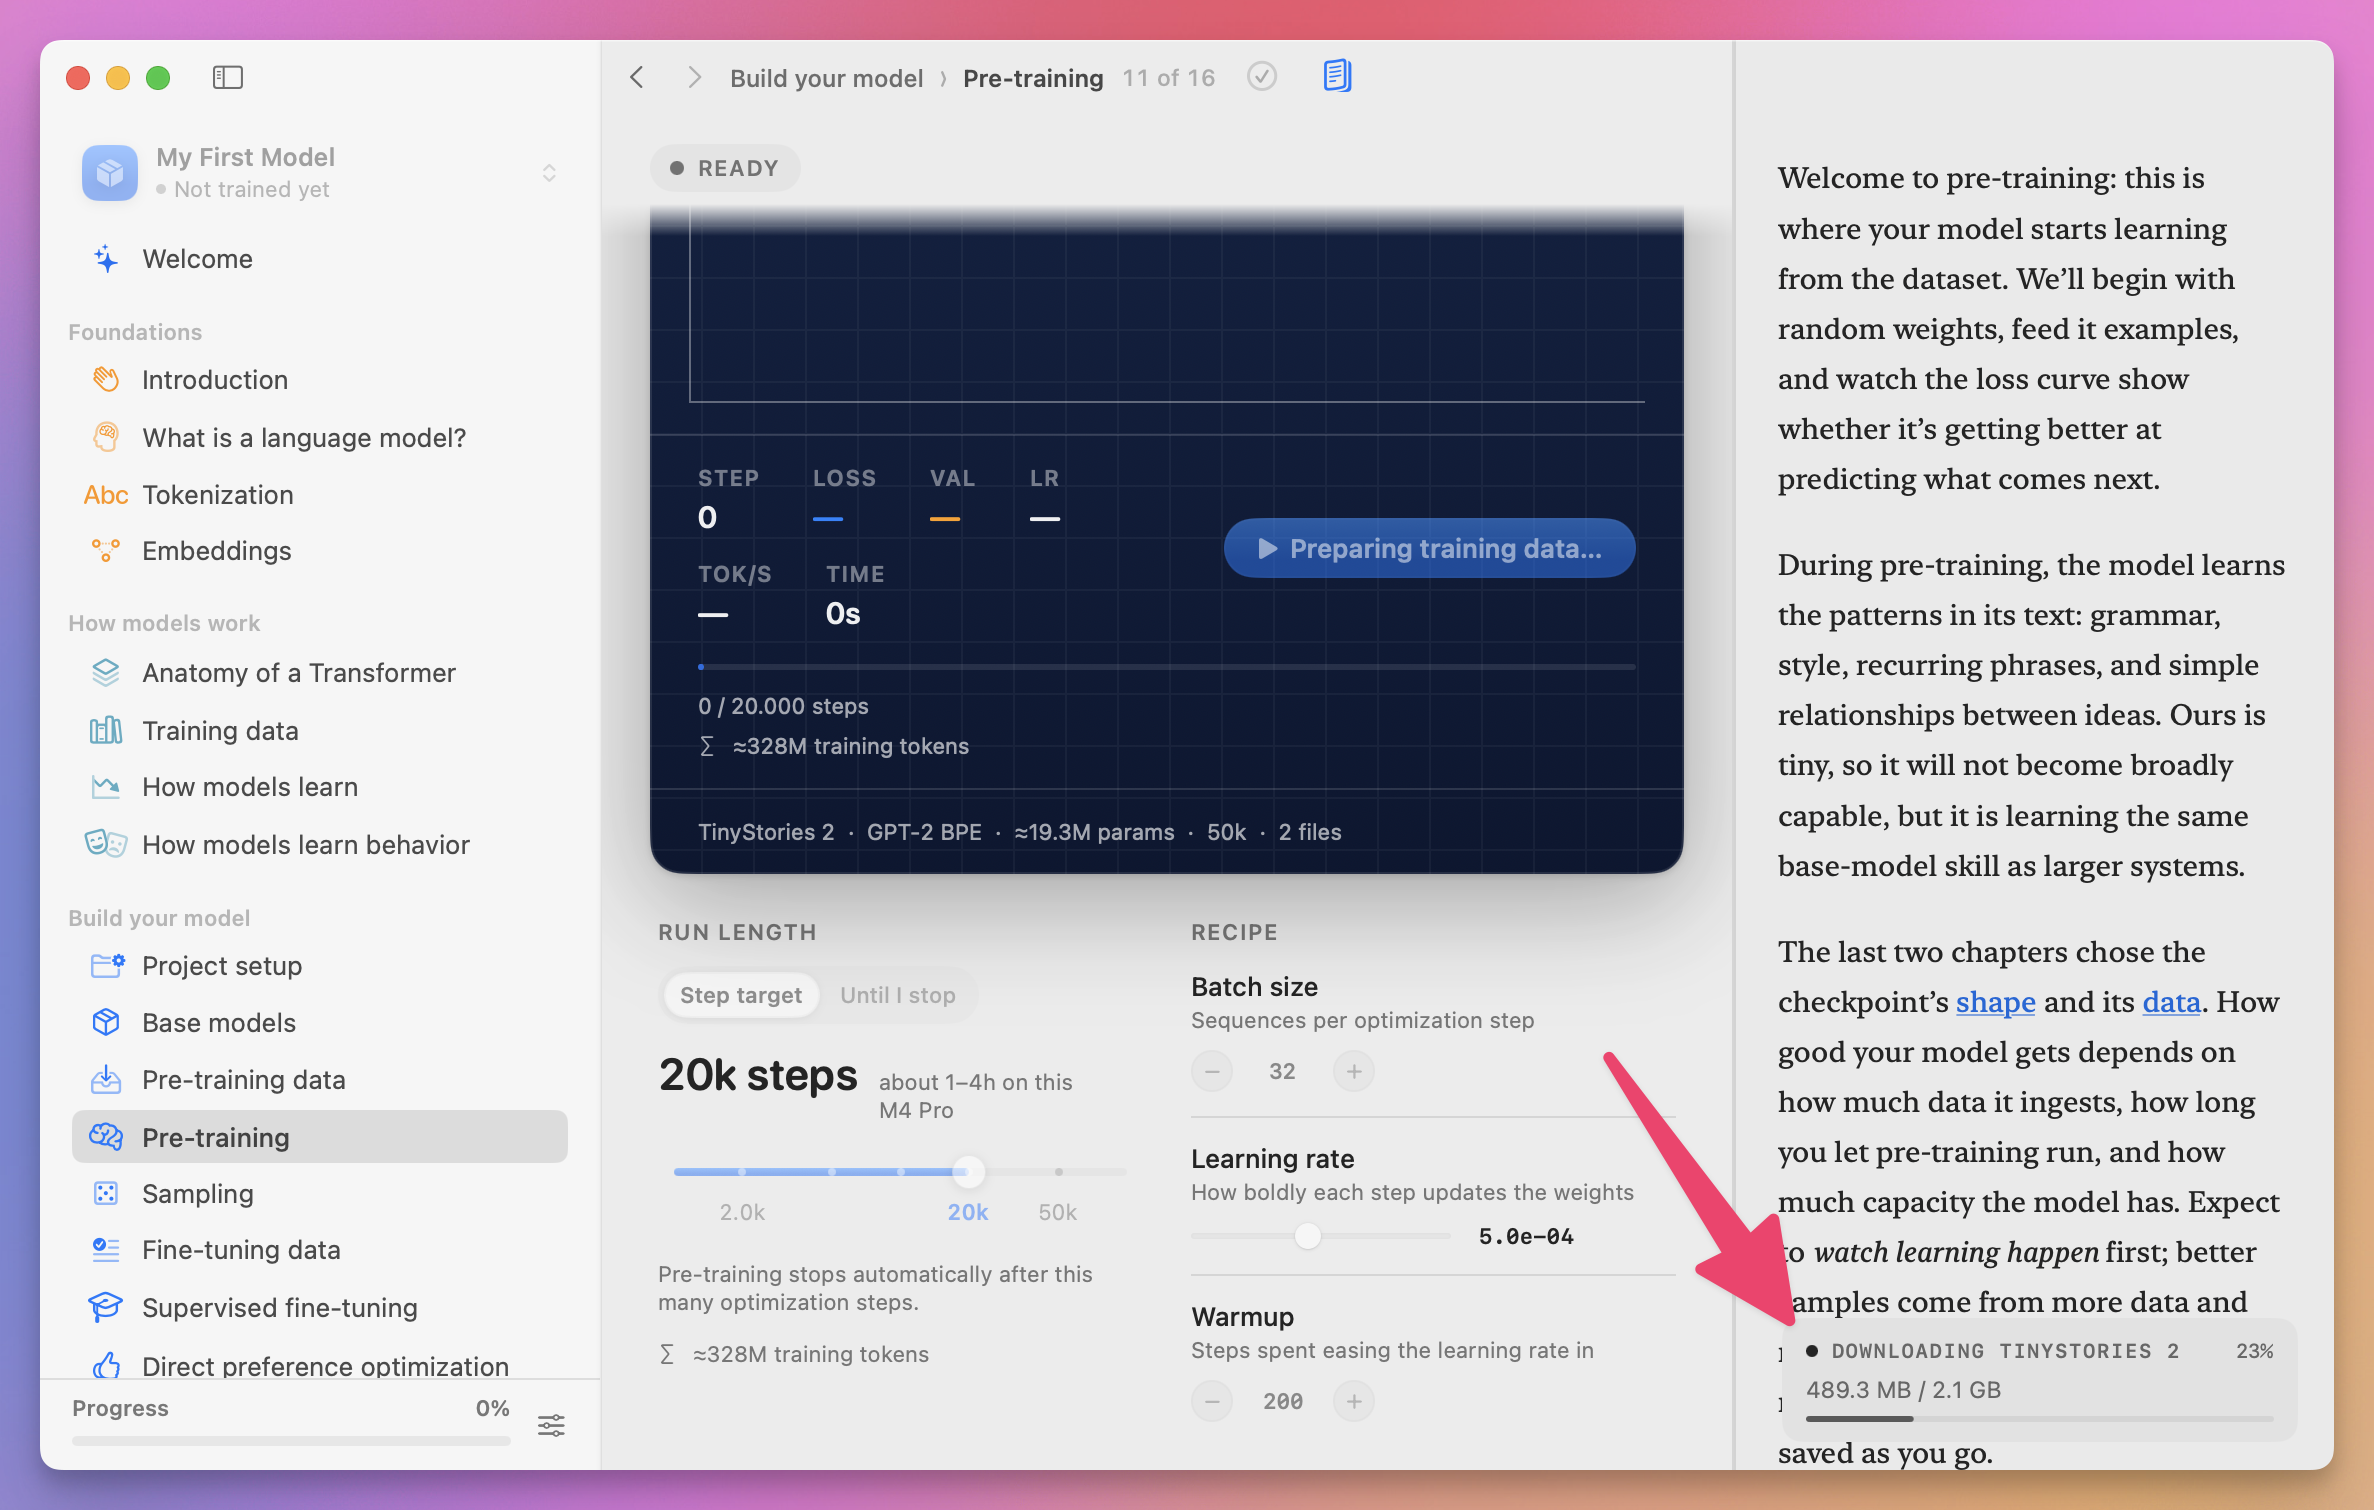
This is the dataset download, not a pretrained model download. We are still starting with random model weights.
After the download, the app prepares the training data and encodes the source files using the selected tokenizer.
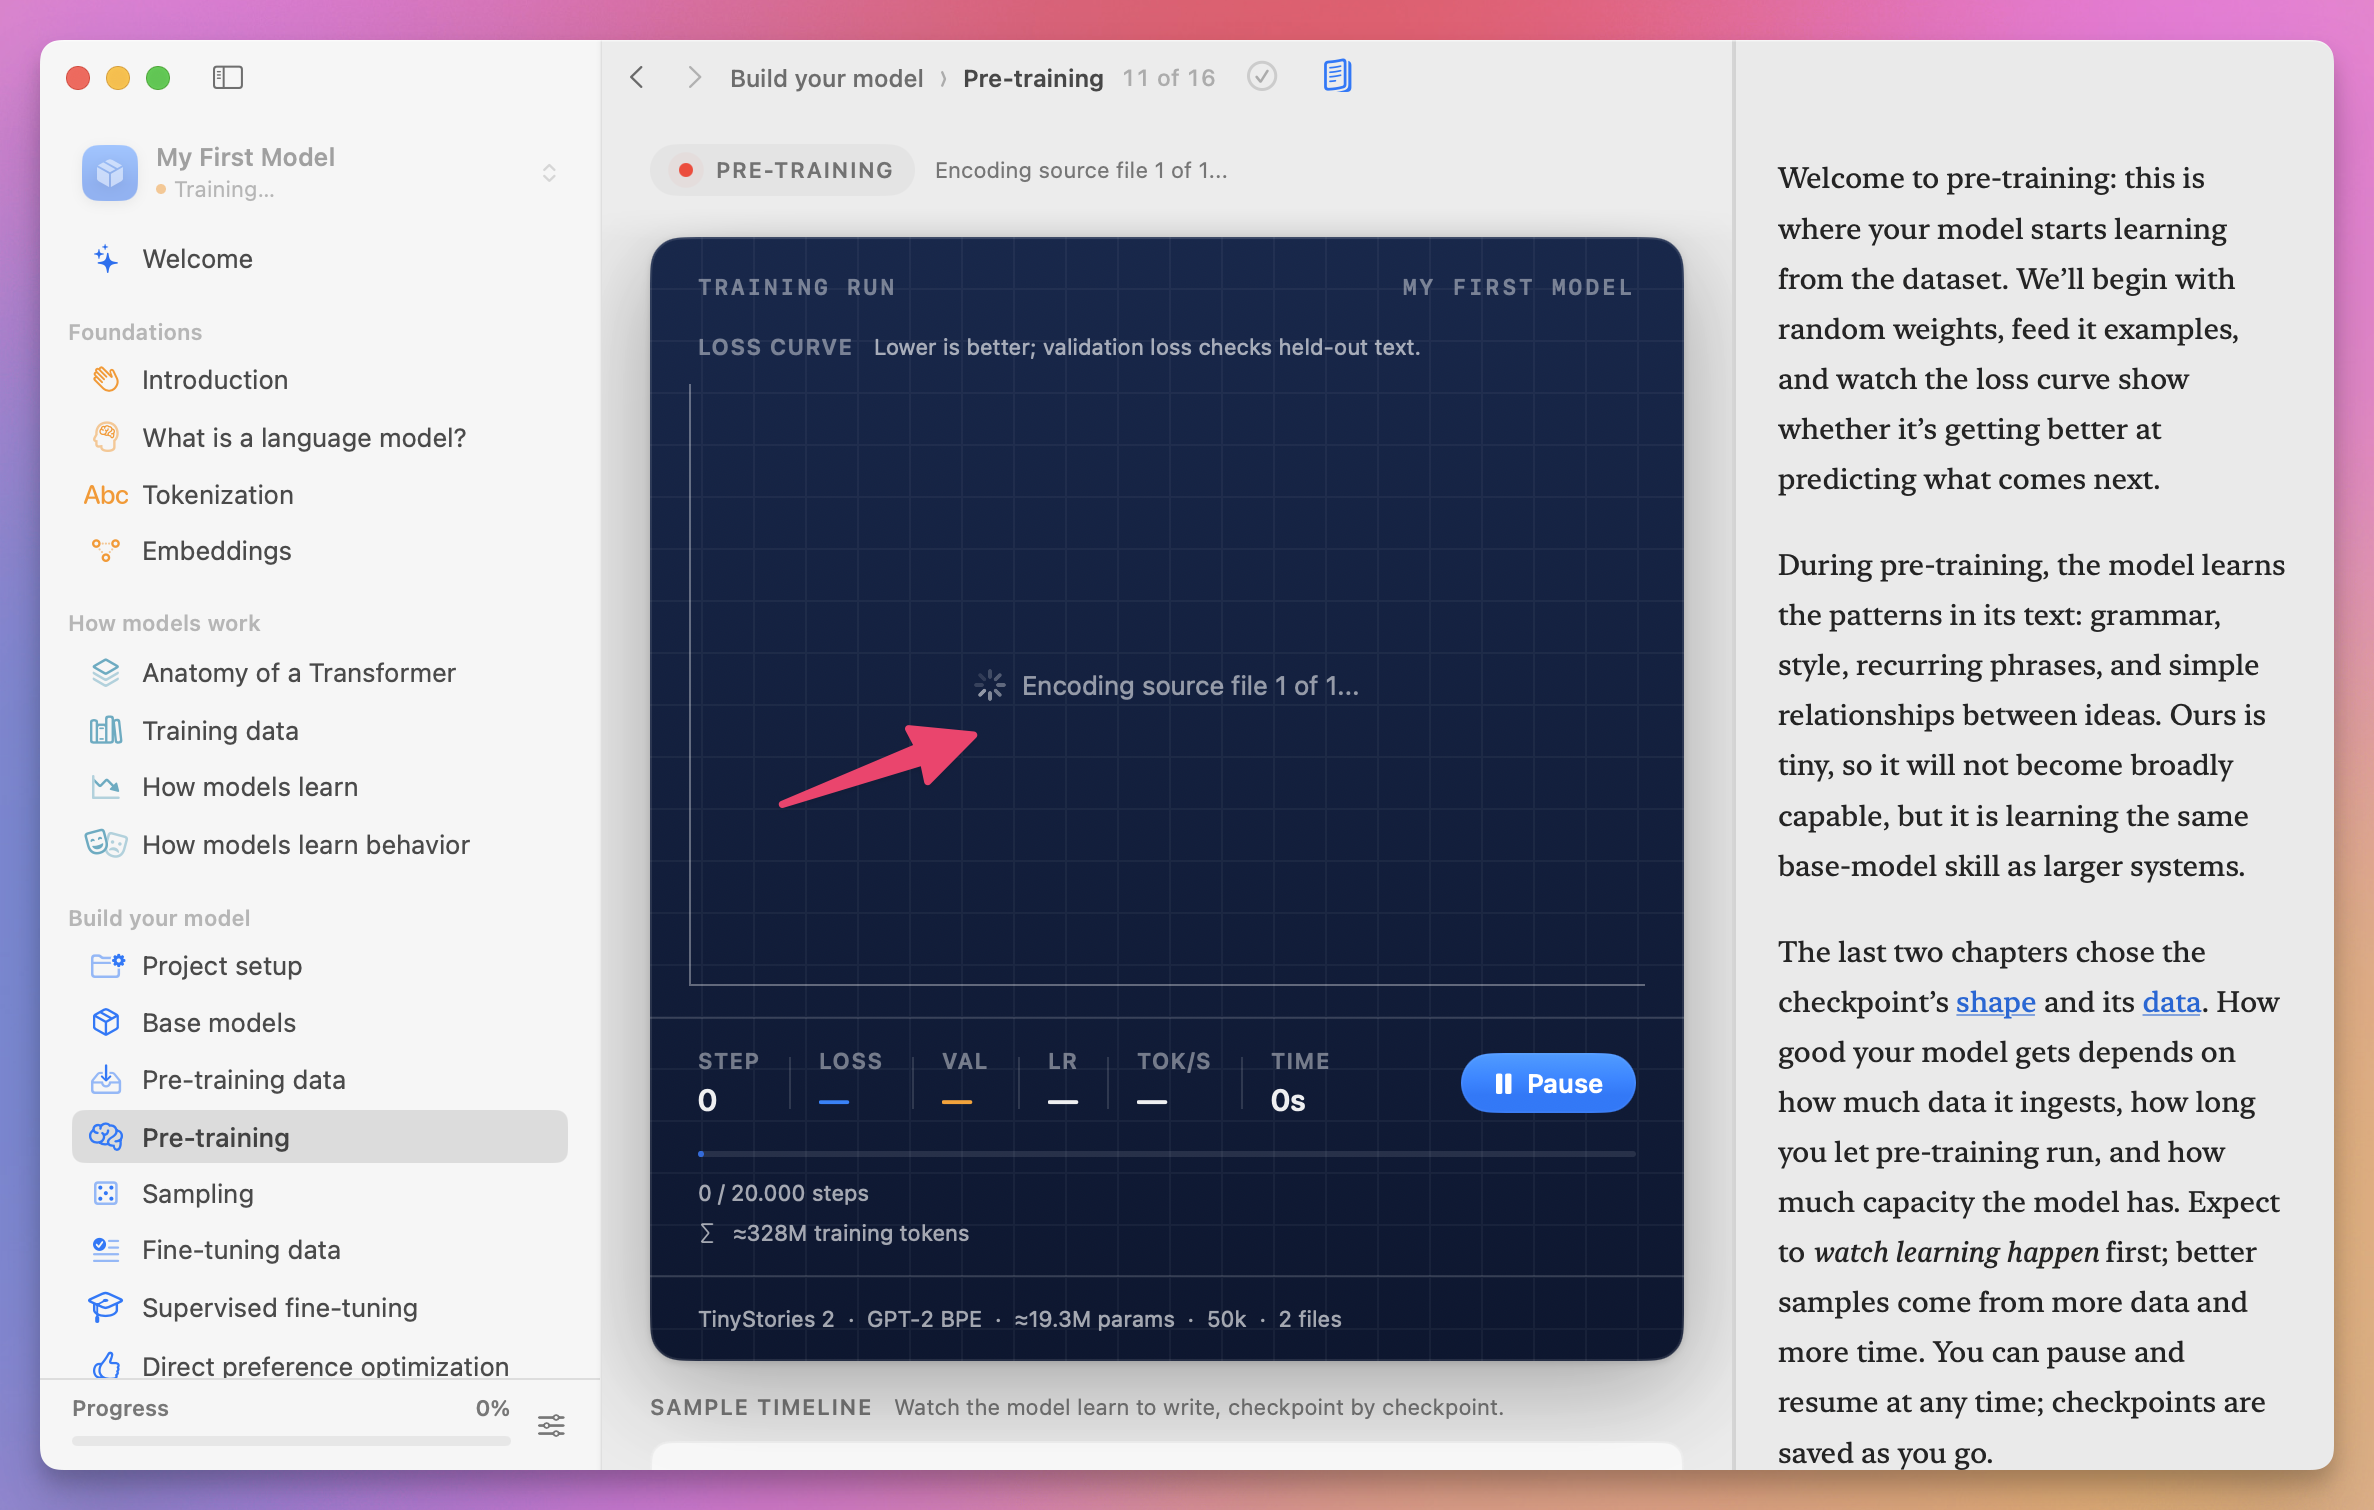
The step counter starts moving only after this preparation finishes.
Treat this like any long-running job.
You want progress metrics, checkpoints, a way to pause, and enough information to resume after a failure.
Record the start time, initial loss, validation loss, and tokens processed per second.
Read the metrics like an engineer
The training screen plots two loss curves.
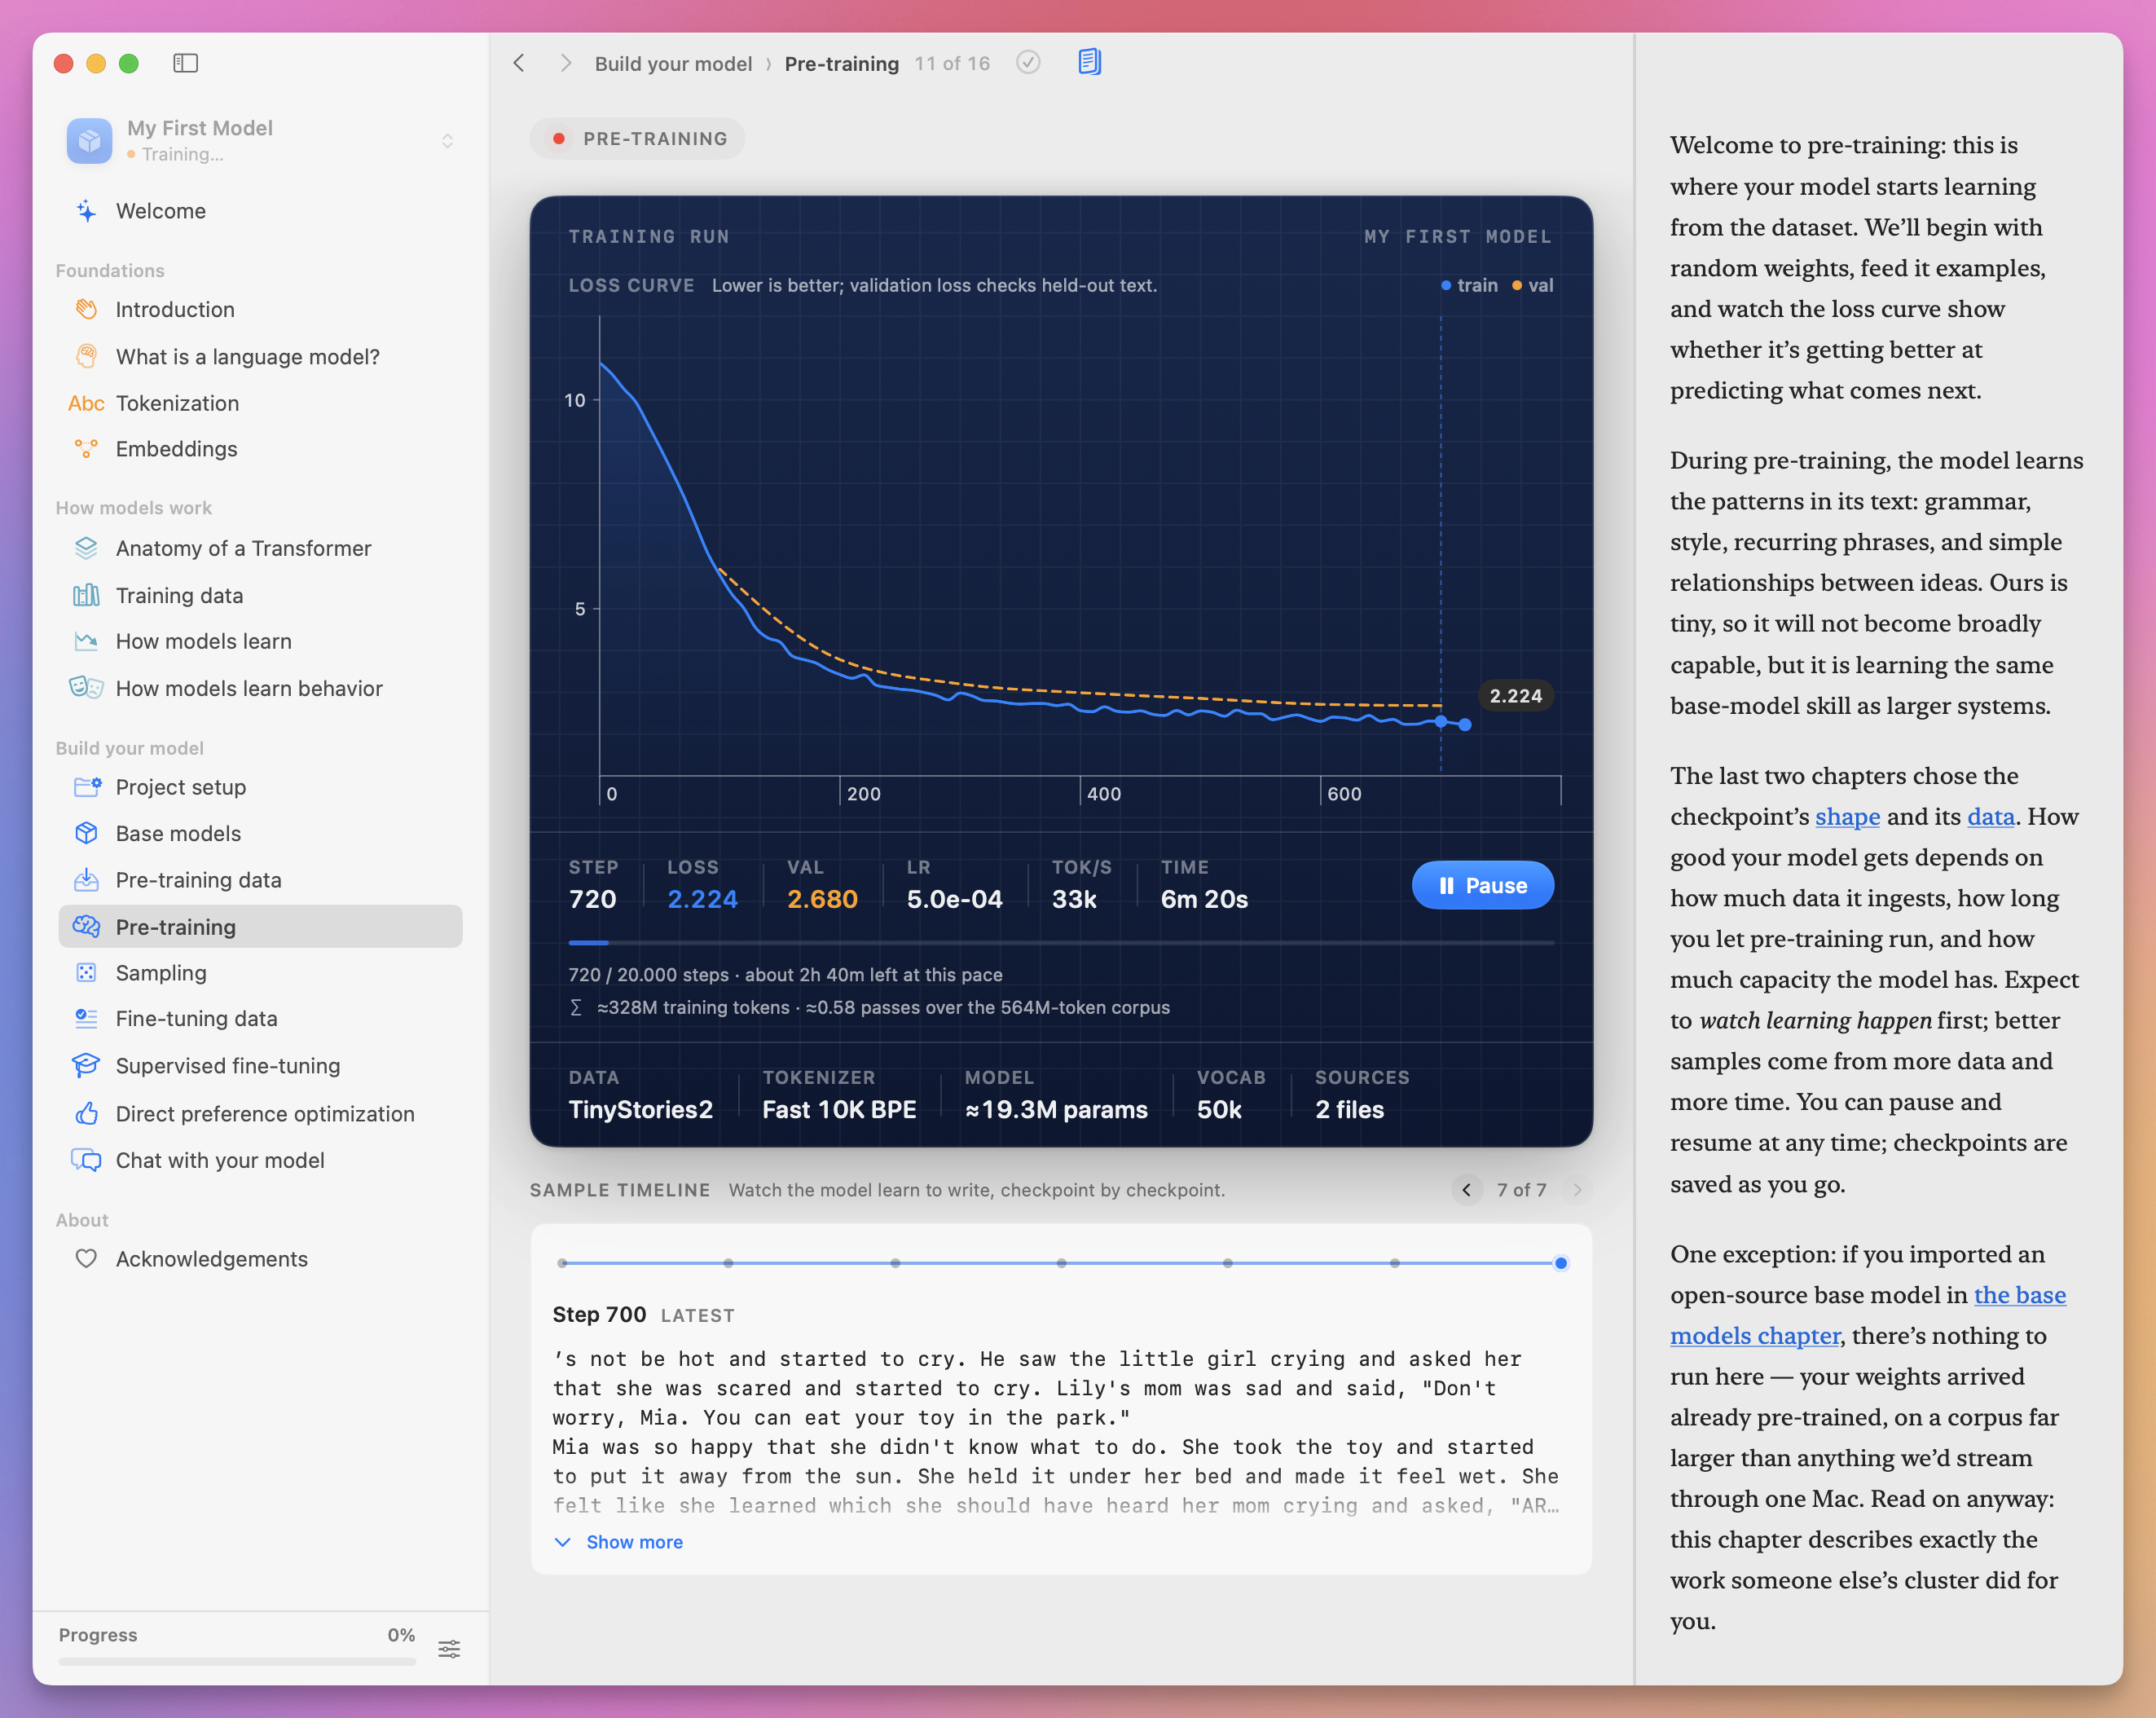
The blue line is training loss. It measures prediction error on the data currently used to update the weights.
The orange line is validation loss. It measures error on held-out data that does not update the weights.
If both improve, the model is learning patterns that also work on unseen examples.
If training loss keeps falling while validation loss rises, the model is fitting the training data without improving on held-out data. This is overfitting.
Do not react to one spike. Look at the trend across many measurements.
Also watch:
- current step
- learning rate
- tokens per second
- elapsed time
- estimated time remaining
Tokens per second tells you how fast the job runs and nothing about the quality of the model. Loss tells you the model is getting better at predicting its data, but not whether the text it generates is any good. For that we need to read samples, which we do in a moment.
At this point, we have to wait.
I waited more than two hours for my run to complete. This is not a quick compile-and-test loop, so start it when you can leave the Mac working for a while.
You do not have to wait for all 20,000 steps before exploring the rest of the app.
Let pre-training run until checkpoints appear in the Sample timeline. Then click Pause.
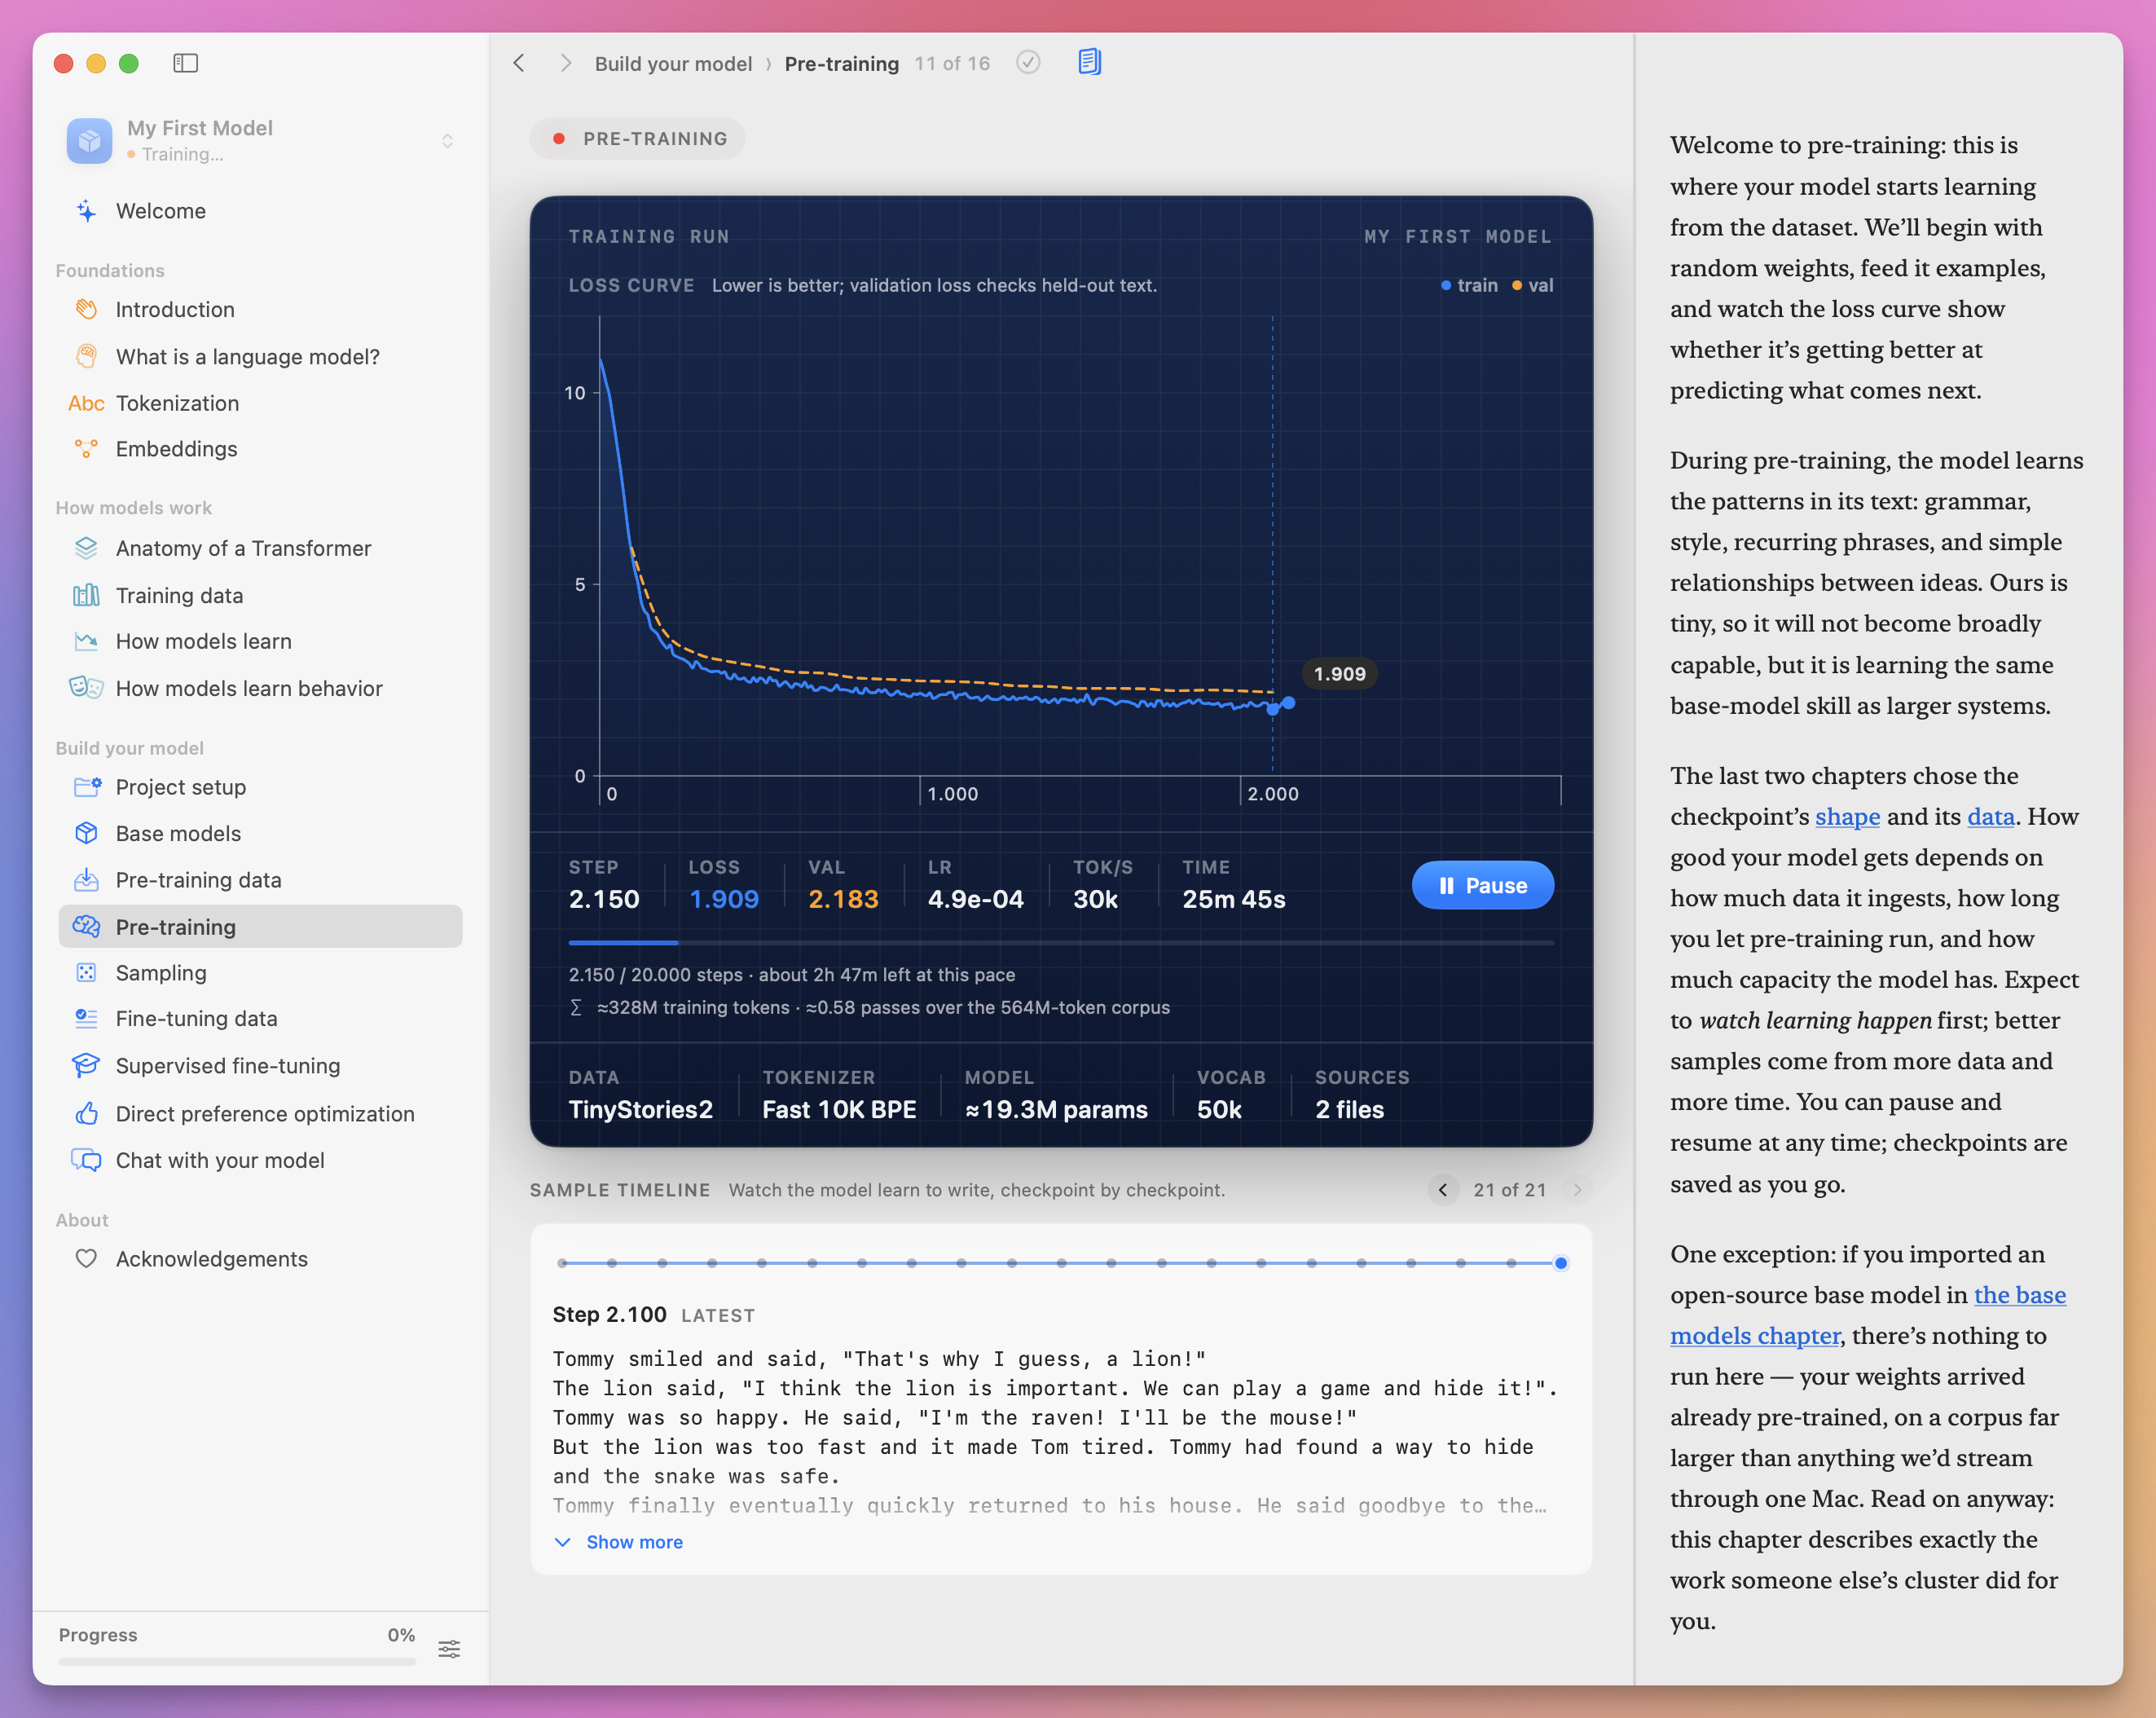
You can now open Sampling and try the latest checkpoint. This is a faster way to understand the complete workflow.
Return to Pre-training and resume the run when you are ready.
Checkpoints are versioned build artifacts
A checkpoint is a saved copy of the model weights at one training step.
Checkpoints let you:
- pause and resume training
- compare earlier and later model states
- return to a better state if later training overfits
- fine-tune a specific base state
Record the step, training loss, validation loss, and sample outputs for each checkpoint you keep.
The latest checkpoint is not automatically the best one.
If the job takes several hours, let it reach a checkpoint before closing the app. Reopen the project and confirm the checkpoint history is present before assuming the run is recoverable.
Sampling is runtime configuration
Open Sampling and choose a checkpoint.
Run the first baseline prompt:
Once upon a time, a small fox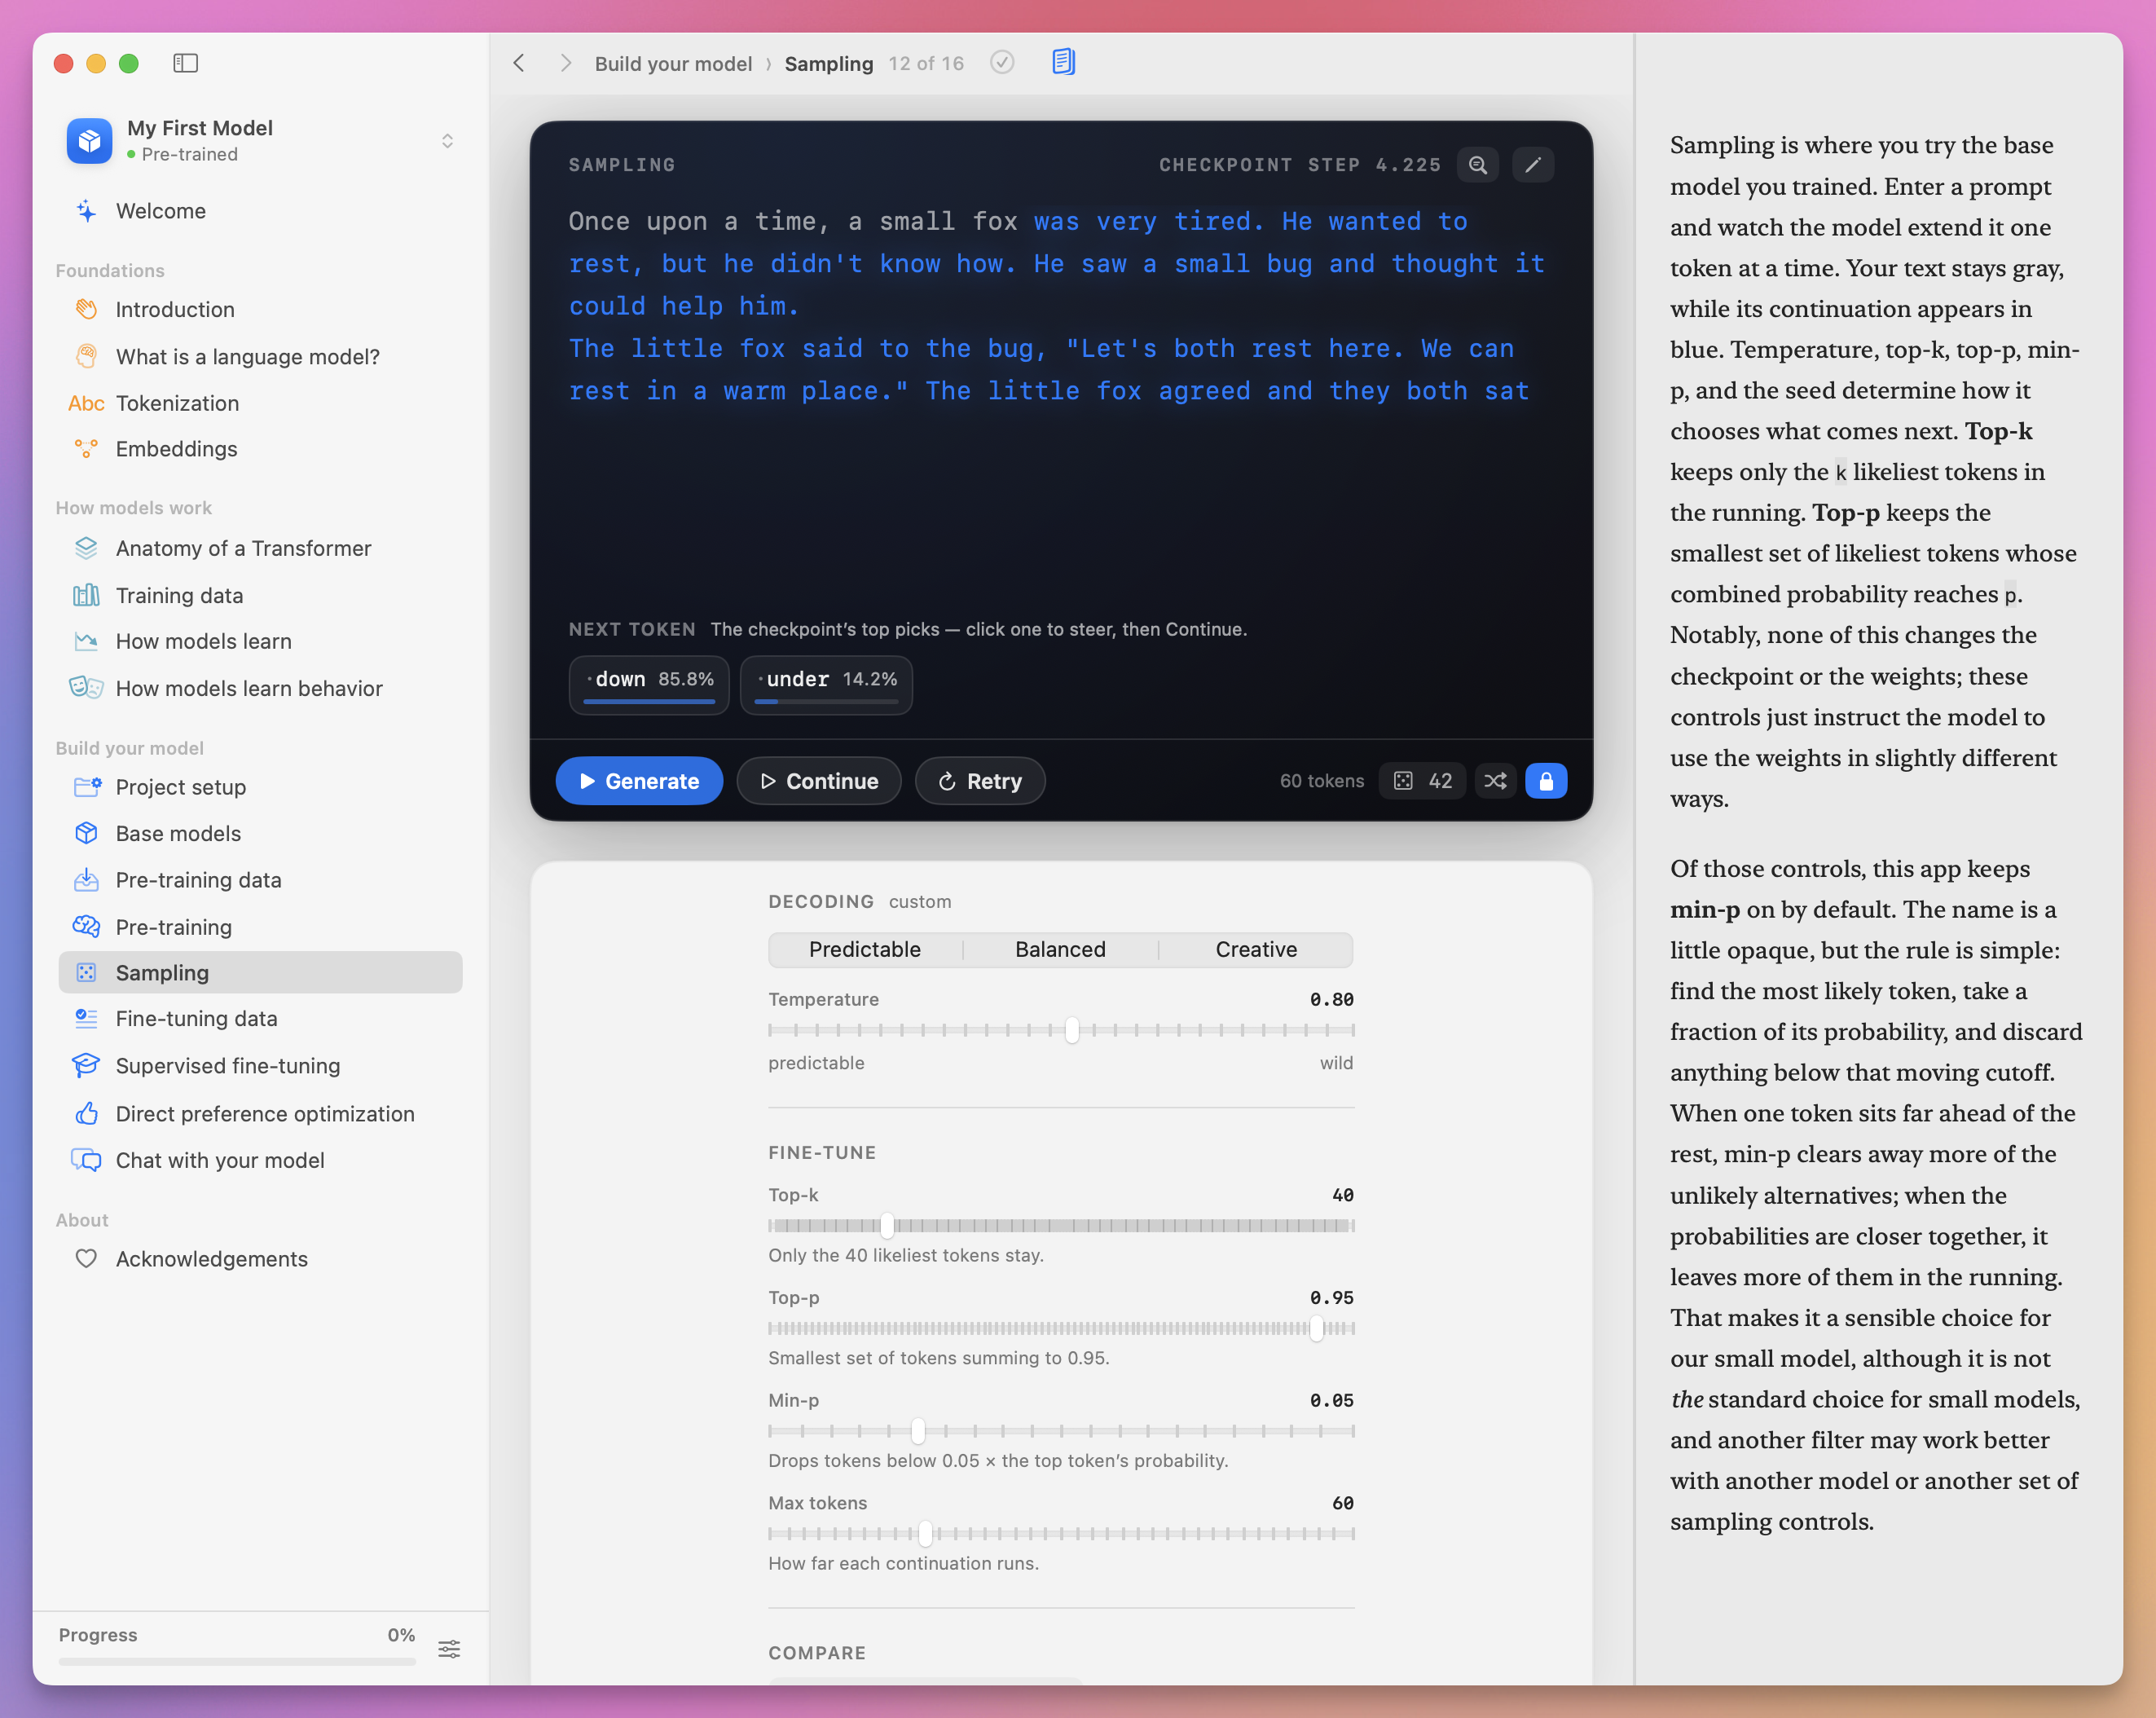
The checkpoint determines the model’s probabilities. The sampling settings determine how the runtime chooses from them.
Changing these controls does not retrain the model.
- Temperature changes how strongly generation favors the most likely tokens.
- Top-k keeps only the
kstrongest candidates. - Top-p keeps the smallest group of candidates whose combined probability reaches the selected value.
- Min-p removes candidates that are extremely weak relative to the strongest one.
- The random seed makes a sample reproducible when the checkpoint, prompt, and other settings stay the same.
This is the model equivalent of testing the same build with different runtime flags.
For checkpoint comparisons, keep every setting fixed.
Decide when the run is good enough
There is no universal loss number that means the model is finished.
Use three signals together:
- validation loss
- the gap between training and validation loss
- samples from fixed prompts and settings
If validation loss and samples keep improving, more training may help.
If validation loss has stopped improving, more steps may waste time or make the model worse on unseen data.
Our 19.3-million-parameter model will stay limited. What we want is an improvement we can see and explain.
Pre-training does not define product behavior
Pre-training teaches the model to continue text.
It does not create a reliable chat interface.
A pre-trained model may complete this pattern:
User: Tell me a short story.
Assistant:
But it was not specifically trained to treat the first line as a request and the second as a response boundary.
That behavior comes from another training stage.
Supervised fine-tuning teaches the interaction contract
Supervised fine-tuning, or SFT, trains the model on prompts and desired responses.
Open Fine-tuning data and inspect a conversational dataset.
Each example usually contains:
- a system instruction
- a user message
- an assistant response
Reserved chat tokens mark where each role starts and ends.
From a software-engineering perspective, SFT teaches the model the interaction contract we expect at runtime.
Open Supervised fine-tuning, select the checkpoint with the best validation result, and use the recommended settings.
After SFT saves a checkpoint, repeat the three baseline prompts with the same sampling settings.
Record what improved and what regressed.
SFT changes how the model responds. It does not add knowledge the model never saw during pre-training.
DPO is an optional policy-tuning stage
Direct preference optimization, or DPO, learns from pairs of preferred and rejected answers.
Open Direct preference optimization.
The app runs the same prompt twice. Choose the answer you would rather receive.
The app stores:
- the prompt
- the chosen answer
- the rejected answer
Four pairs are enough to start a run and see the mechanism work. Shaping real behavior takes many more.
Think of preference pairs as policy tests. If the criteria are inconsistent, the training signal will be inconsistent too.
For a first experiment, DPO is optional. Pre-training plus SFT already teaches the main pipeline.
Use chat as an integration test
Open Chat with your model.
Choose the checkpoint you want to test: pre-trained, SFT, or DPO.
Start with prompts that match the training data:
Tell me a story about a brave little boat.Then test inputs outside the happy path:
- a malformed request
- a request outside the dataset’s domain
- a long conversation near the context limit
- a prompt with unusual names or symbols
Record the exact system instruction and sampling settings.
Chat makes the model look familiar, but it is still a runtime calling next-token prediction repeatedly.
X-ray mode is the debugger
Click X-ray in the chat toolbar.
The response becomes a sequence of individual tokens. Stronger colors indicate higher sampling probabilities.
Click one token to see the alternatives available at that position.
This view is useful when a generation surprises you. It can show whether one token dominated or several choices had similar probability.
It shows the probabilities at each step, which is all the model has, so don’t read it as a thought process.
The transcript panel shows the raw role tokens and messages sent to the model. The context meter shows how much of the 512-token window is in use.
When the conversation exceeds that window, the runtime cannot keep every old token in the active input. That is a hard limit of the model, and every chat product built on an LLM has to work around it somehow.
Build an evaluation instead of judging by vibes
Run the same three prompts against the pre-trained, SFT, and DPO checkpoints.
Keep these values identical:
- temperature
- top-k
- top-p
- min-p
- maximum tokens
- random seed
- system instruction
Save every output, including the bad ones.
Add a table to model-lab.md:
| Prompt | Pre-trained | SFT | DPO |
| --- | --- | --- | --- |
| Small fox | | | |
| Robot door | | | |
| Mia and the sky | | | |
Evaluate things you can observe:
- complete sentence
- repetition
- stays on topic
- follows the requested format
- unsupported claims
Keep the raw output below the table, because a score without the generation is hard to audit.
Choose the checkpoint you would keep and write one reason supported by the results.
Exporting a model means exporting an artifact
Language Model Builder can export weights using the safetensors format.
The weights alone are not enough to run the model. A compatible runtime also needs:
- the architecture definition
- the tokenizer
- the vocabulary and token mapping
- the expected chat format
- the sampling configuration
Keep the Language Model Builder project and model-lab.md beside the exported weights.
Six months from now you will want to know how that file was produced.
How I would use this as a software engineer
I would build this small model once to remove the magic from the stack.
I would not use it as the base of a customer-facing general assistant. It is too small, too narrow, and too expensive to improve into a competitive model by myself.
What I’d get out of it is the mental model.
When an AI feature behaves badly, I can now separate several possible causes:
- the tokenizer handled the input poorly
- important context did not fit in the window
- the model never learned the required domain
- the fine-tuning data taught the wrong interaction pattern
- the prompt is ambiguous
- the sampling settings are too aggressive
- the application failed to validate the output
Those are different bugs, and each one needs a different fix.
This experiment also makes model APIs easier to reason about. An API hides training, weights, and most of the runtime, but the same boundaries still exist.
If you are deciding between running models yourself and paying for an API, I did the math in Running LLMs locally vs paying for an API.
For production software, I would usually start with an existing model and build strong application boundaries around it:
- validate inputs
- control context
- request structured output where possible
- add deterministic code for business rules
- test representative prompts
- log failures without leaking private data
- keep the model provider replaceable
Building one tiny model helps explain why those practices matter.
Try one controlled change next
Once the default project works, create a second project.
Change one variable.
For example, keep the architecture, tokenizer, and step budget fixed. Replace TinyStories with text you own, such as public blog posts or product documentation.
Clean the input first. Remove duplicated pages, navigation, broken encoding, secrets, and content you do not want the model to imitate.
Then compare:
- tokenization
- training speed
- validation loss
- outputs from the same test prompts
- repeated failure patterns
Because only the dataset changed, you can explain the difference more confidently.
Other useful experiments include changing the context length, Transformer depth, embedding width, tokenizer, or training duration, as long as you change one thing per run.
Common software-engineering mistakes in this experiment
Starting with the largest model the Mac can handle. A bigger model makes every feedback loop slower, and the first run is mostly about learning the workflow. Finish one small run end to end before adding capacity.
Changing the configuration without starting a new run. Give every run an identifier, such as starter-tinystories-20k, and record the full configuration next to its checkpoints. Otherwise two weeks later you cannot tell which checkpoint came from which settings.
Watching only training loss. It can keep improving while the model gets worse on held-out data. Watch validation loss too, and keep running the fixed prompts.
Comparing outputs produced with different runtime settings. If temperature, seed, prompt or system instruction changed between two samples, the comparison says nothing about the checkpoints.
Keeping only the best output. One good sample works for a demo, but an evaluation needs the weak outputs and the recurring failures as well.
Treating local training as automatically safe. Training on your Mac keeps data away from a cloud service. It does not give you permission to use private, copyrighted or licensed material. Use data you are allowed to use.
How this differs from a production LLM
Our model uses the same central pipeline as larger GPT-style models:
- tokenization
- embeddings
- causal attention
- Transformer blocks
- next-token prediction
- gradient-based training
- supervised fine-tuning
- probabilistic sampling
The scale is completely different.
Production models can have billions of parameters. They train on enormous datasets using distributed accelerator clusters and extensive evaluation systems.
Even just running one of those models locally has real hardware requirements. I covered them in How much VRAM do you need to run an LLM locally?
Language Model Builder keeps the system small enough to run on one Mac.
That is why it works as a learning tool. The infrastructure and the budget are gone, but the boundaries are the same ones a production model has.
What you built
You started from random weights. You picked a tokenizer and an architecture, chose the data, ran a long background job, watched the metrics, kept versioned checkpoints, changed the behavior with fine-tuning and tested the result with fixed prompts. Described that way, it is a software project that happens to produce a language model.
Behind every LLM API there is the same stack:
architecture
  + tokenizer
  + data
  + learned weights
  + behavior training
  + runtime sampling
  + application code
Download Language Model Builder and do the smallest recommended run first. If you prefer to follow individual lessons and quizzes, the free Build a Language Model on Your Mac course covers the same project.
You won’t build ChatGPT on a laptop. But once you have watched a 19-million-parameter model go from noise to sentences, the big ones stop being magic, and you build better software around them.
Want me to talk about your product? You can sponsor this site.
Related posts about ai: