Airtable API for Developers
By Flavio Copes
Learn why Airtable, a hybrid of spreadsheet and database, is great for prototyping MVPs, and how its REST API and excellent docs make it easy to work with.
Airtable is an amazing tool.
It’s a mix between a spreadsheet and a database.
As a developer you get to create a database with a very nice to use interface, with the ease of use and editing of a spreadsheet, and you can easily update your records even from a mobile app.
Perfect for prototypes
Airtable is much more than a glorified spreadsheet, however. It is a perfect tool for a developer looking to prototype or create an MVP of an application.
An MVP, or Minimum Viable Product, is one initial version of an application or product.
Most products fail not because of technical limitations or because “the stack did not scale”. They fail because either there is no need for them, or the maker does not have a clear way to market the product.
Creating an MVP minimizes the risks of spending months trying to build the perfect app, and then realizing no one wants it.
A great API
Airtable has an absolutely nice API to work with, which makes it easy to interface with your Airtable database programmatically.
This is what makes it 10x superior to a standard spreadsheet, when it comes to data handling AND making it easy to authenticate.
The API has a limit of 5 requests per second, which is not high, but still reasonable to work with for most scenarios.
A great documentation for the API
Here is the Airtable API documentation: https://airtable.com/api.
As developers we spend a lot of time reading through docs and trying to figure out how things work.
An API is tricky because you need to interact with a service, and you want to both learn what the service exposes, and how you can use the API to do what you need.
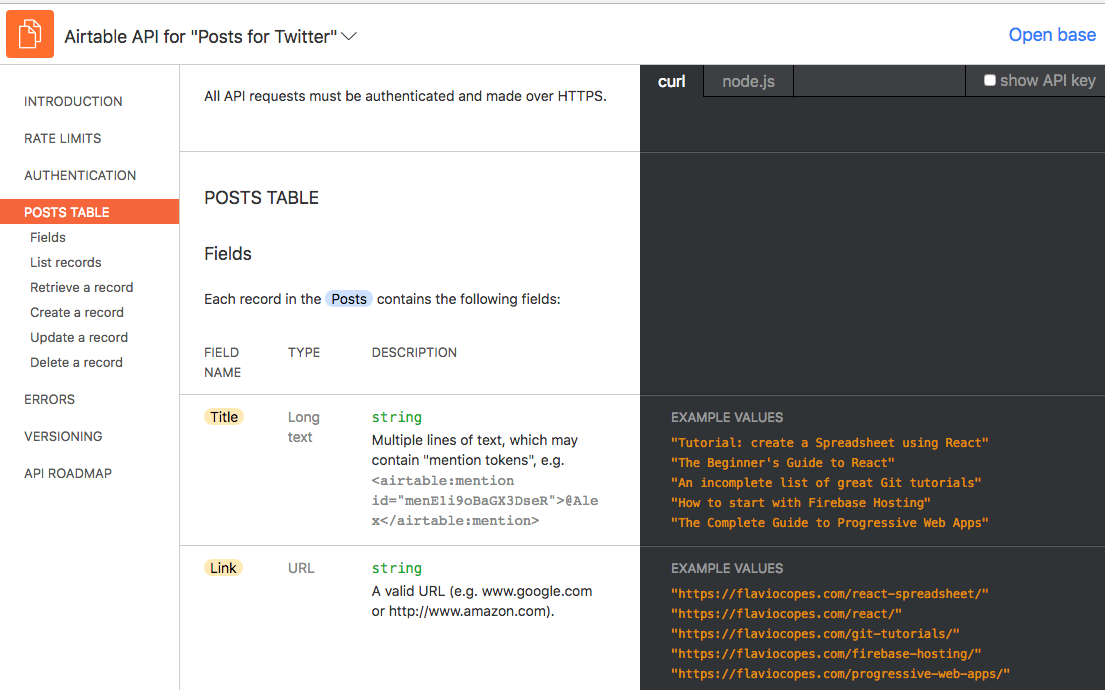
Airtable raises the bar for any API documentation out there. It puts your API keys, base IDs and table names directly in the examples, so you just need to copy and paste them into your codebase and you’re ready to go.
Not just that, the examples in the API docs use the actual data in your table. In this image, notice how the fields example values are actual values I put in my table:
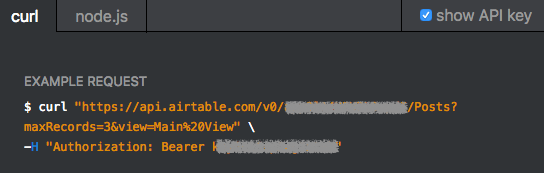
The API documentation offers examples using curl:
and their Node.js official client:
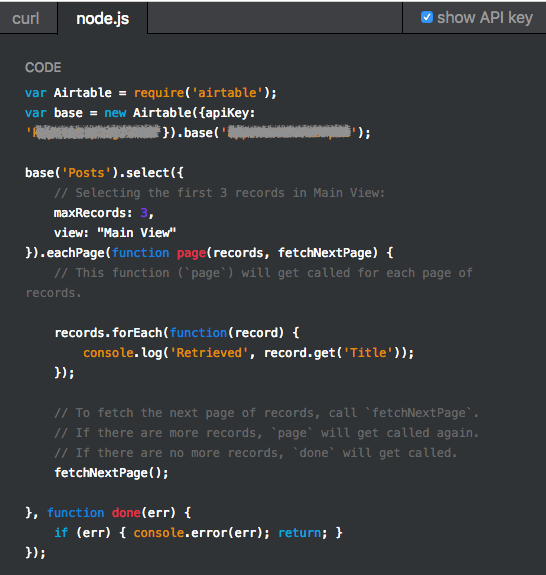
The official Node.js client
Airtable maintains the official Airtable.js Node.js client library, a very easy to use way to access the Airtable data.
It’s convenient because it offers a built-in logic to handle rate limits and retrying the requests when you exceed them.
Let’s see a few common operations you can perform with the API, but first let’s define a couple values we’ll reference in the code:
API_KEY: the Airtable API keyBASE_NAME: the name of the base you’ll work withTABLE_NAME: the name of the table in that base.VIEW_NAME: the name of the table view.
A base is short for database, and it can contain many tables.
A table has one or more views that organize the same data in a different way. There’s always at least one view (see more on views)
Authenticate
You can set up the AIRTABLE_API_KEY environment variable, and Airbase.js will automatically use that, or explicitly add it into your code:
const Airtable = require('airtable')

Airtable.configure({
    apiKey: API_KEY
})
Initialize a base
const base = require('airtable').base(BASE_NAME)or, if you already initialized the Airtable variable, use
const base = Airtable.base(BASE_NAME)Reference a table
With a base object, you can now reference a table using
const table = base(TABLE_NAME)Retrieve the table records
Any row inside a table is called a record.
Airtable returns a maximum of 100 records in each page of results. If you know you will never go over 100 items in a table, just use the firstPage method:
table.select({
    view: VIEW_NAME
}).firstPage((err, records) => {
    if (err) {
      console.error(err)
      return
    }

    //all records are in the `records` array, do something with it
})
If you have (or expect) more than 100 records, you need to paginate through them, using the eachPage method:
let records = []

// called for every page of records
const processPage = (partialRecords, fetchNextPage) => {
  records = [...records, ...partialRecords]
  fetchNextPage()
}

// called when all the records have been retrieved
const processRecords = (err) => {
  if (err) {
    console.error(err)
    return
  }

  //process the `records` array and do something with it
}

table.select({
    view: VIEW_NAME
}).eachPage(processPage, processRecords)
Inspecting the record content
Any record has a number of properties which you can inspect.
First, you can get its ID:
record.id

//or

record.getId()
and the time of creation:
record.createdTimeand you can get any of its properties, which you access through the column name:
record.get('Title')
record.get('Description')
record.get('Date')
Get a specific record
You can get a specific record by ID:
const record_id = //...

table.find(record_id, (err, record) => {
    if (err) {
      console.error(err)
      return
    }

    console.log(record)
})
Or by a specific column value:
const getData = url => {
  table.select({
    filterByFormula: `{url} = "${url}"`
  }).eachPage(function page(records) {
    records.forEach(function(record) {
      console.dir(record.get('json'))
    })
  })
}
It’s also handy to use .all() and async/await if you want to return the data from the function:
const getData = async url => {
  const records = await table.select({
    filterByFormula: `{url} = "${url}"`
  }).all()

  return records[0].get('json')
}
Note that all() fetches all pages of results synchronously, and I’d use it only when you have a few pages of results (or 1 result, like in this case)
Create a new record
You can add a new record
table.create({
  "Title": "Tutorial: create a Spreadsheet using React",
  "Link": "/react-spreadsheet/",
}, (err, record) => {
    if (err) {
      console.error(err)
      return
    }

    console.log(record.getId())
})
Update a record
You can update a single field of a record, and leave the other fields untouched, using update:
const record_id = //...

table.update(record_id, {
  "Title": "The modified title"
}, (err, record) => {
    if (err) {
      console.error(err)
      return
    }

    console.log(record.get('Title'))
})
Or, you can update some fields in a record and clear out the ones you did not touch, with replace:
const record_id = //...

table.replace(record_id, {
  "Title": "The modified title",
  "Description": "Another description"
}, (err, record) => {
    if (err) {
      console.error(err)
      return
    }

    console.log(record)
})
Delete a record
A record can be deleted using
const record_id = //...

table.destroy(record_id, (err, deletedRecord) => {
    if (err) {
      console.error(err)
      return
    }

    console.log('Deleted record', deletedRecord.id)
})Related posts about services: